background image

;YV\ISLZOVV[PUN.\PKL

k" <*"=‘N  
       ! "
#$%%&%'()*(+'

Q

796)3,4!;OL]VS[X\HKKVLZUV[Y\U

76::0)3,*(<:,!;OLIH[[LY`TH`ILSV^VUWV^LY

K       $)(O "  
    _O!   %)J <
and instructions. 

76::0)3,*(<:,!;OLYTHSM\ZLOHZ[YPWWLK

Reset fuse (see page 14).

76::0)3,*(<:,!)H[[LY`JVUULJ[VYVY^PYLZHYLSVVZL

:      E  
E <   ! " #$%%&%'()*(+'

76::0)3,*(<:,!)H[[LY`PZKLHK

k"       ‘  ‘‡
      N   @    ('

76::0)3,*(<:,!,SLJ[YPJZ`Z[LTPZKHTHNLK

Z "     " " ?  
 < ! " #$%%&%'()*(+'

76::0)3,*(<:,!4V[VYPZKHTHNLK

 *"=    ! " #$%%&%'()*(+'

76::0)3,*(<:,!>OLLSU\[ZHYLSVVZL

   <  <    < <

Q

796)3,4!;OL]VS[X\HKKVLZUV[Y\U]LY`SVUN

76::0)3,*(<:,!)H[[LY`TH`IL\UKLYJOHYNLK

:      E  

76::0)3,*(<:,!*OHYNLYPZUV[WS\NNLKPU

‡    K    
charge the battery for 8-10 hours. Do not leave the battery on the charger for more than 20 
!   %)J <

76::0)3,*(<:,!)H[[LY`PZVSK

 *" < "      
 "        N  
 < <*" !   (%  

15

Summary of Contents for Hello Kitty KT1037WM

Page 1: ...is product to the store If any parts are missing or damaged please contact one of our customer service representatives by phone at 8 or by e mail at cXVWRPHUVHUYLFH NLGWUD WR V FRP 3DFLILF FOH QF DPPH...

Page 2: ...ls 5 Connecting the Vehicle Battery 5 Attaching the Seat 6 Use 7 Charging the Battery 7 9 Using the Controls 10 Rules of Safe Riding 11 Maintenance 12 General 12 Battery 12 13 Re charge Interval and T...

Page 3: ...PT T JVTIPULK LPNO PZ RNZ SIZ 3 7 9 0 065 9 8 09 E J K LM N O 3 653 Recharge battery according to directions see pages 7 9 and maintain battery see pages 12 14 69 6 6 9 03 73 9 33 9505 5 4 3 05 9 065...

Page 4: ...x1 Wheels x2 Inner Bushings x2 Washers x6 2SFV for replacement Handlebar x1 Outer Bushings x2 Charger x1 Nut wrench x1 Seat x1 Wheel covers x2 6 OLY VVSZ ULLKLK MVY HZZLTIS Phillips screwdriver Adjus...

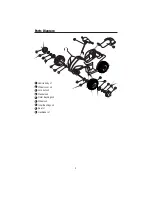
Page 5: ...3 7HY Z PHNYHT 1 2 Z _ 3 _ 4 Z 5 _ 6 Z _ 7 _ 8 9 k...

Page 6: ...column and the handlebar connector on the handle opening in the vehicle 2 Fit the end of the steering column through the hole in the 3 E it snaps into place on the vehicle body PUSH DOWN k q z N z K...

Page 7: ...the wheel Then place another washer onto the axle 4 Align the 3 tabs on the wheel cover with the slots in the outer bushing and snap into place 5 Repeat for the other side 1 Plug the wire connector i...

Page 8: ...s 4 Plug the charger connector into the battery as shown 5 Re attach the seat SCREW WASHER WASHER NUT 2 Use a Philips screwdriver and an Adjustable wrench to secure the seat to the vehicle body 1 Use...

Page 9: ...should only be done by an adult CAUTION You must charge the 6 volt battery for a FULL 8 10 hours prior to use NEVER charge the battery longer than 20 hours K O z the battery longer than 20 hours Neve...

Page 10: ...79 5 09 5 3 90 6 2 zq qN E E zq qN E occur q z zq qN E z z HZO OHUKZ HM LY OHUKSPUN q shock zq qN battery 6 volt battery is heavy and contains lead acid electrolyte cause serious injury supply cord an...

Page 11: ...LK TVU OZ HUK W 4 04 4 0 0 2 3 K N N N O page 14 OHYNL VS H LY 7YPVY V PYZ ZL VU PU LK 653 5 3 5 9 5 9 9 9 See page 12 13 for battery maintenance ZPUN OL VS X HK 79 5 051 90 5 5 9 3 03 5 5 09 3 7 9 0...

Page 12: ...10 ZPUN OL VU YVSZ 1 Power Switch N button to stop POWER SWITCH...

Page 13: ...3 96 5 E 5L LY KYP L ULHY H LY V UV KYP L KV U H Z LLW ZSVWL or slip V UV KYP L W H Z LLW ZSVWL V UV KYP L ULHY KYVW VMMZ Z JO HZ Z LWZ VY KLJRZ could tip over 2LLW OHUKZ OHPY HUK JSV OLZ H H MYVT TV...

Page 14: ...12 4HPU LUHUJL LULYHS 4HPU LUHUJL H LY Note locknuts q z Z serious injury or death E E z q E K E K or handles E K battery and keep the battery dry 9505...

Page 15: ...an 20 hours See pages 7 9 for charging instructions k could occur temperatures are over 24 C 75 F or under 24 C 10 F Do not place the battery It is best to leave the battery in the battery compartment...

Page 16: ...er 6 Replace the battery with a 6 volt quad battery and reconnect the connectors 7 Replace the battery bracket 8 Replace the seat Do not overload the vehicle Do not tow anything behind the vehicle Do...

Page 17: ...0 3 H LY JVUULJ VY VY PYLZ HYL SVVZL E E 76 0 3 H LY PZ KLHK k N 76 0 3 SLJ YPJ Z Z LT PZ KHTHNLK Z 76 0 3 4V VY PZ KHTHNLK 76 0 3 OLLS U Z HYL SVVZL Q 796 3 4 OL VS X HK KVLZ UV Y U LY SVUN 76 0 3 H...

Page 18: ...S X HK PZ V LYSVHKLK O 76 0 3 YP PUN PU OHYZO JVUKP PVUZ E Q 796 3 4 VS X HK ULLKZ H W ZO V NV MVY HYK 76 0 3 7VVY JVU HJ VM PYLZ VY JVUULJ VYZ E around the motor and reconnect if necessary 76 0 3 LHK...

Page 19: ...JVUULJ VY PZ SVVZL E 76 0 3 OHYNLY PZ UV WS NNLK PU 76 0 3 OHYNLY PZ UV VYRPUN Q 796 3 4 H LY I aaLZ VY N YNSLZ OLU JOHYNPUN also normal Q 796 3 4 OHYNLY MLLSZ HYT OLU YLJOHYNPUN IH LY This is normal...

Page 20: ...18 6UL LHY 3PTP LK HYYHU P_ 4VU O 3PTP LK HYYHU VU H LY K OO _ OO _ N L _ O HYYHU 3PTP H PVUZ X z X 3PTP H PVU VM HTHNLZ 3PTP H PVU VM HYYHU PLZ HUK V OLY HYYHU LYTZ K z X...

Reviews: