Installation Procedure
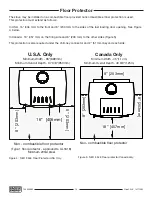
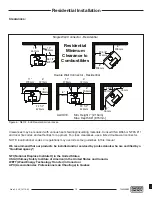
1. Select the position for your wood stove based on the clearances diagram. Position the floor protection
and stove.
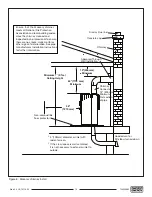
2. Mark the position for the hole in the ceiling and roof by using a string and plumb-bob hanging over the
exact center of the stoves flue pipe.
3. Check that the intended location will not interfere with floor joists, ceiling joists or rafters before
proceeding further. Adjust if necessary and reconfirm the clearance's from the stove to combustibles.
4. Carefully follow the directions of the listed chimney for installation of the chimney system from the ceiling
through to the rain cap. This may include framing in holes etc.
5. Start installing smoke pipe / chimney connector, slip the crimped edge of the pipe inside the stove collar.
Use holes provided in collar to secure pipe with two screws.
6. Install the remaining lengths of pipe one on top of the other up to the finished height of the chimney and
using the manufacturers approved adapter, secure to each other. A slip section can make this easier.
Combustion Air
Intake or combustion air can be supplied to the stove in one of two ways. Consult your local building code or
CAN/CSA-B365, Installation Code for Solid-Fuel-Burning Appliances and Equipment before proceeding.
Outside air supply -
(Necessary for mobile home installation, optional for residential installation.)
To draw
outside air through the floor
- This hole must get its air from a ventilated crawl space or be
extended with duct to the outdoors. See "Figure 7: Residential venting." on page 18. The use of outside
combustion air for residential installation requires the unit to be secured to the structure to prevent dislodging
of the air duct.
• Cut or drill a hole in the floor, (large enough to fit 4" metal flex venting) behind where the unit will sit. Once
the stove is in place, attach the 4" Intake Starter to the Ash Box Enclosure. Connect thru the floor with the
4"(100mm) i.d. metal flex pipe.
To draw
outside air from behind the stove
, Use a 4"(100mm) Air intake. Cut or drill the recommended size
hole through a wall behind the unit.
• Install the 4" Intake Starter over the hole in the rear of the Ash Box enclosure. Attach metal flex between
the starter and the Air Intake.
Room air supply
- The stove will draw its air from the room through the opening in the Ash Box Enclosure
and into the firebox intake.
Note:
The living space around the heater must be well ventilated with good air circulation. Anything that
may cause a negative pressure can cause gases or fumes to be pulled into the living area. During extremely
cold weather, and especially when burning at very slow rates, the upper parts of the exposed chimney may
ice up, partially blocking the flue gases. If blockage occurs, flue gases may enter the living space.
Neo 2.5 LE_14119-32
17
100003380

