


280514-24
SUPER-SD1 13
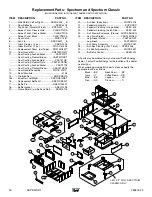
Baffle Removal
Chimney connector pipe should be disconnected from stove
to clean and inspect. Only if this is not possible should you
remove baffle assembly.
DO NOT OPERATE WITH BAFFLE ASSEMBLY OR
INSULATION REMOVED.
Removal
Remove retaining pin at the back top of the fi rebox, just under
the baffle. Lift baffle up and pull forward to disconnect from
the supply tube. Tilt baffle sideways to drop down and remove
from fi rebox. Inspect gasket between baffle and supply tube.
If necessary, replace with gasket #139.5 available from your
Pacifi c Energy dealer. Re-install baffle assembly in reverse
order. The two side pieces of insulation must be tight against
the siderails.
Optional Blower
The optional blower kit (kit #WODC.BLOW) is equipped with
a three prong power cord and may be installed at any time.
Follow installation instructions supplied with the kit. Route
power supply cord away from heater.
Electrical rating: 115 volts A.C.-1.02 amps.
Fan output rating: 125 CFM
Blower Operation
Proper blower speed matched with air control setting will en-
sure peak performance from your stove. Operate as follows:
- Air control set to "L" (low), operate blower speed control
on "Low".
- Air control set between "L" and "H" (low and high), oper-
ate blower speed control at desired setting.
Automatic:
To operate the blower automatically, set the
rocker switch on the side of the fan housing to "Auto" and set
the speed control to desired setting. This will allow the fan to
turn on as the stove heats up to operating temperature. It will
also shut the blower off after the fi re has gone out and the
unit cooled to below a useful heat output range.
Manual:
To manually operate the blower, set the rocker switch
to "Man" and set the speed control to desired setting. This will
bypass the sensing device and allow full control of the blower.
Switching from "Auto" to "Man" or selecting speed may be
done anytime.
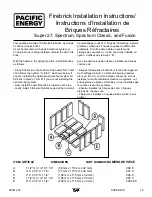
Optional Outside Air Adaptor
The adaptor is only required if the blower kit is to be installed
and outside combustion air to be ducted to rear of pedestal.
Installation:
Remove blower kit if already installed. Place adaptor with the
4"(100mm) round hole facing up and opposite end covering
the room air knockout hole on the back of the pedestal. Mark
attachment holes on pedestal base and drill with 1/8" bit.
Attach with #8 x 1/2" screws and reinstall fan. Combustion
air duct from outside can now be attached to the 4"(100mm)
round collar.
Summary of Contents for SPECTRUM
Page 20: ...20 SUPER SD1 280514 24...
Page 21: ...280514 24 SUPER SD1 21...
Page 22: ...22 SUPER SD1 280514 24...


