background image

280514-24 

SUPER-SD1 5

Creosote

Formation and Need for Removal

When wood is burned slowly, it produces tar and other or-
ganic vapours, which combine with expelled moisture to form 
creosote.  The creosote vapours condense in the relatively 
cool chimney fl ue of a slow burning fi re.  As a result, creosote 
residue accumulates on the fl ue lining.  When ignited, this 
creosote makes an extremely hot fi re.  The chimney connector 
and chimney should be inspected periodically (at least once 
every two months) during the heating season to determine if 
a creosote buildup has occurred. If creosote has accumulated 
(3 mm. or more), it should be removed to reduce the risk of 
a chimney fi re.

1.   Highest smoke densities occur when a large amount of 

wood is added to a bed of hot coals and the air inlet is 
closed.  The heated wood generates smoke, but without 
ample air, the smoke cannot burn.  Smoke-free, clean 
burning requires small fuel loads, two or three logs at 
a time or 1/4 to 1/2 of fuel load and leaving the air inlet 
relatively wide open, especially during the fi rst 10 to 30 
minutes after each loading, when most of the smoke 
generating reactions are occurring.  After 30 minutes or 
so, the air inlet can be turned down substantially without 
excessive smoke generation.  Wood coals create very 
little creosote-producing smoke.

2.    The cooler the surface over which the wood smoke is pass-

ing, the more creosote will be condensed.  Wet or green 
wood contributes signifi cantly to creosote formation as the 
excess moisture that is boiled off cools the fi re, making 
it difficult for the tars and gases to ignite, thus creating 
dense smoke and poor combustion.  This moisture-laden 
smoke cools the chimney, compounding the problem by 
offering the smoke the ideal place to condense.


In summary, a certain amount of creosote is inevitable 
and must be lived with. Regular inspection and cleaning is 
the solution.  The use of dry, seasoned wood and ample 
combustion air will help to minimize the buildup.

Chimney Fires

The result of excessive creosote buildup is a chimney fi re.  
Chimney fi res are dangerous. Chimney inside temperatures 
can exceed 2000°F(1100˚C).  This causes much higher than 
normal temperatures in the chimney and on its exterior sur-
faces.  Thus ignition of nearby or touching combustible material 
is more likely during a chimney fi re.  Proper clearances are 
critical during such a fi re.
Chimney fi res are easy to detect; they usually involve one or 
more of the following:
 

-Flames and sparks shooting out of the top of the chimney


-A roaring sound


-Vibration of the chimney

In Case of a Chimney Fire

1.  Prepare to evacuate to ensure everyone's safety.  Have 

a well understood plan of action for evacuation. Have a 
place outside where everyone is to meet.

2.  Close air inlet on stove.

3.  Call local fi re department.  Have a fi re extinguisher handy.  

Contact your local municipal or provincial fi re authority for 
further information on how to handle a chimney fi re.  It is 
most important that you have a clearly understood plan 
on how to handle a chimney fi re.

4.  After the chimney fi re is out, the chimney must be cleaned 

and checked for stress and cracks before starting another 
fi re.  Also check combustibles around the chimney and 
the roof.

- The services of a competent or certifi ed installer, (certifi ed 
by the Wood Energy Technical Training program (WETT) - in 
Canada, Hearth Education Foundation (HEARTH) - in U.S.A.,) 
are strongly recommended.

Avoiding a Chimney Fire

There are two ways to avoid chimney fi res:
1.  Do not let creosote build up to a point where a big chimney 

fi re is possible.

2.  Do not have fi res in the heater that may ignite chimney 

fi res.  These are hot fi res, such as when burning household 
trash, cardboard, Christmas tree limbs, or even ordinary 
fuel wood; (e.g.. with a full load on a hot bed of coals and 
with the air inlet excessively open.)

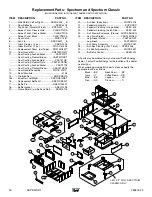
Summary of Contents for SPECTRUM

Page 1: ...tioninstructions Contact local building or fire officials about restrictions and installation inspection requirements in your area TESTED and LISTED to CAN ULC S627 AND UL 1482 Meets the Environmental...

Page 2: ...ce 3 Maintenance Checks 4 Creosote 5 Formation and Need for Removal 5 Chimney Fires 5 In Case of a Chimney Fire 5 Avoiding a Chimney Fire 5 Assembly 6 Crate Removal 6 Optional Ash Cleanout System Inst...

Page 3: ...tained in good condition Periodically inspect seals and replace if neces sary Follow instructions included in the DR31 WDGKIT kit obtainable from your nearest Pacific Energy dealer 5 DOOR GLASS Do not...

Page 4: ...himney System Top baffle board blanket Baffle Top heat shield and mounting bolt Baffle Gasket Brick Rails Manifold Blower The blower should be cleaned out a minimum every six months by using a vacumn...

Page 5: ...nd must be lived with Regular inspection and cleaning is the solution The use of dry seasoned wood and ample combustion air will help to minimize the buildup Chimney Fires The result of excessive creo...

Page 6: ...at secure stove body to bottom pallet 4 Place stove body carefully on its back 5 Using two 3 4 wrench remove 1 x 1 2 bolts and save for later use 6 Remove pallet retaining brackets from stove bottom O...

Page 7: ...leaks 6 Install connector as per manufacturer s instructions 7 Attach stove to flooring using two 1 4 x 2 or longer lag screws Mobile Home Installation Warning Undernocircumstancesisthisheatertobeins...

Page 8: ...ney Support 56 1422 mm Minimum Minimum 7 2 1m Ceiling Height Attachment to floor for mobile homes Non combustible floor protector 48 1219 mm 3 914 mm Minimum Hooded vent or 90 elbow turned down The ch...

Page 9: ...ffect stove performance Chimney flue exit is to be 3 feet 1 m above roof and two feet 0 6 m above highest projection within 10 feet 3 m The installation must meet all local codes Do not connect this u...

Page 10: ...equires the unit to be secured to the structure to prevent dislodging of the air duct To draw outside air from behind the stove an outside air adaptor may be required see Optional Blower section Cut o...

Page 11: ...for the first 2 3 times it is very important that the room be well ventilated Open all windows and doors Smoke and fumes caused by the curing process may cause discomfort to some individuals Lighting...

Page 12: ...Overnight Burns 1 Open door and rake hot embers towards the front of the heater Add a couple of dry split logs on top of embers close door 2 Adjust air control to high and in just a few minutes logs...

Page 13: ...perate as follows Air control set to L low operate blower speed control on Low Air control set between L and H low and high oper ate blower speed control at desired setting Automatic To operate the bl...

Page 14: ...latch Excessive Creosote Buildup See 1 2 3 above Low Heat Output 1 Wood is wet Use dry wood 2 Fire too small Build a larger fire 3 Draft too low Chimney plugged or restricted inspect and clean Won t B...

Page 15: ...Door Handle Assembly WODC 4147C 11 Boost Manifold 4105 12 Firebrick Set BRIC SSERA 13a Brick Rail Left Right SSER RAILSET 14 Replacement Baffle Kit SSER DBAKIT 15 Baffle Pin SSER 125001 16 Baffle Gas...

Page 16: ...kel CAST 31NI Door Casting Radiant Nickel CAST 31RSNI 12 Door Handle Assembly WODC 4147C 13 Boost Manifold 4105 14 Firebrick Set BRIC SSERA 15a Brick Rail Left Right SSER RAILSET 16 Replacement Baffle...

Page 17: ...ng the basic functions of this design Traditional wood stoves had a basic combustion system which allowed a considerable amount of heat energy to escape up the chimney as unburned gases and particulat...

Page 18: ...ts back 5 Using a 3 4 wrench remove 1 x 1 2 bolts and save for later use 6 Remove pallet retaining brackets from stove bottom Pedestal Kit 1 With the unit on its back and the removable cover facing up...

Page 19: ...either A B C as shown below if you are installing the optional ash cleanout system or 1 full brick in place of A B if you are not installing the ash cleanout system Next install the side firebricks 4...

Page 20: ...20 SUPER SD1 280514 24...

Page 21: ...280514 24 SUPER SD1 21...

Page 22: ...22 SUPER SD1 280514 24...

Page 23: ...07 INSTALLEZ ET UTILISEZ SELON LES INSTRUCTIONS D INSTALLATION ET D OP RATION FOURNI AVEC L APPAREIL CONTACTEZ LES OFFICIELS DE LA CONSTRUCTION OU DE SERVICE D INCENDIE POUR DES INFORMATIONS QUANT AUX...

Page 24: ...PACIFIC ENERGY FIREPLACE PRODUCTS LTD 2975 Allenby Rd Duncan B C V9L 6V8 Phone 250 748 1184 Web site http www pacificenergy net Printed in Canada...

Reviews: