background image

©PACIFIC ENERGY FIREPLACE 

PRODUCTS LTD.

3

010515-20 ALT4

Safety and Maintenance

1.  Burn only dry, well seasoned wood.  The denser or heavier the wood when dry, the greater 

its heat value. This is why hardwoods are generally preferred.  Green or wet wood will cause 
a rapid buildup of creosote. If you feel it is necessary to burn wet or unseasoned wood, do so 
only with the air inlet set open enough to maintain a good strong fire and fairly high chimney 
temperatures. Do not attempt to burn overnight using green wood or wet wood.  Wet wood 
will reduce heat output, as well as contributing significantly to creosote buildup.

2.  Remove ashes frequently and only when the stove is cold. Too much ash could cause embers to 

roll out the door when it is opened. This may pose a fire hazard. For proper operation, maintain 
a 25mm minimum ash base.

3.  If glass becomes darkened from slow burning or poor wood, it can readily be cleaned with 

fireplace glass cleaner when stove is cold. Never scrape with an object or use abrasive cleaners 
that might scratch the glass.  The type and amount of deposit on the glass is a good indication of 
the flue pipe and chimney buildup.  A light brown dusty deposit that is easily wiped off usually 
indicates good combustion and dry, well-seasoned wood, therefore relatively clean pipes and 
chimney. On the other hand, a black greasy deposit that is difficult to remove is a result of wet 
and green wood and too slow a burning rate. This will also create heavy deposit buildup in the 
chimney.

4.  DOOR GASKETS - The gasket used on this stove (8mm medium density fiberglass rope) 

requires only light pressure to seal.  This will prolong seal life.  It is important that the door seal 
be maintained in good condition. Periodically inspect seals and replace if necessary.  Follow 
instructions included in the door gasket kit obtainable from your nearest Pacific Energy dealer.

5.  DOOR GLASS - Do not slam loading door or otherwise impact glass.  When closing door, make 

sure that no logs protrude to impact the glass. If the glass gets cracked or broken, it must be 
replaced before using the stove. Replacement glass can be obtained from your dealer.  Use 
ceramic glass only. Do not substitute with any other type.


GLASS SIZE – 413mm x 267mm x 5mm


To remove broken glass, undo the four retaining screws and remove clamps, noting posi-

tion for re-assembly.  Remove all particles of glass. Be careful as they are very sharp. 

Install new glass complete with gasket.  Replace clamps and screws.

6.  Do not store wood within heater installation clearances, or within the space required for fuel 

loading and ash removal.  Keep the area around the heater clean and free of loose combustibles, 
furniture, newspapers, etc.

7.  If the heater requires cleaning, use mild soap and water only. 

Use of abrasive cleaners will 

void warranty.

8.  Establish a routine for fuelling and firing the heater. Check daily for creosote buildup until 

experience shows how often you need to clean the chimney to be safe.

9.  Be aware that the hotter the fire, the less creosote is deposited. Weekly cleaning may be necessary 

in mild weather, even though monthly cleaning is usually enough in the coldest months when 
burning rates are higher.

10.  Instruct all members of your family on the safe operation of the heater. Ensure they have enough 

knowledge of the entire system if they are expected to operate it. Study the section on chimney 
fires and the importance of following the steps outlined "In Case of Chimney Fire".

WARNING: 

Never use chemicals or any other volatile 

liquid to start a fire.  Do not burn garbage, or 

flammable fluids such as gasoline, 

naptha, or engine oil. We strongly 

recommend that smoke detectors be installed.

CAUTION: 

• do not overtighten, tighten screws very
   carefully
• do not clean glass when hot
• do not use abrasive cleaners on glass

WARNING: 

Only use materials supplied by 

manufacturer when doing maintenence or 

replacements.

Summary of Contents for T4

Page 1: ...S AUSTRALIA SAFETY NOTICE If this stove is not properly installed a house fire may result For your safety follow the installation instructions Contact local building or fire officials about restrictio...

Page 2: ...ll and use your new room heater Failure to follow instructions may result in property damage bodily injury or even death Contents 2 Safety and Maintenance 3 Maintenance Checks 4 Formation and Need for...

Page 3: ...ble from your nearest Pacific Energy dealer 5 DOOR GLASS Do not slam loading door or otherwise impact glass When closing door make sure that no logs protrude to impact the glass If the glass gets crac...

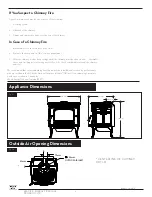
Page 4: ...firebox Back side of airwash chamber Baffle locking pin Boost tube cover When Cleaning the Chimney System Top baffle board blanket Baffle Top heat shield and mounting bolt Baffle Gasket Brick Rails M...

Page 5: ...sote will be condensed Wet or green wood contributes significantly to creosote formation as the excess moisture that is boiled off cools the fire making it difficult for the tars and gases to ignite t...

Page 6: ...od Energy Technical Training WETT Fig 1a 6 010515 20 ALT4 If You Suspect a Chimney Fire Signs of a chimney fire may be one or more of the following 1 A roaring sound 2 Vibration of the chimney 3 Flame...

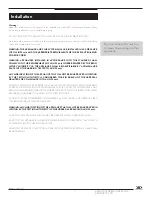
Page 7: ...L BE IDENTIFIABLE BY A COMPLIANCE PLATE WITH THE MARKING TESTED TO AS NZS 4013 ANY MODIFICATION OF THE APPLIANCE THAT HAS NOT BEEN APPROVED IN WRITING BY THE TESTING AUTHORITY IS CONSIDERED TO BE IN B...

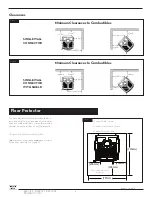
Page 8: ...g 3 Non combustible floor protector 300mm 781mm 723mm 200mm 200mm Minimum Width 781mm Minimum Overall Depth 723mm Minimum Thickness 6mm Thestovemaybeinstalledonacombustiblefloor provided ember protect...

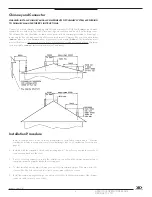
Page 9: ...ue serving another appliance Minimum system height is 4600mm measured from base of appliance Installation Procedure 1 Install all components to the chimney manufacturer s installation requirements Out...

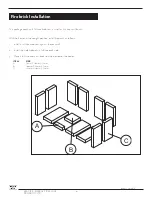
Page 10: ...e heater in the upright position install firebricks as follows 1 Install 4 full size firebricks against the rear wall 2 Install the side firebricks 2 full size each side 3 Place 3 full size and 2 cut...

Page 11: ...revent dislodging of the air duct Not e When installed in a mobile home this unit is not designed to be operated with the firing door open In addition to the obvious hazard of sparks landing on combus...

Page 12: ...a waste of fuel Too slow a burn contributes to creosote buildup and lowers combustion efficiency NOTE Left and Right as referred to in this manual are considered your left and right when facing the f...

Page 13: ...a good coal base exists and wood has charred Normal Operation 1 Set air control to a desired setting If smoke pours down across the glass waterfall effect this indicates you have shut the control dow...

Page 14: ...s deep in your firebox and when fire has burned down and cooled remove excess ashes Leave an ash bed approximately 25 mm deep on the firebox bottom to help maintain a hot charcoal bed Ash Chute Operat...

Page 15: ...irebox Inspectgasketbetweenbaffleandsupplytube Ifnecessary replacewithgasketSSER 1395 available from your Pacific Energy dealer Re install baffle assembly in reverse order The two side pieces of insul...

Page 16: ...eosote Buildup See 1 2 3 above See 1 2 3 above Low Heat Output 1 Wood is wet Use dry wood 2 Fire too small Build a larger fire 3 Draft too low Chimney plugged or restricted inspect and clean Won t Bur...

Page 17: ...DOOR GASKET KIT 4880 4e GLASS C W GASKET 2080 7 4f GLASS CLAMPS 4720 01 5 FIREBRICK SET BRIC VISTA 6 SIDE CASTING ASSY 2 BLACK PAINT ALT4 4925MBK BLACK ENAMEL ALT4 P4925BKA MAJOLICA BROWN ENAMEL ALT4...

Page 18: ...PACIFIC ENERGY FIREPLACE PRODUCTS LTD 18 010515 20 ALT4...

Page 19: ...HCMG 13 047A 30 Sept 2013 FREEESTANDING Tested by HRL TECHNOLOGY PTY LTD TRAMWAY ROAD MORWELL VICTORIA MAXIMUM AVERAGE HEAT OUTPUT BURNING HARDWOOD 7 2 kW OVERALL AVERAGE EFFICIENCY BURNING HARDWOOD...

Page 20: ...PACIFIC ENERGY FIREPLACE PRODUCTS LTD PACIFIC ENERGY FIREPLACE PRODUCTS LTD Web site www pacificenergy net 2975 Allenby Rd Duncan BC V9L 6V8 PRINTED IN CANADA...

Reviews: