background image

201213-20 

                                                                                                                        17

OPERATING TIPS

1. Always use dry, seasoned fi rewood, up to 18" 
long.  Load wood endwise, a mixture of large 
and small pieces, on top of a good ash base 
(1" minimum).

2.  Operate on a medium to high setting, for up 
to 1 hour from cold start.  After the initial warm 
up period, refuel and leave the air control on a 
medium setting for 5 to 10 minutes more and 
then set the air control to the desired position.

3.  If a slow burn is desired, set the air control to 
low.  Active secondary burning should be present 
above the wood load.  If it is not present or goes 
out shortly after, proper operating temperature 
has not been reached and the stove needs ad-
ditional warm up time.

Understanding & Operating Your Pacifi c Energy Stove

The Pacifi c Energy SUPER SERIES line of 
woodstoves is a culmination of years of research 
and development.  Designed to be efficient, 
clean-burning and user-friendly, this heater will 
give you years of warm service.  However, a 
knowledgeable operator is still the most impor-
tant factor for maximum performance and part 
of this is understanding the basic functions of 
this design.

Traditional wood stoves had a basic combustion 
system which allowed a considerable amount of 
heat energy to escape up the chimney as un-
burned gases and particulates (smoke).  Pacifi c 
Energy has designed a system that solves the 
problem by burning the smoke and releasing 
the additional heat to the room.

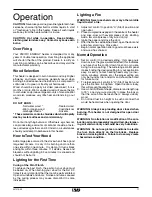
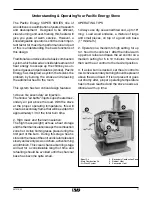
This system has two critical design features:

1. 

Above fi re secondary air injection:

The hollow "air baffle" injects super-heated sec-
ondary air just above the load. With the stove 
at the proper operating temperature, this will 
create a secondary fl ame that will be evident for 
approximately 1/3 of the total burn time.

2. 

High mass and thermal insulation:

The high mass (weight) acts as a heat storage 
and the thermal insulation keeps the combustion 
zone hot.  Active fl aming takes place during the 
fi rst part of the burn.  During this stage, heat is 
stored in the mass of the unit and is later released 
slowly and evenly.  As wood chars, active fl aming 
will diminish.  This clean charcoal burning stage 
will last for a considerable length of time and 
refuelling should be avoided until the charcoal 
base has become quite small.
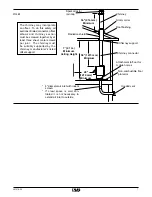
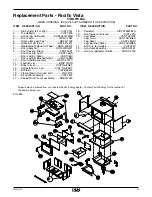
1

2

3

5

6

4

1 -Boost Air 

4 -Secondary Combustion Zone

2 -Main Combustion Air 

5 -Radiant Heat

3 -Air Wash System 

6 -Convected Heat

Summary of Contents for VISTA

Page 1: ...e fire may result For your safety followtheinstallationinstructions Contact local building or fire officials about restrictions and installation inspection requirements in your area IMPORTANT THESE IN...

Page 2: ...ion and Need for Removal 5 Chimney Fires 5 In Case of a Chimney Fire 5 Avoiding a Chimney Fire 5 Assembly 6 Crate Removal 6 Pedestal Kit 6 Leg Kit 6 Optional Ash Cleanout System 6 Mobile Home Installa...

Page 3: ...liquid to start a fire Do not burn garbage or flammable fluids such as gasoline naphtha or engine oil We strongly recommend that smoke detectors be installed 2 Remove ashes frequently Embers can roll...

Page 4: ...imney System Top baffle board blanket Baffle Top heat shield and mounting bolt Baffle Gasket Brick Rails Manifold Blower The blower should be cleaned out a minimum every six months by using a vacumn o...

Page 5: ...lived with Regular inspection and clean ing is the solution The use of dry seasoned wood and ample combustion air will help to minimize the buildup Chimney Fires The result of excessive creosote build...

Page 6: ...he unit on its back and removable cover of the ash drawer enclosure facing up align mounting holes with studs on stove bottom 2 Position the legs on the stove 3 Place the 1 2 washers over the studs an...

Page 7: ...ashing Storm collar Hooded vent Attachment to floor for mobile homes Spark arrestor rain cap FIG 2 7 2 1 m Minimum Ceiling Height 58 1473 mm Minimum 48 1219 mm Minimum The chimney may incorporate an o...

Page 8: ...e flashing and storm collar and be sure to maintain the vapour barrier at this point Seal securely Attach rain cap and check flashing for leaks 6 Install connector as per manufacturer s instructions 7...

Page 9: ...ll connector for use with solid fuel Install all components to the chimney connector manu facturer s installation requirements Single wall Connector Smoke Pipe Smoke pipe must be secured at every join...

Page 10: ...osure to the floor with a short 4 diameter pipe If you wish to connect the outside air to the rear hole on the ash box then remove the 4 knockout or cover plate at the rear of the ash box Thisholemust...

Page 11: ...best finish the paint on your stove must be baked on When burning your stove for the first 2 3 times it is very important that the room be well ventilated Open all windows and doors Smoke and fumes c...

Page 12: ...out 1 2 and turn clockwise This will unlock the ash dump and allow it to open Hold handle openwhilepullingashesintothehole Avoidlargecharcoal pieces as these still contain heat value Release handle a...

Page 13: ...o and set the speed control to desired setting This will al low the fan to turn on as the stove heats up to operating temperature It will also shut the blower off after the fire has gone out and the u...

Page 14: ...air for combustion 4 Door gasket leakage Replace gasket Check latch EXCESSIVE CREOSOTE BUILDUP See 1 2 3 above LOW HEAT OUTPUT 1 Wood is wet Use dry wood 2 Fire too small Build a larger fire 3 Draft...

Page 15: ...Door casting Brushed NIkel CAST 16BNI 10 Door handle assembly WODC 4147C 11 Firebrick set BRIC VISTA 12 Brick rail set VIST RAILSET 13 Rail extensions 2 pc VIST RAILEXT 14 Baffle kit VIST BAFKIT 15 F...

Page 16: ...4147C 11 Firebrick set BRIC VISTA 12 Brick rail set VIST RAILSET 13 Rail extensions 2 pc VIST RAILEXT 14 Baffle kit VIST BAFKIT 15 Flame shield c w nut bolt VIST 2115 16 Air shutter assembly VIST 453...

Page 17: ...g the basic functions of this design Traditionalwoodstoveshadabasiccombustion systemwhichallowedaconsiderableamountof heat energy to escape up the chimney as un burned gases and particulates smoke Pac...

Page 18: ...the upright position install firebricks as follows First install 4 full size firebricks against the rear wall Next install the side firebricks 2 full size each side Lastly place 4 full size on the bo...

Page 19: ...7 INSTALLEZ ET UTILISEZ SELON LES INSTRUCTIONS D INSTALLATION ET D OP RATION FOURNI AVEC L APPAREIL CONTACTEZ LES OFFICIELS DE LA CONSTRUCTION OU DE SERVICE D INCENDIE POUR DES INFORMATIONS QUANT AUX...

Page 20: ...20 201213 20 Printed in Canada PACIFIC ENERGY FIREPLACE PRODUCTS LTD 2975 Allenby Rd Duncan BC V9L 6V8 Phone 250 748 1184 Web site www pacificenergy net...

Reviews: