background image

®

I N C .

P A C I F I C

M I C R O S O N I C S

36

Setup & Operation

Model Two HDCD

®

 User’s Manual

Rev. C - January 2002

DSP Gain

From the Operating Menu select (LEVELS/DSPGAIN)

DSP Gain is a digital gain control that adjusts the level of digital input sources over a +6
to -25.9 dB range (+12 to -19.9 dB with Peak Extension) and has extremely low distortion.
DSP Gain allows 24-bit or 20-bit input sources to be “fit” optimally into the more limited
dynamic range of a 16-bit release format by setting peak levels as close as possible to 0
dBfs.  Note: If Peak Extension is used, DSP Gain can set peak levels as high as + 6 dBfs.
If DSP Gain is set below unity, for example at - 0.1 dB, then independent of the input level,
the output level can be no greater than the DSP Gain setting relative to full scale record
level. In this example, input levels which would drive the output higher than - 0.1 dB
relative to peak record level are clipped at - 0.1 dB, and no “overs” can occur.

Low Level Extension

From the Operating Menu select (OPS 2/LOWLVL/NORMAL).

Low Level Extension is an average signal level based low level compression / expansion
system used on HDCD 16-bit amplitude encoded recordings which very gradually raises
gain a preset amount when the average signal level drops below a preset threshold. During
HDCD 16-bit decoded playback the compression curve is expanded back to linear gain by
the HDCD decoder using a precisely mapped inverse of the compression curve controlled by
a hidden code, producing a dynamic range and resolution floor beyond 16-bit. During
undecoded playback low level information normally lost by standard 16-bit players is pre-
served, providing more accurate timbral and spatial reproduction.

There are two modes of Low Level Extension, “Normal” and “Special”.  Normal mode begins
to affect the input signal 45 dB below peak level, gradually raising the gain 4 dB as the
level drops over an 18 dB range.  Special mode begins to affect the input signal 39 dB
below peak level, and gradually raises the gain 7.5 dB over a 26 dB range.  Normal mode is
optimized to provide the best combination of decoded dynamic range and resolution and
undecoded compatibility.  Special mode is designed to provide the best possible decoded
dynamic range and resolution at some potential expense of undecoded compatibility. To
access Special mode, from the Operating Menu select (SETUP/OUTPUT/HDCD_16/LOWLVL/
SPECIAL). Typically, Special mode is used only for HDCD 16-bit master tracking with the
assumption that the recording will be decoded by the Model Two to a 24-bit or 20-bit word
length for digital post production before being re-encoded to HDCD 16-bit using Normal
mode to produce a release master.

Use of Low Level Extension is optional in the HDCD 16-bit encoding process. Low Level
Extension can be turned on and off “on the fly” whenever the signal level is above - 30 dBfs.

Summary of Contents for Two HDCD

Page 1: ...Model Two HDCD A D Converter D A Converter Digital Processor User s Manual Version 3 01 PN 9300 0020 Rev C Euphonix Inc 220 Portage Avenue Palo Alto CA 94306 Phone 650 855 0400 Fax 650 855 0410 ...

Page 2: ...ccessible through the Model Two s Graphic Display For details see page 65 in the Reference Section If the Versions do not match please contact Euphonix to obtain the correct User s Manual or update the Software Version Euphonix is committed to the ongoing support of our products and customers If we can be of assistance in any way please call us at 650 855 0400 Monday through Friday between 9 00 AM...

Page 3: ... Analog Tape Recordings 34 Creating the 16 Bit HDCD Release Sound You Want 35 HDCD16 bit Amplitude Encoding Dither Options 35 Peak Extension HDCD Limiting 35 DSP Gain 36 Low Level Extension 36 3 Table of Contents Model Two HDCD User s Manual Rev C January 2002 HDCD 16 bit Dithers 37 Operating Techniques 37 Limited Dynamic Range Pop or Rock 37 Wide Dynamic Range Jazz or classical 38 Reference Menu ...

Page 4: ...ot have a power switch and is active only when connected to the Processor unit via the DC power cable and the Processor power is turned on A description and illustration of the Power Supply is on page 11 DC Power Cable CAUTION Do not connect or disconnect the DC power cable from the Processor or Power Supply while the Power Supply AC power cable is plugged in Always unplug the AC power cable befor...

Page 5: ...DCD Indicator will go dark or remain lit depending on system set up Power up is complete when an Operating Menu appears on the Graphic Display similar to the one shown below At power up all settings will remain as they were prior to power off From the Operating Menu all Processor functions are accessible Function buttons see page 17 are used to navigate through menus and select items within the me...

Page 6: ...the panel in place The pins and jumpers are located as follows The twelve pairs of pins on the left set Channel 1 and the twelve pairs of pins on the right set Channel 2 Placing the jumpers on the outermost pair of pins on each side provides maximum input sensitivity a 12 dBu input signal will generate full scale record level Each position inward of the jumpers produces 1 dB of attenuation Placing...

Page 7: ...rents flowing between different pieces of equipment Analog Output Networks HDCD Processor Analog Output Networks AON s are designed to improve the high fre quency impedance match between the Model Two s D A analog output impedance which is about 10 Ω per leg and the characteristic impedance of typical analog audio cables which is about 60 Ω The improved impedance match better terminates reflected ...

Page 8: ... signals AES Signal Ground Isolators Pacific Microsonics AES Signal Ground Isolators are designed to break ground loops which can occur between the grounds of digital and analog signal cables when they are con nected together by a single device that has both digital and analog signal connections such as the Model Two HDCD Processor If not properly isolated noise currents on grounds have the potent...

Page 9: ...r 176 4 kHz The DIO receives and transmits AES3 data word clock and RS 232 serial data The DSP performs all HDCD encoding decoding frequency and word length conversion digital signal gain changes etc employing eight Motorola 56009 Digital Signal Proces sors and one Pacific Microsonics PMD 100 HDCD Process Decoder ASIC The DAC converts 2 channels of 24 bit to 16 bit digital data to analog signals T...

Page 10: ...digital signal XLR balanced female input active only in certain modes 5 RS 232 Serial data port for external computer loading D Sub 9 Pin male of system software 6 AES Out 1 Two or one channel AES3 format digital signal XLR balanced male output 7 AES Out 2 Two or one channel AES3 format digital signal XLR balanced male output 8 AES In Ref AES3 format digital signal input used for external XLR bala...

Page 11: ...y con nects to a 100V to 240V 50 60 Hz AC power source using a standard IEC grounded AC power cord The rear panel connections on the Power Supply are as shown below AC Line Voltage Select 1 DC Output Connector Connects from the Power Supply to the DC Input on the 28 pin female Processor using the supplied DC power cable 2 AC Line Voltage Select Line voltage selection 100V 120V 220V 240V AC 50 60 H...

Page 12: ... Audio playback equipment 4 44 1 48 kHz to 88 2 96 kHz and 176 4 192 kHz high resolution HDCD interpolation filtering to provide very high accuracy for both D A conversion and high sample rate processing of 44 1 48 kHz signals 5 HDCD Limiting which is identical in function to Peak Extension except that the limiting curve is not undone during HDCD decoded playback 6 DAC System Optimize which allows...

Page 13: ...aphic Display Processor control and display functions are described below Note Menu selections starting from the Operating Menu to access a menu or feature are shown in parentheses Signal Level Meters The Signal Level Meters consist of two four color LED bar graphs which indicate program level for each channel The LED ranges by color are shown below Green to 11 dB Yellow 10 to 1 dB Amber 0 dB Red ...

Page 14: ...eak level A standard peak reading bar mode is also available by selecting PEAKBAR in the Meter Display Menu SETUP MORE METER Off No Signal Present Green to 11 dB Signal Yellow 10 dB to 1 dB Signal Amber 0 dB Signal Red Over Signal FINE Displays average signal level at 2 dB per segment resolution with the selected meter operating reference level indicated by the green to yellow LED transition point...

Page 15: ...ring HDCD 16 bit signals using Peak Extension or HDCD Limiting during recording and signals with Peak Extension during playback The six LED s illuminate from right to left with each LED indicating 1dB of limiting The full range of the Peak Extension HDCD Limiting Meters will illuminate after the amber 0 dB LED s and before the red Over LED s on the Signal Level Meters For more information on Peak ...

Page 16: ...eter 11 9 to 24 dBu at 88 2 96 176 4 and 192 kHz Note It is recommended that the Monitor Output Level be set close to 18 dBu to provide the best combination of digital resolution and analog output stage performance Power Switch CAUTION Follow instructions in the Installation section before switching power on The Power Switch toggles between power on and power off When the Model Two is off pressing...

Page 17: ... until the top level Operating Menu is reached Function Buttons The five Function Buttons are used to select menu options shown on the Graphic Display Each function button selects the menu item located directly above it on the display Active menu items are displayed in reverse while selected items are outlined In some cases a function button will operate as a toggle selecting between multiple choi...

Page 18: ...ftware Download are considered nonstandard System Status Indicator Clock Indicator and HDCD Indicator brightness are adjusted by selecting STATUS in the Front Panel Display Menu SETUP MORE SYSTEM PANEL Clock Indicators The Clock Indicators are two green LED s which indicate A D and D A clock status Indica tions are as follows Green Locked Off Not Locked HDCD Indicator The HDCD Indicator consists o...

Page 19: ...e decoding 7 DD88 88 88 2 kHz 24 20 and 16 bit word length conversion level adjustment and HDCD LSB code insertion 8 AD176 4 176 4 kHz 24 20 and 16 bit A D conversion 9 DD176 4 176 4 kHz 24 20 and 16 bit word length conversion level adjustment and HDCD LSB code insertion 10 DD176 88 176 4 kHz to 88 2 kHz sampling frequency conversion 24 20 and 16 bit word length conversion level adjust and HDCD LS...

Page 20: ... Factory Presets DD1X 20 DD1X 16 AD DD44 Mode In AD DD44 Mode the Model Two combines AD_44 1 and DD44 44 Modes allowing their functions to be cascaded saving considerable production time For example an analog input signal can be converted to a 24 bit HDCD signal on digital output 2 fed to a 24 bit processor or work station returned to digital input 2 which has an input word length of 24 bits and o...

Page 21: ... tween HDCD 24 20 or 16 bit Monitoring the 88 2 kHz output in DD44 88 Mode provides enhanced D A conversion accuracy for 44 1 kHz signals and is excellent for converting 44 1 kHz sources such as DAT s for analog processing during mastering Selectable two wire standard speed or single wire double speed AES signal formats are used for the 88 2 kHz stereo output signal SETUP OUTPUT FORMAT 1_WIRE or 2...

Page 22: ...on using HDCD decimation filtering The 88 2 kHz output word length is selectable between HDCD 24 bit 20 bit or 16 bit A two wire double speed AES signal format is used for the 176 4 kHz stereo input signal Digital input 1 is channel 1 and digital input 2 is channel 2 Selectable two wire standard speed or single wire double speed AES signal formats are used for the 88 2 kHz stereo output signal SET...

Page 23: ... bit Monitoring the 176 4 kHz output in DD44 176 Mode provides greatly en hanced D A conversion accuracy for 44 1 kHz signals and is excellent for converting 44 1 kHz sources such as DAT s for analog processing during mastering The 176 4 kHz output word length is selectable between HDCD 24 20 or 16 bit A two wire double speed AES signal format is used for the 176 4 kHz stereo output signal Digital...

Page 24: ...sets are listed below NOTE The preset setup values shown below appear if the 44 1_X base sample rate is selected If the 48 X base sample rate is selected the setup values remain the same except multiples of 48 appear in place of multiples of 44 1 Factory Preset Configurations NOTE The following setup values are the same for all factory presets Menu FUNCTION VALUE Operating MTRMODE NORMAL Operating...

Page 25: ...2 Word Length HDCD_24 HDCD_24 ______ HDCD_24 HDCD_16 HDCD_20 HDCD_16 HDCD_16 Output 2 HDCD_16 Dither DITHER1 DITHER1 ______ DITHER1 Digital Output Format ______ ______ 2_WIRE ______ A D Reference Clock INTERN INTERN INTERN ______ A D Filter Mode NORMAL NORMAL ______ ______ Monitor Input HDCD Code Detect 24 BIT 20 BIT 24 BIT ______ 16 BIT 16 BIT 16 BIT Monitor Reference Clock DIG_IN DIG_IN DIG_IN _...

Page 26: ... INPUT MON_REF A D_REF 4 Connect a 75 Ω coaxial cable from the Model Two s Word Clock Ref BNC connector to the 75 Ω external word clock or word sync input BNC connector on the component connected to the Model Two s digital signal inputs and outputs or to a 75 Ω word clock distribution amplifier For DD Operating Modes 1 From the Operating Menu select the desired Base Sample Rate SETUP MODE 44 1_X o...

Page 27: ...del Twos used for multichannel A D conversion The floating signal is compatible with most CMOS TTL compatible 75 Ω word clock inputs found on modern equipment A true TTL clock input will draw more current which may reduce the signal amplitude to below safe TTL trigger levels An AC coupled CMOS input word clock distribution amplifier with a ground refer enced TTL compatible output can be used to bu...

Page 28: ...rating Menu select SETUP MODE 44 1_X or 48_X 3 From the Operating Menu select SETUP PRESETS and select preset AD2X 24 4 Or from the Operating Menu select SETUP MODE MORE MORE AD_88 2 or 96 5 From the Operating Menu select SETUP OUTPUT OUTPUT then select the digital output word length HDCD_24 is selected by preset AD2X 24 6 From the Operating Menu select SETUP OUTPUT FORMAT then select the digital ...

Page 29: ...c can be changed as desired For more information refer to pages 47 through 55 in the Reference section For more detailed A D operating techniques see A D Conversion of Analog Tape Record ings on page 34 Setup for 44 1 48 kHz A to D Conversion With Simultaneous D to D Processing In AD DD44 or DD AD48 Modes the Model Two converts analog signals to HDCD 44 1 48 kHz 24 bit or 20 bit signals and can si...

Page 30: ... code is performed on HDCD 24 bit recordings intended for 24 bit DVD format release the LSB code must be reinserted by passing the signal through the Model Two set up in the same 24 bit D to D mode To perform digital processing of HDCD 16 bit amplitude encoded using Peak Extend or Low Level Extend recordings the Model Two must first be used to decode them to 24 bit or 20 bit signals prior to proce...

Page 31: ...CAUTION Do not feed a standard STEREO 44 1 kHz or 48 kHz AES signal to either AES In 1 or 2 when the Model Two is set up for AES two wire input in DD88 44 or DD96 48 Modes Doing so will cause supersonic spurious energy to appear at the D A analog outputs which may damage loudspeakers Setup for 44 1 48 kHz to 88 2 96 kHz Interpolation Word Length Conversion In DD44 88 or DD48 96 Modes the Model Two...

Page 32: ...nu select SETUP OUTPUT OUT_1 and select the word length Setup for 44 1 48 kHz to 176 4 192 kHz Interpolation Word Length Conversion In DD44 176 or DD48 192 Modes the Model Two converts 24 bit 20 bit or 16 bit 44 1 48 kHz signals to HDCD 24 bit 20 bit or 16 bit 176 192 kHz signals using high resolution HDCD interpolation filtering 1 From the Operating Menu select SETUP MODE 44 1_X or 48_X 2 Connect...

Page 33: ...ets does not change DAC dither settings Compact Disc Release Mastering The Model Two produces HDCD 16 bit 44 1 kHz Compact Disc release masters from both analog sources or longer word length digital sources If a digital source wasn t made using HDCD A D conversion its dynamic range can be preserved by using HDCD 16 bit amplitude encoding and decoding but without the benefit of HDCD A D conversion ...

Page 34: ... fed to a 24 bit editing DAW Thus a 24 bit 44 1 or 48 kHz archive recording can be made at the same time the DAW is being loaded 3 Digital processing in the workstation that involves level shifting EQ etc should be carefully evaluated for sonic quality High quality 24 bit editors if set up correctly can sound quite neutral when used for assembling and sequencing segments how ever level shifting EQ...

Page 35: ...he menu selections to access an option starting from the Operating Menu are shown in parentheses Peak Extension HDCD Limiting For Peak Extension from the Operating Menu select OPS 2 PEAKEXT ON For HDCD Lim iting select OPS 2 PEAKEXT LIMIT Peak Extension is a restorable with HDCD decoding soft peak limiter that allows peak levels up to 6 dB above standard full scale level 6 dBfs on HDCD 16 bit reco...

Page 36: ...n curve is expanded back to linear gain by the HDCD decoder using a precisely mapped inverse of the compression curve controlled by a hidden code producing a dynamic range and resolution floor beyond 16 bit During undecoded playback low level information normally lost by standard 16 bit players is pre served providing more accurate timbral and spatial reproduction There are two modes of Low Level ...

Page 37: ...usly recorded HDCD 16 bit material ROCK_1 ROCK_2 and ROCK_3 are designed to be useful for certain types of dense dis torted source material to keep an edge to the sound when dithering from 24 bit or 20 bit signals to HDCD 16 bit Each has a different flavor though they will all distort clean source material as they are intentionally designed towards truncation in effect Operating Techniques Listeni...

Page 38: ...ed with limited dynamic range material that has little ambient information Low Level Extension can be turned off Wide Dynamic Range Jazz or Classical This type of material typically has infrequent short duration peaks such as snare drum rim shots cymbal crashes bass drum hits etc These types of short duration peaks can be limited by as much as 5 dB or 6 dB using Peak Extension with little audible ...

Page 39: ...ft hand corner of the display The selected Operating Mode appears on the first line after the menu name or on the second line below the menu name If 44 1 kHz is selected as the Base Sample Rate the Operating Modes are AD_44 1 shown above DD44 44 AD DD44 AD_88 2 DD88 44 DD44 88 DD88 88 AD176 4 DD176 4 DD176 88 DD176 44 DD88 176 and DD44 176 If 48 kHz is selected as the Base Sample Rate the Operatin...

Page 40: ...ly in DD4X 2X to 1X Modes Deleted if 2X or 4X Sample Rate Only if 2X Sample Rate Deleted in AD DD1X Mode Only in AD DD1X Mode Only if different Output 1 2 Word Lengths Å Only if 2X or 4X Sample Rate Follows Output 1 in DD4X 2X to 1X OPS 2 INPUT ANALOG INPUT AD_44 1 DD44 44 AD DD44 MORE AD_88 2 DD88 44 DD44 88 DD88 88 MORE OUT_2 DIGITAL OUTPUT 2 WORD LENGTH OUT_1 DIGITAL OUTPUT 1 WORD LENGTH HDCD_1...

Page 41: ...Sources Repeated button pushes choose OUT_1 OUT_2 and DIG_IN In AD DD44 mode only DIGIN_2 also appears OUT_1 Digital output 1 is used as the meter source OUT_2 Digital output 2 is used as the meter source DIG_IN Digital input 1 is used as the meter source DIGIN_2 Digital input 2 is used as the meter source AD DD44 only For additional information on Meter Mode and Source selection see page 14 in th...

Page 42: ... Operating Menu by selecting OPS 2 SOURCE Function buttons 1 4 select the monitor source Button 1 FOLWMTR selects the meter source as the monitor source button 2 OUT_1 selects digital output 1 button 3 OUT_2 selects digital output 2 and button 4 DIG_IN selects digital input 1 as the monitor source Pressing ENTER activates the selected source In follow meter mode FOLWMTR the monitor source is the s...

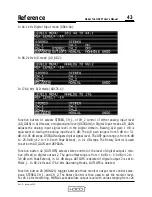
Page 43: ...s DSPGAIN adjusts digital signal level The DSP gain range is from 6 dB to 25 9 dB 12 to 19 9 with Peak Extend in 0 1 dB steps The Rotary Control is used to set both AD_GAIN and DSPGAIN Function button 2 OUT1OFS selects stereo control of the level of digital output 1 rela tive offset to digital output 2 The gain offset range is from 6 dB to 9 9 dB 12 to 3 9 dB with Peak Extend in 0 1 dB steps OUT1O...

Page 44: ...ccepts it and deactivates the knob Toggling to a different selection will keep the new level If the Levels Menu is exited while the Rotary Control is active it will remain active Rotating the control one step in either direction will recall the Levels Menu with the control still active This allows for example pushing the Menu Up button to get to the Operating Menu selecting a different meter mode ...

Page 45: ...m software download procedure Prior to initiat ing download the following message is displayed Download new system file Press EN TER to confirm or any other key to cancel Pressing ENTER brings up the Select Baud Rate Menu to start the download process Refer to System Software Download on page 65 Button 2 TEST selects the Test Menu button 3 VERSION selects the Software Version Menu button 5 MORE re...

Page 46: ... the Operating Menu by selecting SETUP MODE MORE Function buttons 1 3 select the operating modes Button 1 AD_44 1 selects 44 1 kHz A D conversion mode button 2 DD44 44 selects 44 1 kHz digital input mode button 3 AD DD44 selects 44 1 kHz A D conversion simultaneous with 44 1 kHz digital input mode button 5 MORE selects the Operating Mode 2_X Modes Menu Pressing ENTER activates the selected mode Op...

Page 47: ...o of the Operating Mode 4_X Modes Menu Button 1 D88 176 selects 88 2 kHz to 176 4 kHz DD mode button 2 D44 176 selects 44 1 kHz to 176 4 kHz DD mode and button 5 MORE selects the 44 1 48 Base Sample Rate Menu Pressing ENTER activates the selected mode Descriptions of the Operating Modes are on pages 19 23 and details of using each mode are on pages 26 to 31 in the Setup Operation section Digital O...

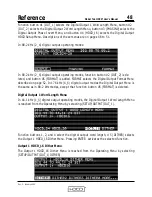
Page 48: ...s de leted and button 5 FORMAT is added FORMAT selects the Digital Output Format Menu described on page 52 In 176 kHz 4_X digital output modes the Digital Output Menu is the same as in 88 2 kHz modes except that function button 5 FORMAT is deleted Digital Output 1 Word Length Menu In 44 1 kHz 1_X digital output operating modes the Digital Output 1 Word Length Menu is reached from the Operating Men...

Page 49: ... of the Dither Menu Pressing ENTER activates the selected dither type ROCK_1 ROCK_2 and ROCK_3 are designed to be useful for certain types of dense distorted source material to keep an edge to the sound when dithering from 24 bit or 20 bit signals to HDCD 16 bit Each has a different flavor though they will all distort clean source material as they are designed towards truncation in effect See page...

Page 50: ... Dither Menu is deleted when FOLW_1 is selected in the Digital Output 2 Word Length Menu Page two of the Output 2 HDCD_16 Dither Menu Function buttons 1 3 select HDCD Rock dithers 5 selects the first page of the Dither Menu Pressing ENTER activates the selected dither The dithers are the same as those in page two of the Output 1 HDCD_16 Dither Menu Digital Output Word Length Menu In 88 2 or 176 4 ...

Page 51: ...N HDCD Limiting LIMIT ON and OFF Peak Extension is a restorable with HDCD decoding 9 dB soft peak limiter with a threshold of 3 dBfs that can increase dynamic range up to 6 dB when decoded HDCD Limiting is the same as Peak Extension except that HDCD decoding doesn t undo it Button 3 LOWLVL selects between three Low Level Extension options When NORMAL mode is selected HDCD 16 bit amplitude encoding...

Page 52: ... the selection Analog Input Menu In all AD modes the Analog Input Menu is reached from the Operating Menu by selecting SETUP INPUT This menu appears in different forms depending on whether 1_X 2_X or 4_X AD operating modes are selected In 44 1 kHz 1_X AD operating mode The A D REF clock mode is displayed on the top right of the menu and is set using the Reference Clock Menu selected by function bu...

Page 53: ...urce Button 1 INTERN selects the A D converter s internal clock which should always be used unless an external reference is required button 2 REF_AES selects the clock connected to the AES In Ref input button 3 REFWCLK selects the clock connected to the Word Clock Ref connector button 4 DIG_IN selects the digital input data source connected to the AES In 1 input and button 5 MASTER both selects th...

Page 54: ...ncy response testing Monitor Input HDCD Code Detect Menu In all AD operating modes the Monitor Digital Input Word Length Menu is reached from the Operating Menu by selecting SETUP INPUT HDCDBIT Function buttons 1 3 select the digital input HDCD code detect word length Pressing ENTER activates the selected word length In all AD operating modes selecting DIG_IN in the Operating Menu allows monitorin...

Page 55: ...X or 4X AD and DD operating modes the External Ref Clock Frequency Menu is reached from the Operating Menu by selecting SETUP INPUT REF_FRQ Function buttons 1 1X_REF and 3 2X_REF select the frequency of the external refer ence clock source when REF_AES or REFWCLK are selected in the A D Reference Clock Menu and the frequency of the reference word clock output of the Model Two when MASTER is select...

Page 56: ...cts the Digital Input HDCD_16 Decoding Menu button 5 REF_CLK selects the Digital In Reference Clock Menu Menu descriptions are on pgs 56 57 and 58 In 88 2 kHz 2_X DD input modes Function button 1 HDCDBIT selects the Digital Input HDCD Code Detect Menu button 2 FILTERS selects the 2X to 1X Filter Mode Menu button 3 REF_CLK selects the Digital In Reference Clock Menu button 4 REF_FRQ selects the Ext...

Page 57: ...eached from the Operating Menu by selecting SETUP INPUT HDCD_IN Function button 1 DCODE_16 toggles between HDCD 16 bit amplitude decoding ON or OFF Button 3 SCALING toggles between automatic 6 dB input level gain scaling ON or OFF Toggling DCODE_16 to ON decodes with automatic 6 dB level scaling for Peak Extended signals an HDCD 16 bit amplitude encoded input signal to a 24 bit signal that can be ...

Page 58: ... 2 REF_AES selects the clock connected to the AES In Ref input button 3 REFWCLK selects an external word clock connected to the Word Clock Ref connector and button 5 MASTER selects the Model Two s internal clock and feeds it to the Word Clock Ref connector providing a master word clock output The Digital In Reference Clock Menu is used to select the D A converter clock source when monitoring digit...

Page 59: ...CALL selects the high lighted preset When a preset is selected the following message is displayed Recall this preset Press ENTER to recall or any other key to cancel Pressing ENTER configures the system with the preset s contents Note All System Menu settings Front Panel Display Analog Polarity and DAC System Optimize and Meter Setup Menu settings are not changed during preset loading Caution sele...

Page 60: ...cels the setting change and ENTER activates the new setting Once set values are not altered during the loading or saving of presets or during power down Analog Polarity Menu The Analog Polarity Menu is reached from the Operating Menu by selecting SETUP MORE SYSTEM POLARTY The function buttons select the XLR connector pin polarity of the Analog Input and Output ports Button 1 PIN2HOT selects pin 2 ...

Page 61: ...al NORMAL and inverted INVERT button 2 MONHD16 toggles HDCD 16 bit amplitude decoding of the monitor output between AUTO ON and OFF AUTO Monitor decoding follows the monitor source ON Monitor always attempts to decode OFF Monitor never attempts to decode Toggling MONHD16 to OFF turns off amplitude decoding of Peak Extension and Low Level Extension This allows using DSP gain to optimize peak extend...

Page 62: ... an average reading bar with a single pip peak indication AVRG PK AVRG PK mode displays both average levels which determine perceived loud ness and channel balance and peak digital signal levels at the same time The DISPLAY setting is not stored in presets Meter Overload Light 1 Menu The Meter Overload Light 1 Menu is reached from the Operating Menu by selecting SETUP MORE METER OVRLD_1 Function b...

Page 63: ...E STORE_P The Rotary Control is used to scroll through the presets A brief preset description is displayed on menu line six The description for blank presets is UNUSED Factory in stalled presets are indicated in parenthesis and cannot be stored renamed or erased Function button 1 STORE selects the Store Preset Menu and function button 2 RE NAME selects the Rename Preset Menu Descriptions of these ...

Page 64: ...and returns to the Store Presets Menu Rename Preset Menu The Rename Preset Menu is reached from the Operating Menu by selecting SETUP MORE STORE_P RENAME The Rename Preset Menu is used to rename a current preset This menu is the same as the Store Preset Menu except that only the new name and not the current system configura tion is saved Test Functions Menu The Test Functions Menu is reached from ...

Page 65: ...not typically erase or overwrite user defined presets System software updates are provided on floppy disk for PC based systems Future updates may also be provided through modem downloads CAUTION Existing system software and setup parameters but not user generated presets are deleted during download Model Twos are supplied with a floppy disk containing the installed system software version to allow...

Page 66: ... data port 3 From the Model Two s Operating Menu select SETUP MORE MORE to get to page 3 of the Setup Menu Initiate the system software download procedure by selecting DOWNLD The following menu will appear 4 Press the ENTER key to begin the download procedure The message DETECTED REQUEST TO DOWNLOAD NEW HDCD PROGRAM will momentarily be displayed and the following menu will appear SELECT BAUD RATE ...

Page 67: ...4 During transfer a series of asterisks will be displayed on the PC screen When file transfer is complete the message DOWN LOAD SUCCESSFUL will momentarily be displayed on the Model Two The Model Two will then automatically reboot From the Operating Menu select SETUP PRESETS and load the first factory preset AD1X 24 Then from the Operating Menu select SETUP MORE MORE TEST Select ADT and set ADL to...

Page 68: ...ncoding Most of the intelligence of the HDCD process has been incorporated in the Model Two HDCD Processor lowering the cost to implement HDCD decoding in consumer equipment An analog signal fed to the Processor is converted into a digital signal having a 24 bit word length and a sampling frequency of 176 4 kHz After decimation to 88 2 kHz a continuous real time analysis of the signal is made usin...

Page 69: ...digital soft limiter with a curve that mimics analog tape saturation except that on decoding the peaks are restored Peak Extension can be used for several purposes to provide headroom to capture occasional peaks or as a method to raise the average signal level to create a hot recording Peak extension allows raising the average level of a recording as much as 6 dB without overload Of course like an...

Page 70: ...ever a 16 bit signal without peak extension is detected Gain Scaling can be set to On automatic or Off in the Monitor Setup Menu or the Second Operating Menu When monitoring 24 bit or 20 bit signals Gain Scaling is normally Off When monitoring 16 bit signals scaling is normally On auto matic and monitor gain is increased by 6 dB for HDCD signals with Peak Extend See pages 42 57 and 61 for addition...

Page 71: ...and 2 Signal Format AES3 16 bit 20 bit 24 bit single wire at 44 1 kHz and 48 kHz single wire or two wire at 88 2 kHz and 96 kHz two wire at 176 4 kHz and 192 kHz Connectors XLR 3 32 Level RS 422 Impedance 110 Ω balanced Output 1 and 2 word lengths may be independently set at 44 1 kHz and 48 kHz Digital Reference Input Signal Format AES3 16 bit to 24 bit 44 1 kHz 48 kHz 88 2 kHz and 96 kHz Connecto...

Page 72: ...librated digital signal word length display mode 6 dB HDCD 16 bit Peak Extend level indication display reset variable brightness Peak bar or simultaneous average bar with peak dot display modes HDCD Signal Processing Eight Motorola 56009 DSPs and one Pacific Microsonics PMD 100 HDCD decoder ASIC con trol A D conversion sampling rate conversion word length conversion digital gain ad justment HDCD e...

Page 73: ...Start Icon then Programs then Accessories then Communi cations and finally HyperTerminal The HyperTerminal Dialog Box will open Select the Hypertrm exe program icon by double clicking on it The HyperTerminal communications program will start Assign an easy to remember name to the connection configuration file you are creating you may be using the same program and connection configuration file to u...

Page 74: ...oard to begin download ing During downloading the Windows communication program screen will have a series of asterisks scrolling across it Downloading will take approximately 6 minutes at 19200 baud or approximately 3 minutes at 57600 baud When the Windows communications program has finished downloading the file it will display DONE on the PC screen At the same time the Model Two will display DOWN...

Reviews: