OPERATING PROCEDURES
F.
STOPPING THE ENGINE.
1.
Pull the throttle back and low idle the engine.
2.
Turn the propane tank valve clockwise to a closed posi-
tion.
NOTE:
The exhaust system will be very hot and takes several
minutes to cool, so keep yourself and all materials clear!
G. TRANSPORTING THE MACHINE.
1.
The tank should be securely fastened.
2.
The tank valve must be closed.
The transport area should be well ventilated
H. STORING THE MACHINE.
1.
The engine should be stopped properly
and the tank valve closed.
2.
Remove the LP tank from the machine
and store the tank in an approved area.
3.
Store your machine in a safe area: away
from enclosed high heat, away from sparks
or flames, away from traffic lanes of heavy
equipment.
REFER TO SAFETY INSTRUCTIONS!
MAINTENANCE
A. MACHINE MAINTENANCE
1.
Change the oil and filter according to the Honda Engine
Owners Manual. Change the oil at the first 20 hours of
operation. Thereafter, oil should be changed at 50-hour
intervals.
2.
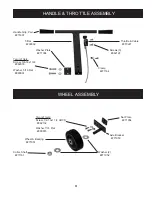
Grease the wheels every 50 hours of operation.
3.
Keep the cooling air filter (on top of the engine) clean at
all times. Wet clean it at the end of every use. Never oper-
ate the machine unless the filter is clean and properly in-
stalled.
4.
Each week wet clean the carburetor foam pre-filter with
soap and water. Blot dry with paper towels and reinstall.
Do not treat this filter with oil. Never operate the unit
unless the paper element and the pre-filter are properly in-
stalled. Install a new paper element every 200 hours of
operation.
5.
Clean the entire unit after each use.
6.
When cleaning the unit, check for possible loose nuts and
bolts.
7.
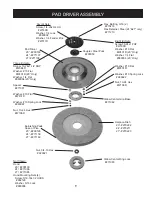
Check the pad driver weekly for rigidity and wear. Re-
place the harpoon face as needed.
8.
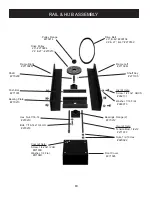
Check the bearing hub shaft and bearings weekly. If the
shaft shows any looseness, the bearings and possibly the shaft
must be replaced.
Remember that being safe is a full-time, every
day job. Follow all information posted on the
machine and the LP tank.
9.
Soap test for LP leaks at least every time
you install a fresh LP tank. To do this test
properly, the LP lines must be pressurized and
every inch of line and connections must be
sprayed. If you find a leak, make the proper
repairs before operating the machine. Also
see Item B under Operating Procedures.
Never allow anyone to operate this machine that
has not read or cannot understand the given
instructions.
B. CHANGING THE DRIVE BELT.
1.
The engine should be off and the ma-
chine level with the floor.
2.
Remove the front cover (7/16-inch
wrench).
3.
Loosen only (do not remove) the 4 hub
plate mounting bolts (3/4-inch wrench).
These are the front 2 bolts located on the right
and left sides of the main frames above the
hood. The third bolt on either side mount
the push bar and should not be loosened.
6
Summary of Contents for NIGHTHAWK 20
Page 4: ...NOTES 4 ...
Page 15: ...15 NOTES ...


