background image

8

4.  CONNECTING THE BATTERY CONNECTOR

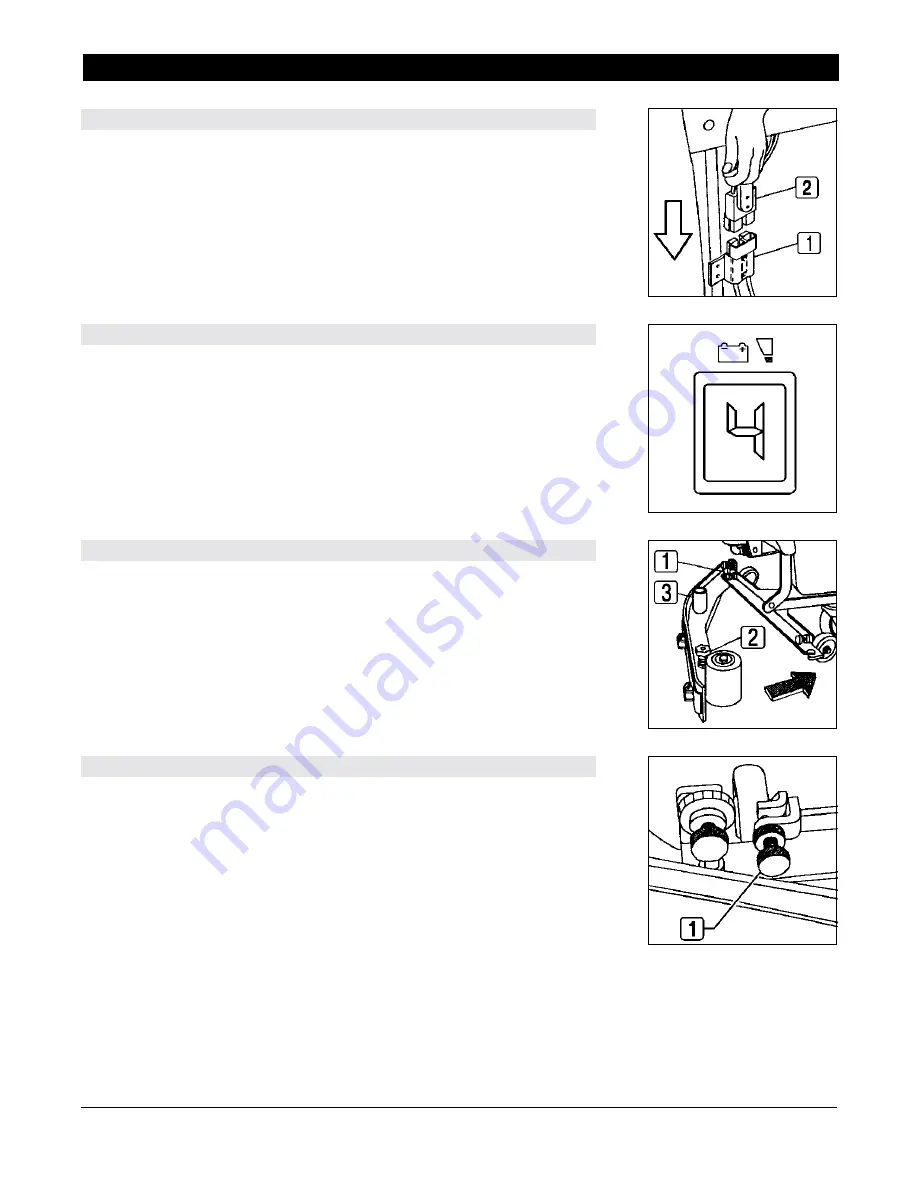
After charging the batteries, reconnect the battery connector (2) to the connector of
the machine (1).

5.  BATTERY INDICATOR

The battery indicator is digital with 4 fixed positions and a blinking one. The numbers,
which appear on the display, show the approximate charge level.

4

 = maximum charge,  

3

 = ¾ charge,  

2

 = ½ charge,  

1

 =  ¼ charge,

0

 = (blinking)  discharged batteries

6.  SQUEEGEE ASSEMBLY

The squeegee is assembled as shown in the figure.  The squeegee lever should be in
its up position.

1.

Insert the left squeegee pin (1) into the left arm slot.

2.

Then insert the right pin (2) into the right slot.  First, loosen the handwheel on
top of the pin.  Also, be careful to keep the spring and washer over the blade of
the arm.  Retighten the handwheel.

3.

Fit the squeegee hose into its coupling.

7.  ADJUSTING THE SQUEEGEE HEIGHT

The height from the floor to the squeegee should be adjusted based on the blade’s wear.
Rotate the knob (1) clockwise to lift the squeegee and counterclockwise to lower it.

Note:

 Adjust the right and left knobs the same amount; the squeegee should be

positioned parallel to the floor.

MACHINE PREPARATION

Summary of Contents for ScrubMaster 26C

Page 1: ...ldings For new books write to Pacific Steamex Inc 2259 S Sheridan Muskegon MI 49442 6252 Carefullyinspectallcomponentstoensurethat there is no concealed freight damage If such damage is discovered fil...

Page 2: ...VERYTANKFULL 5 BRUSHCONTROL UPONCOMPLETIONOFTHEWORK DAILYMAINTENANCE 1 CLEANING THE RECOVERY TANK AND FILTER 2 CLEANING THE SOLUTION TANK AND FILTER 3 CLEANING THE SQUEEGEE 4 DISASSEMBLY OF THE BRUSHE...

Page 3: ...a ramp Do not stop and leave the machine on a ramp or incline 14 When the machine is parked take out the key and set the parking brake 15 Duringanymaintenanceoperationdisconnectthepowersupplyfromthem...

Page 4: ...sition of the squeegee Indicatesthesqueegeeleverposition Symbolindicatingthechargelevelsofthebatteries It is necessary to recharge the batteries when the green light begins to blink Symbolindicatingth...

Page 5: ...recovery tank Indicationofthemaximumrecommendedtemperatureforthesolutionwater 50 Cor 122 F It is located near the fill hole of the solution tank Symbolforthecoupling Indicates the anchor points and th...

Page 6: ...CKINGTHEMACHINE 1 Use a fork truck to move the machine when packaged 2 Take off the outer package 3 The machine is fixed on the pallet with wooden wedges that block the wheels and metal brackets ancho...

Page 7: ...SMOKING WARNING To prevent an explosion charge the batteries only in an area with good ventilation WARNING Always wear eye protection and protective clothing when working near batteries When charging...

Page 8: ...ee lever should be in its up position 1 Insert the left squeegee pin 1 into the left arm slot 2 Then insert the right pin 2 into the right slot First loosen the handwheel on top of the pin Also be car...

Page 9: ...pedal 2 Turn the key to the off position 0 8 ADJUSTINGTHESQUEEGEEINCLINATION During operation the rear squeegee blade is most efficient when tilted back about 3 16 inch 5mm along its whole length To...

Page 10: ...ALWAYSUSELOWFOAMINGDETERGENT Adding antifoam liquid into the recovery tank before cleaning will also help preventfoaming NEVERUSEPUREACID 10 BRUSHASSEMBLYCONTINUED 3 Place the brushes under the base L...

Page 11: ...iformly but not so much that it gets past the splash guard Remember that the correct solution quantity depends on the type of floor the dirt and the speed 7 Release the foot pedal and lower the brush...

Page 12: ...d movement For reverse movement press on the lower half of the brush motor switch You must continue to hold down on the lower part of the switch while pushing down on lever 1 at the same time WARNING...

Page 13: ...enoid valve switch 1 5 Switch off the vacuum motor switch 3 6 Take the machine to the location where the recovery tank is to be emptied 7 Switch off the brush motor switch 4 the brush indicator light...

Page 14: ...ove the filter and its housing 6 Rinse with water 7 For a more thorough cleaning remove the filter from its housing and rinse 8 Reassemble 2 CLEANINGTHESOLUTIONTANKANDFILTER 1 Open the water valve 2 E...

Page 15: ...hem Refer to the Weekly Maintenance section 6 Reassemble Note This maintenance assures a longer life for the vacuum motor 4 DISASSEMBLYOFTHEROTATINGBRUSHES 1 Lift the brush base with its lever 2 Turn...

Page 16: ...necessary to replace it proceed as follows 1 Unhook the two metallic blades 1 2 Take the splash guard off and replace it 3 Reassemble 1 REPLACEMENTOFTHEREARSQUEEGEEBLADE If the rear squeegee blade is...

Page 17: ...the hose from its coupling on the squeegee 2 Take off the other end from the recovery tank 3 Wash the inner part of the hose with a water jet from the tank side 4 Reassemble WARNING Donotwashthehoset...

Page 18: ...TDRYTHEFLOORWELL 1 Check that the squeegee blades are clean 2 Adjust the inclination of the squeegee 3 Confirm the vacuum hose is correctly fitted in its housing on the recovery tank 4 Confirm the squ...

Page 19: ...19 SERVICE LOG...

Page 20: ......

Page 21: ......

Page 22: ...Dealer you may contact Pacific Steamex Inc at the address listed herein for the location of the nearest Pacific Steamex Inc repair center or agent or for other instructions pertaining to your warranty...

Reviews: