background image

Chapter 4 - Installing the Packard Bell 

Compasseo in your car 


Setting up the device 

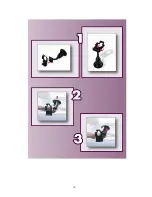
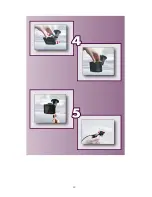
Please refer to the pictures on the following page and instructions below to set up your device correctly.  


1.  To assemble your car holder kit first attach the cradle to the suction-mount gooseneck. Ensure 

that the 'CLOSE' arrow points in the direction you attach the cradle. 

2.  Place the car holder kit in a suitable location on your windscreen and release the clip at the base 

of the gooseneck.  

3.  Push the clip back into place to fix the suction-mount gooseneck firmly to the windscreen.  
4.  Attach the Compasseo to the car holder kit: position the bottom of the Compasseo first, then tilt 

the top of the Compasseo back into position. Pull the top clip until it clicks into place. Twist the 
gooseneck to adjust the position of the Compasseo so that you can see the screen comfortably. 

5.  You can charge the Compasseo from your car using the supplied car adapter cable. For your 

own safety and that of others, you should connect the cables only when your vehicle is 
stationary. Connect the supplied USB cable to the USB port on the Compasseo and plug the 
other end into the cigarette lighter. You can then start driving. 


The Packard Bell Compasseo is now ready for use! Please read the instructions regarding Destinator 
Navigates to know how to use your GPS.  
 

CAUTION: Do not leave the device in your car. Exposure to sunlight may cause damage. 


11


Summary of Contents for COMPASSEO

Page 1: ...PACKARD BELL COMPASSEO USER S GUIDE...

Page 2: ...arty information or use thereof or the inability to use by any party or in connection with any failure or performance error omission interruption defect delay in operation or transmission computer vir...

Page 3: ...arch order to Street City or ZIP Postal Code Street to find street data for the smaller municipality Important Information If you install the Packard Bell Compasseo in your car make sure you position...

Page 4: ...tarted 7 2 1 Powering ON OFF 7 2 2 Connecting to your computer 7 2 3 Disconnecting from your Computer 8 2 4 Charging the Battery 8 Chapter 3 Troubleshooting Upgrading the Compasseo 10 3 1 Resetting th...

Page 5: ...k Start Guide 1 2 Features Plug and drive GPS device uch screen 3 5 TFT LCD colour to SD MMC card reader d with country map 256 512 MB MMC card provide r MP3 player and Photo viewe High quality loudsp...

Page 6: ...B cable to connect the Compasseo to your computer and exchange files or charge the battery or connect the supplied car adapter cable and plug the other end into the cigarette lighter to charge the bat...

Page 7: ...on process once 1 Connect the small end of the supplied USB cable to your Compasseo and the other to one of your computer s USB ports 2 Insert the Companion CD DVD into your computer and click on the...

Page 8: ...low be sure to charge it in time Otherwise the device may automatically turn off and cannot be turned on If your device becomes fully discharged and cannot be started follow the procedure below 1 Con...

Page 9: ...adapter optional Connect the AC adapter cable to the USB connector on your device The device will automatically charge Note It may take up to 2 5 hours to fully charge the device Note The charging LED...

Page 10: ...emory and restores the factory default settings of the device You will have to perform the first start process again calibrate screen settings acquire GPS connection etc Reset Button Battery lock swit...

Page 11: ...r kit position the bottom of the Compasseo first then tilt the top of the Compasseo back into position Pull the top clip until it clicks into place Twist the gooseneck to adjust the position of the Co...

Page 12: ...12...

Page 13: ...13...

Page 14: ...ector SD MMC Slot supports SD MMC memory cards up to 1G bytes External GPS Antenna Connector MMCX type Environment Temperature Operating Temperature 0 to 40 C Storage temperature 20 to 60 C Humidity 2...

Reviews: