114
Chapter 3
Main Module Reassembly Procedure
Replacing the CPU
IMPORTANT:
The CPU has a Pin1 locator that must be positioned corresponding to the marker on the CPU socket.
Replacing the Thermal Module
IMPORTANT:
Apply a suitable thermal grease and ensure all heat pads are in place before replacing the
Thermal Module.
The following thermal grease types are approved for use:
•
Silmore GP50
•
Honeywell PCM45F-SP
•
ShinEtsu 7762
The following thermal pads are approved for use:
Eapus XR-PE
1.
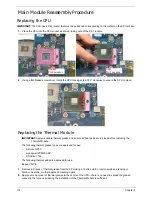
Place the CPU into the CPU socket as shown, taking note of the Pin1 locator.
2.
Using a flat-bladed screw driver, rotate the CPU locking screw 180° clockwise to secure the CPU in place.
1.
Remove all traces of thermal grease from the CPU using a lint-free cloth or cotton swab and Isopropyl
Alcohol, Acetone, or other approved cleaning agent.
2.
Apply a small amount of thermal grease to the centre of the CPU—there is no need to spread the grease
manually, the force used during the installation of the Thermal Module is sufficient.
Socket
Pin1 Locator
CPU
Pin1 Locator
Summary of Contents for EasyNote LJ75
Page 6: ...VI ...
Page 10: ...X Table of Contents Online Support Information 207 Index 209 ...
Page 15: ...Chapter 1 5 System Block Diagram ...
Page 58: ...48 Chapter 2 ...
Page 71: ...Chapter 3 61 5 Remove the HDD from the carrier ...
Page 85: ...Chapter 3 75 11 Carefully remove the LCD module from the chassis ...
Page 94: ...84 Chapter 3 5 Lift the entire Speaker assembly clear of the Upper Cover ...
Page 148: ...138 Chapter 3 ...
Page 178: ...168 Chapter 4 ...
Page 186: ...176 Chapter 5 ...
Page 199: ...Chapter 6 189 ...
Page 216: ...206 Appendix B ...
Page 218: ...208 Appendix C ...
Page 222: ...212 ...

