Chapter 3
79
Removing the CPU
IMPORTANT:
The pins on the underside of the CPU are very delicate. If they are damaged, the CPU may
malfunction. Place the CPU on a clean, dry surface when it is not installed.
1.
See “Removing the Thermal Module” on page 78.
2.
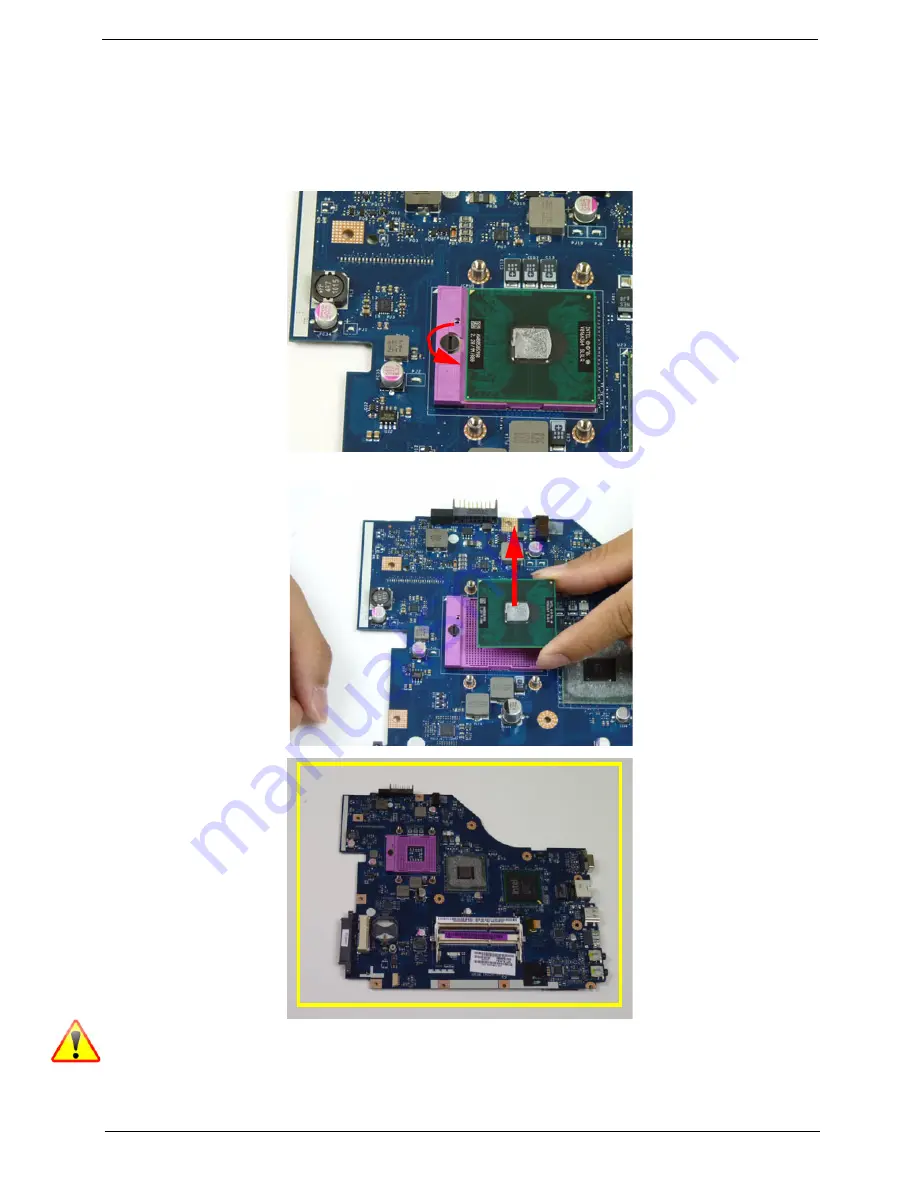
Using a flat-bladed screw driver, rotate the CPU locking screw 180° counter-clockwise as shown.
3.
Lift the CPU clear of the socket as shown.
NOTE: Circuit boards >10 cm² have been highlighted with a yellow rectangle as shown in the previous
image. Please detach the Circuit board and follow local regulations for disposal.
Summary of Contents for ENTK36 Series
Page 6: ...VI ...
Page 10: ...X Table of Contents ...
Page 66: ...56 Chapter 3 4 Detach the WLAN module from the WLAN socket ...
Page 76: ...66 Chapter 3 5 Lift the speaker module clear of the device ...
Page 87: ...Chapter 3 77 10 Disconnect the Bluetooth cable from mainboard ...
Page 92: ...82 Chapter 3 8 Remove the LCD assembly from the lower cover ...
Page 103: ...Chapter 3 93 5 Lift the microphone set clear of the panel ...
Page 114: ...104 Chapter 3 4 Replace the adhesive tape securing the inverter board cable to the LCD cover ...
Page 120: ...110 Chapter 3 7 Replace the adhesive tape to secure the antennas to the lower cover ...
Page 123: ...Chapter 3 113 5 Connect the fan cable ...
Page 130: ...120 Chapter 3 4 Connect the USB cable to the mainboard and lock the connector ...
Page 134: ...124 Chapter 3 Replacing the Upper Cover 1 Place the upper cover on the lower cover as shown ...
Page 136: ...126 Chapter 3 4 Connect the speaker cable B 5 Connect and lock the touchpad FFC C ...
Page 138: ...128 Chapter 3 Replacing the RTC Battery 1 Place the RTC battery into the mainboard connector ...
Page 140: ...130 Chapter 3 4 Slide the HDD module in the direction of the arrow to connect the interface ...
Page 198: ...Appendix A 188 ...
Page 206: ...196 Appendix C ...
Page 210: ...200 ...


