32
Chapter 2
Security
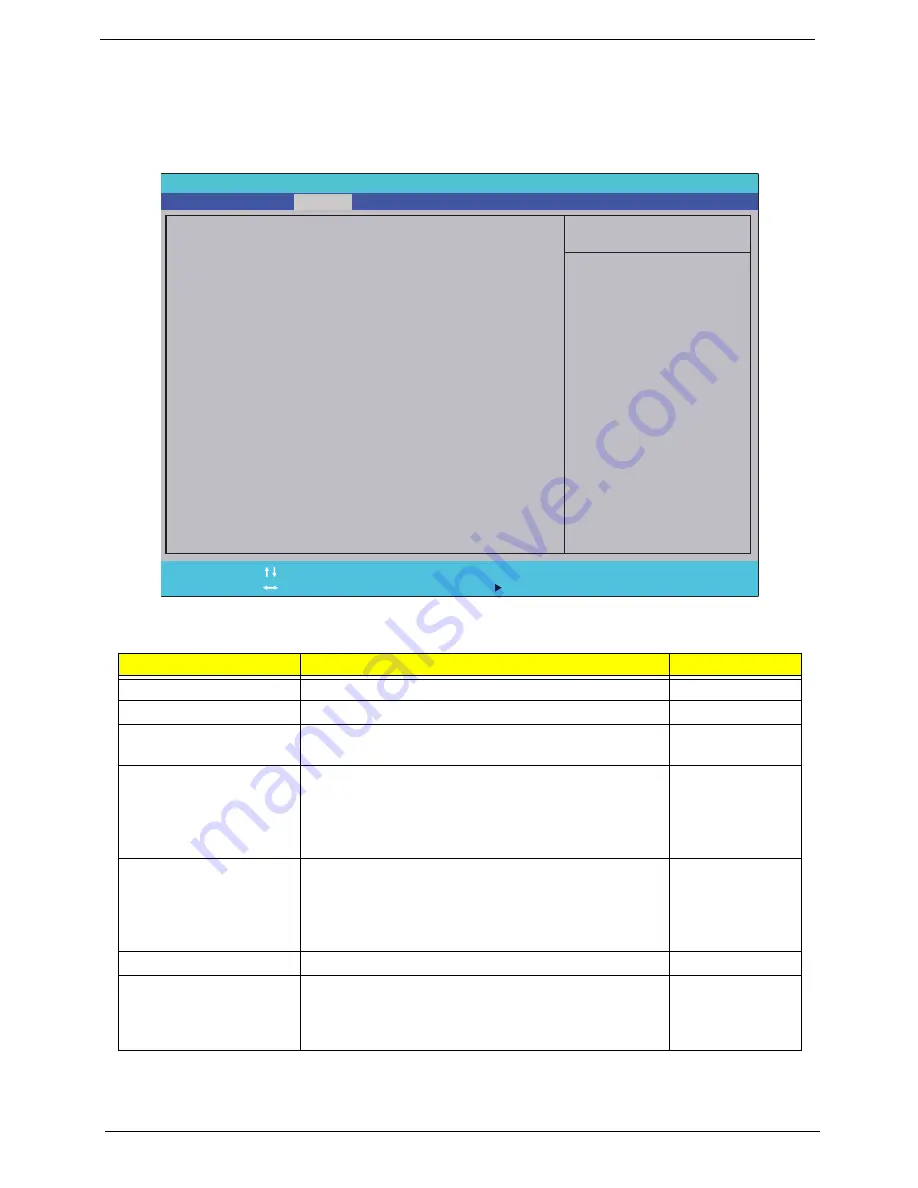
The Security screen contains parameters that help safeguard and protect your computer from unauthorized
use.
NOTE:
System BIOS does not support Trusted Platform Module (TPM).
The table below describes the parameters in this screen. Settings in
boldface
are the default and suggested
parameter settings.
NOTE:
When prompted to enter a password, you have three tries before the system halts. If you forget your
password, you may have to return your notebook computer to your dealer to reset it.
Parameter
Description
Option
Supervisor Password Is
Shows the setting of the supervisor password
Clear
or Set
User Password Is
Shows the setting of the user password.
Clear
or Set
HDD Password Is
Shows the setting of the HDD password.
Clear
, Set, or
Frozen
Set Supervisor Password
Press Enter to set the supervisor password. When
supervisor password is set, the BIOS Setup Utility is
protected from unauthorized access. The user can not
either enter the Setup menu nor change the value of
parameters except the date and time.
N/A
Set User Password
Press Enter to set the user password. When user
password is set, this password protects the BIOS Setup
Utility from unauthorized access. The user can enter
Setup menu only and does not have right to change the
value of parameters.
N/A
Set HDD Password
Enter HDD Password.
N/A
Password on Boot
Defines whether a password is required or not in order
for the computer to finish booting up. CAUTION: It may
be difficult to reset the computer once the password is
lost. Take care when using this function.
Disabled
or
Enabled
I t e m S p e c i f i c H e l p
I n s t a l l o r C h a n g e t h e
p a s s w o r d a n d t h e l e n g t h
o f p a s s w o r d m u s t b e l e s s
t h a n o n e w o r d s .
F 1
E S C
H e l p
E x i t
S e l e c t I t e m
S e l e c t M e n u
C h a n g e Va l u e s
S e l e c t
S u b M e n u
E n t e r
F 9
F 1 0
S e t u p D e f a u l t
S a v e a n d E x i t
C l e a r
C l e a r
C l e a r
[ D i s a b l e d ]
C l e a r
C l e a r
C l e a r
[ D i s a b l e d ]
S u p e r v i s o r P a s s w o r d I s :
U s e r P a s s w o r d I s :
H D D P a s s w o r d I s :
S e t S u p e r v i s o r P a s s w o r d
S e t U s e r P a s s w o r d
S e t H D D P a s s w o r d
P a s s w o r d o n B o o t
S u p e r v i s o r P a s s w o r d I s :
U s e r P a s s w o r d I s :
H D D P a s s w o r d I s :
S e t S u p e r v i s o r P a s s w o r d
S e t U s e r P a s s w o r d
S e t H D D P a s s w o r d
P a s s w o r d o n B o o t
F 5 / F 6
I n s y d e H 2 0 S e t u p U t i l i t y R e v . 3 . 5
Information
Main
Boot
Exit
Security
Summary of Contents for ENTK83 Series
Page 6: ...VI...
Page 10: ...X Table of Contents...
Page 38: ...28 Chapter 1...
Page 55: ...Chapter 2 45...
Page 56: ...46 Chapter 2...
Page 71: ...Chapter 3 61 4 Detach the WLAN module from the WLAN socket...
Page 88: ...78 Chapter 3 5 Lift the Bluetooth cable from the cable guides Discrete UMA...
Page 99: ...Chapter 3 89 8 Remove the LCD assembly from the lower cover...
Page 110: ...100 Chapter 3 5 Lift the microphone set clear of the panel...
Page 121: ...Chapter 3 111 4 Replace the adhesive tape securing the inverter board cable to the LCD cover...
Page 127: ...Chapter 3 117 7 Replace the adhesive tape to secure the antennas to the lower cover...
Page 138: ...128 Chapter 3 4 Connect the USB cable to the mainboard and lock the connector...
Page 144: ...134 Chapter 3 Replacing the Upper Cover 1 Place the upper cover on the lower cover as shown...
Page 146: ...136 Chapter 3 4 Connect the speaker cable B 5 Connect and lock the touchpad FFC C...
Page 150: ...140 Chapter 3 4 Slide the HDD module in the direction of the arrow to connect the interface...
Page 160: ...150 Chapter 3...
Page 188: ...178 Chapter 5...
Page 219: ...Chapter 6 209...
Page 228: ...Appendix A 200...
Page 236: ...208 Appendix C...
Page 240: ...212...


