4
Installation
Connecting the Broadband Phone Adapter
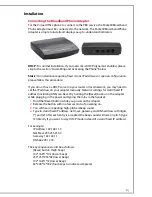
For the Virtual Office phone to connect to the PBX service, the Packet
8
Broadband
Phone Adapter must be connected to the network. The Packet
8
Broadband Phone
Adapter is simple to install and displays easy-to-understand indicators.
DHCP:
For normal installation, if your network is DHCP (dynamic) enabled, please
skip to the section “Assembling and Activating the Phone” below.
Static:
For installation requiring fixed / static IP addresses or special configuration,
please follow this procedure:
If you do not have a DHCP server on your router or local network, you may need to
set the IP address on your adapter manually. Network settings for static/fixed IP
address (including DNS) can be set by holding the [Reset] button on the adapter
while plugging in the power and typing them in via the handset:
1.
Hold the [Reset] button while you power on the adapter.
2.
Release the button within a few seconds of powering on.
3.
You will hear a repeating high-pitched beep sound.
4.
Type in static/fixed IP address, net mask, gateway, and DNS address with digits,
[*] and [#]. After each entry is accepted, the beep sound will lower in pitch (type
[#] directly if you want to stay DHCP mode instead of a static/fixed IP address).
For example:
IP Address 192.16
8
.1.10
Net Mask 255.255.255.0
Gateway 192.16
8
.1.1
DNS 63.209.12.1
8
The key sequence would be as follows:
[Reset] button (high beep)
192*16
8
*1*10# (lower beep)
255*255*255*0# (lower beep)
192*16
8
*1*1# (lower beep)
63*209*12*1
8
# (four beeps to indicate complete)


