background image

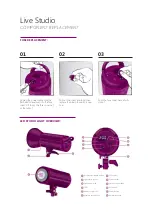
LED STUDIO LIGHT OVERVIEW:

Accessories release button

Light stand locker

Light head locker

LED

Power output icon

Wireless receiver icon

Fuse socket

Power socket

Output control knob

Set button

Power button

Umbrella socket

Live Studio

COMPONENT REPLACEMENT

FUSE REPLACEMENT:

01

02

03

Unplug the power cable. Insert a 

flat head screwdriver into the fuse 

cover. Lift to pry the fuse cover out 

ot the socket.

Pull out the cover and fuse, then 

replace the blown fuse with a new 

one..

Push the fuse cover back into its 

socket.

Summary of Contents for LiveStudio

Page 1: ...LiveStudio QuickStart I N S T A L L A T I O N G U I D E ...

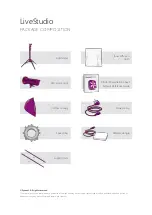
Page 2: ...ot be copied reproducved modified published uploaded posted or distributed in any way without PackshotCreator s prior consent LiveStudio PACKAGE COMPOSITION LED studio light Softbox canopy Speed ring Product Registration Sheet Quick Reference Guide Inner diffusion cloth Power cable Wireless dongle Support rods 2x 2x ...

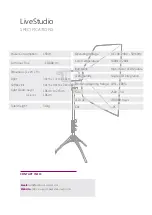
Page 3: ... x W x H Light Softbox Kit Light Stand Height Footprint Total Weight 150W 18 000 cm 34cm x 13cm x 19cm 60cm x 90cm x 38cm 106cm to 265cm 106cm 5 4kg Operating Voltage Color Temperature Illuminant LED Quantity Dimming Adjusting Range Fuse LED Life CRI AC 100 240V 50 60Hz 5500k 200k High Power LED Module Single LED Integration 10 100 250V 3A 100 000 Hours 95 ...

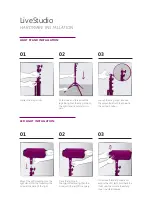
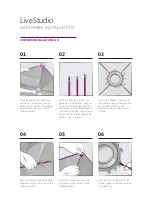
Page 4: ...b Remove the spigot Re attach the spigot in the vertical position LED LIGHT INSTALLATION 01 02 03 Mount the LED studio light on the light stand Start by loosening the screw at the base of the light Place the light onto the spigot stud and tighten the screw until the light fits securely To remove the safety cover and expose the LED light hold back the lock knob then rotate the safety cover counterc...

Page 5: ...her end The other 2 support rods have small silver caps on one end center and large silver caps right on the one end Insert the 4 support rods into the speed ring 2 facing the large silver caps ends and 2 facing the fasteners ends as shown on the picture Pass the 2 support rods with large silver caps through the loop of the softbox canopy Insert their small silver ends into the pocket at the corne...

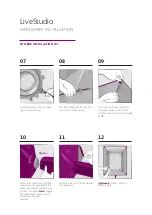
Page 6: ...ugh the loop of the softbox canopy Insert their small silver ends into the pocket at the corners of the softbox canopy as done for step 4 and 5 Attach the S type mount softbox assembly to the light Rotate the speed ring counterclockwise until it clicks into place Note Wiggle the speed ring to make sure it is locked onto the light securely Attach the four Velcro flaps around the speed ring 10 11 ...

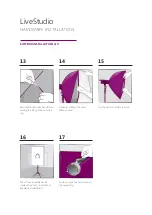
Page 7: ...two white hand screws holding the top light panel to the top Stretch and attach the outer diffusion cover Use the Velcro to hold it in place The softbox assembly can be rotated to vertical horizontal or any desired orientation To do so loose the hand screw on the speed ring 16 17 ...

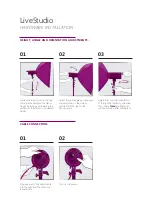
Page 8: ... 02 03 Loosen the wing knob on the light stand joints and adjust the stand height by raising and lowering the sections of the stand to the desired height Adjust the light angle by loosening the wing knob on the side as pictured Tilt the light to the desired angle Adjust the horizontal orientation of the light by loosening the screw then rotate Note Re tighten all knobs and screw after adjustment ...

Page 9: ...ocket Output control knob Set button Power button Umbrella socket Live Studio COMPONENT REPLACEMENT FUSE REPLACEMENT 01 02 03 Unplug the power cable Insert a flat head screwdriver into the fuse cover Lift to pry the fuse cover out ot the socket Pull out the cover and fuse then replace the blown fuse with a new one Push the fuse cover back into its socket ...

Reviews: