background image

Four-Channel Digital Video Recorder 

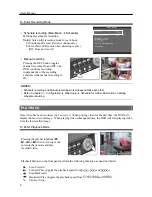
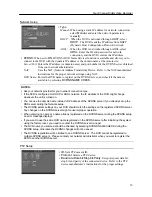
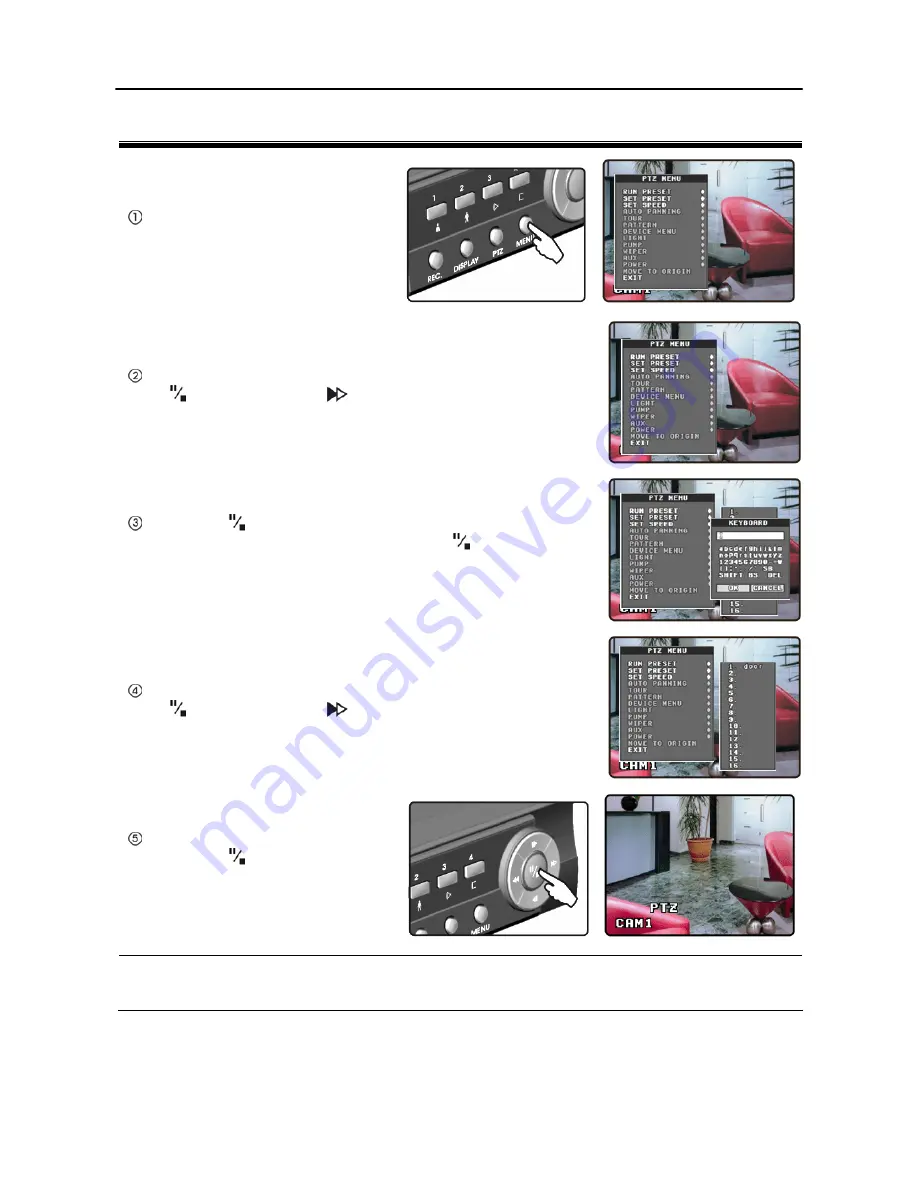
To Run Preset 


Pressing the MENU button in PTZ 
mode displays the PTZ menu. 


 Move to 

SET PRESET

 in the PTZ menu and select it by pressing 

the 

 button.  Pressing the 

 button displays the preset name box.


 Pressing the 

 button again displays a virtual keyboard.  Enter the 

preset name by pressing the arrow buttons and 

 button, and then 

press the 

OK

 button.


 Move to 

PRESET RUN

 in the PTZ menu and select it by pressing 

the 

 button.  Pressing the 

 button displays the preset name box.


 Selecting the desired preset name by 

pressing the 

 button moves to the 

selected preset number view. 


NOTE:  

Depending on the camera specifications, some features on the PTZ menu may not be 

supported.  Refer to the camera manufacturer’s instructions for the proper settings.


Summary of Contents for PDR420

Page 1: ......

Page 2: ......

Page 3: ...NED TO PROVIDE REASONABLE PROTECTION AGAINST HARMFUL INTERFERENCE WHEN THE EQUIPMENT IS OPERATED IN A COMMERCIAL ENVIRONMENT THIS EQUIPMENT GENERATES USES AND CAN RADIATE RADIO FREQUENCY ENERGY AND IF NOT INSTALLED AND USED IN ACCORDANCE WITH THE INSTRUCTION MANUAL MAY CAUSE HARMFUL INTERFERENCE TO RADIO COMMUNICATIONS OPERATION OF THIS EQUIPMENT IN A RESIDENTIAL AREA IS LIKELY TO CAUSE HARMFUL IN...

Page 4: ...has been damaged B If liquid is spilled or objects have fallen into the equipment C If the equipment has been exposed to rain or water D If the equipment does not operate normally by following the operating instructions adjust only those controls that are covered by the operating instructions as an improper adjustment of other controls may result in damage and will often require extensive work by ...

Page 5: ...ry Reset 3 Front Panel Controls 3 Chapter 2 Operation 4 Turning on the Power 4 Live Viewing 5 Recording 5 Playback 6 Searching 7 PTZ Control 8 Chapter 3 Configuration 10 Overview 10 Main Setup 11 Appendix 15 WebGuard 15 Minibank self player 18 Factory Default Settings 19 System Log 20 Troubleshooting 21 Connector Pin Outs 21 Specifications 22 ...

Page 6: ...User s Manual iv ...

Page 7: ...Various Record Modes Schedule Continuous Event and Manual Ÿ Multiple Search Engines Date Time Calendar Event Ÿ Loop Through Video Connectors Ÿ Alarm Input and Output Connections Ÿ Built in Buzzer Ÿ Live or Recorded Video Access via Internet Explorer Web Browser PACKAGE CONTENTS The package contains the following Ÿ Digital Video Recorder Ÿ Power Cord Ÿ User s Manual This document CAUTION ROUTE POWE...

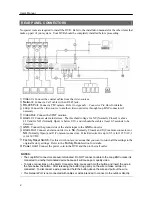
Page 8: ... Alarm Out Connect an alarm out device to NC Normally Closed and C Common connectors or NO Normally Open and C Common connectors Permitted current is up to 0 5 A for 125 VAC 1 A for 30 VDC Factory Reset Switch Use this switch on rare occasions that you want to return all the settings to the original factory settings Refer to the Factory Reset section for details Power Cord Connect the power cord t...

Page 9: ...essing the 1 or 2 button zooms in or out and the 3 or 4 button focuses near or far Playback Arrow Buttons Pressing the button controls playback of recorded video in playback or searching mode Pressing the button moves to another item or changes a selected number value in Main Setup menu Pressing the button pans or tilts a PTZ camera in PTZ mode Pause Stop Button Pressing the button pauses or stops...

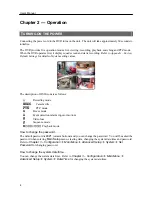
Page 10: ... follows Recording mode Camera title PTZ mode Freeze mode Event detection alarm input or motion Video loss Sequence mode Playback mode How to change the password The default password is 4321 camera buttons and you can change the password You will be asked the password when entering Main Setup menu clearing data changing the system date time and password Refer to Chapter 3 Configuration à Main Menu...

Page 11: ...button in quad screen mode displays four cameras in sequence Pressing the DISPLAY button again in sequence screen mode returns to the quad screen mode Ÿ Freeze screen Pressing the Pause Stop button freezes the current screen Pressing the button again releases the freeze screen mode RECORDING When you turn the DVR on it starts recording according to the default recording schedule Recording can also...

Page 12: ...ly each other Ÿ Refer to Chapter 3 Configuration à Main Setup à Schedule for further information on setting schedule recording PLAYBACK Once video has been recorded you can view it When playing video for the first time the DVR will display the most recent image When playing video subsequent times the DVR will start playing video from the last recalled image To Enter Playback Mode Pressing the play...

Page 13: ...me and clicking the GO button display the recorded image of that date or time Pressing the playback button plays the recorded video Ÿ Event search Selecting the event log to search for displays the recorded image of that event Pressing the playback button plays the recorded video Refer to Chapter 3 Configuration à Main Setup à Advanced Setup for further information on setting event recording Ÿ Cli...

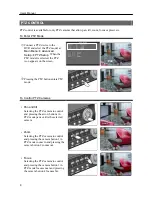
Page 14: ...n the screen Pressing the PTZ button enters PTZ mode To Control PTZ Cameras Ÿ Pan and tilt Selecting the PTZ camera to control and pressing the arrow buttons in PTZ mode pans or tilts the selected camera Ÿ Zoom Selecting the PTZ camera to control and pressing the camera button 1 in PTZ mode zooms in and pressing the camera button 2 zooms out Ÿ Focus Selecting the PTZ camera to control and pressing...

Page 15: ...oard Enter the preset name by pressing the arrow buttons and button and then press the OK button Move to PRESET RUN in the PTZ menu and select it by pressing the button Pressing the button displays the preset name box Selecting the desired preset name by pressing the button moves to the selected preset number view NOTE Depending on the camera specifications some features on the PTZ menu may not be...

Page 16: ...ed Enter the password by pressing the camera buttons 1 to 4 and a Main Setup screen appears The default password is 4321 How to Select Items Move to the desired item by pressing the arrow buttons and Pressing the Pause Stop button selects the item How to Change Values Select the desired item and press the arrow buttons and to increase or decrease the value Pressing the button completes the entry ...

Page 17: ...etween the upper and lower case keyboards BS backspaces and DEL deletes entered characters MAIN SETUP NOTE Refer to the Appendix Factory Default Settings for the further information about system default settings Schedule Ÿ On Off Enables or disables schedule recording Ÿ Setup Sets schedule mode Select the desired time to set up schedule and change the schedule mode value The schedule modes are as ...

Page 18: ...ing mode Sens Adjusts sensitivity to motion The higher the number is more images it detects as events Zone Sets the motion detection zone by using the arrow buttons and Pause Stop button Ÿ Alarm In Sets alarm in device type Off inactivate NO Normally Open NC Normally Closed Out When it is set to ON alerts by activating alarm during 10 seconds when any event occurs Ÿ Buzzer When it is set to ON ale...

Page 19: ...s configured for DHCP or ADSL network the IP address of the DVR might change whenever the unit is turned on Ÿ You can use the domain name instead of IP address of the DVRNS server if you already set up the DNS server during the Network setup Ÿ The DVRNS server settings on your DVR should match the settings on the registered DVRNS server Any changes on the DVRNS server might cause improper operatio...

Page 20: ...n the front panel and naming the settings saves the current DVR settings in cfg file format Ÿ System Log Displays the system logs Refer to Appendix System Log for the details of system log information NOTES Ÿ You cannot upgrade the software while HDD is not installed Ÿ If the file system on the USB flash drive is not FAT16 or FAT32 format format device using FAT16 or FAT32 format Ÿ If the DVR sens...

Page 21: ...ng the login information and then clicking the LOGIN button logs in WebGuard Ÿ DVR Address Enter the IP address of the remote DVR to connect Ÿ ID Password Enter the password of the DVR Entering the user ID is not required Ÿ Port Setup Click the Port Setup button and select the mode between the WATCH Web monitoring and SEARCH Web search Do NOT change the default port settings Ÿ Save Cookie Check th...

Page 22: ...the mouse pointer on the logo to see the version of the WebGuard program DVR Information The DVR Information window displays the time information of the remote DVR and login information of WebGuard Display Mode Select the desired display mode Camera Buttons Select the camera to be viewed PTZ Control Click the to control pan tilt and zoom of the camera from a remote site Event Status Window The eve...

Page 23: ...previous image go to the next image and go to the last image Display Mode Click the desired display mode Time lapse Search Click the to enter the time lapse search mode which allows you to search for recorded data by time and then play back images found within the time parameters The Timetable window located at the bottom displays the time information for the image of the date selected on the cale...

Page 24: ...on Click to save the current image in a bitmap file format to the local hard disk drive Print Button Click to print the current image on the printer connected to your computer Backup File Information window It displays information regarding the backup file Location displays the site description of the DVR where the backup was made Record displays the time span of the video backup file Encryption d...

Page 25: ...iles recorded at maximum speed with very high image quality will be played back slowly FACTORY DEFAULT SETTINGS MENU ITEM PARAMETER DEFAULT SETTING ON OFF ON SCHEDULE SETUP C Continuous record E Event Record C RECORD QUALITY VERY HIGH HIGH STANDARD LOW STANDARD RECORD SPEED 7 5 6 25 6 5 4 3 2 1 OFF NTSC 6 25 6 5 4 3 2 1 OFF PAL 7 5 NTSC 6 25 PAL SYSTEM DATE TIME YYYY MM DD H M S Current Date Time ...

Page 26: ...chedule recording began REC END Schedule recording ended REC M START Manual recording began REC M END Manual recording ended TIME CHANGED System time changed SYS UPGRADE System upgraded DISK FULL Disk is full RECORD BAD Recording is bad SHUTDOWN System shutdown REBOOT System restarted VIDEO LOSS Video input lost DISK BAD Disk is bad SMART FAIL S M A R T is bad DVRNS OK DVRNS notify succeeded DVRNS...

Page 27: ... or set the DVR to the Overwrite Mode DVR displays an error message stating that the last recorded image date and time is later than the current date and time setting of the DVR The DVR will automatically reset the time and date of the unit according to the time and date of the last recorded image If this is not the correct time and date reset the time and date manually If the correct time and dat...

Page 28: ...ctivity 10 100 Base Ethernet CONNECTORS Video Input Composite 4 BNC Video Loop Composite 4 BNC Monitor Output Composite 1 BNC Alarms Terminal block Ethernet Port RJ 45 RS 485 Serial Port 2 connector terminal block USB Port 1 on front panel 2 0 STORAGE Primary Storage EIDE hard disk drive GENERAL Dimensions W x H x D 13 38 x 1 83 x 2 38 340 0mm x 46 5mm x 314 5mm Unit Weight 6 67 lbs 3 03kg Shippin...

Page 29: ...t or human health from uncontrolled waste disposal please separate this from other types of wastes and recycle it responsibly to promote the sustainable reuse of material resources Household users should contact either the retailer where they purchased this product or their local government office for details of where and how they can take this item for environmentally safe recycling Business user...

Reviews: