Operating Instructions
Initial Setup
1. Remove all packaging materials from the grill.
2. Open the grill to make sure the warming rack, cooking grids, diffuser and grease tray are
properly installed.
3. Open the hopper lid and verify there are no foreign objects obstructing the auger.
4. Make sure the hopper safety guard is in place and the pellet clean-out door is closed and
locked.
5.
Fill the hopper with your choice of barbecue pellets and close the hopper lid.
6.
Make sure the power cord is connected to the grill before plugging the other end into a
grounded electronic outlet.
7.
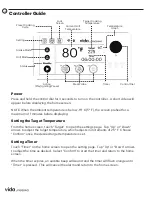
Turn on your grill by pressing the dial for 3 seconds.
8. Open the grill lid.
9. Prime the auger tube by entering settings, then press “Auger”. Select “Load Pellets”. Once
you press “Confirm”, the auger will engage filling the auger with pellets and automatically
stop.
10.
Set the temperature to 400 °F (204 °C) and “Confirm”.
11.
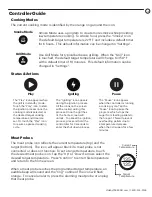
Press PLAY/PAUSE to start the ignition process.
12.
Once the grill has lit, close the grill lid. During ignition, there may be a large amount of smoke
coming from the grill.
13. While monitoring the grill, let it run for at least 30 minutes. This will remove manufacturing
process oils.
14. When complete, press the dial for 3 seconds to turn off the controller and start the automatic
shutdown process.
15.
Once the grill has been properly shut down and cooled, unplug the grill from the power source.
16.
Open the lid and clean the cooking grids and warming rack with a grill brush or wood scraper.
17.
Clean thoroughly following the instructions in “Care and Maintenance Instruction” section.
18. Once your grill is cleaned, make sure all parts are reinstalled properly before use.
Regular Use
Follow these steps every time you operate the pellet grill:
1.
Make sure the hopper is filled with enough pellets.
2.
Clean and dispose of any residual ash and grease. Inspect for creosote buildup. Remove
accumulated grease and creosote to reduce the risk of fire. Remove ash from the fire pot at
least every third use (if not each time). Accumulated ash may impact ignition and performance.
3. Always plug the power cord into a grounded outlet.
4.
Open the grill lid while lighting to help verify proper ignition.
24
TM
Summary of Contents for vida 910-05005
Page 1: ...Pellet Grill User Manual Model 910 05005 SKU A1 TM...
Page 5: ...Package Parts List 5 VidabyPADERNO com 1 800 263 9768 9 7 5 3 2 10 8 6 4 1 x2 x2 11 12x2...
Page 6: ...Package Parts List 6 21 19 17 15 14 22 20 18 16 13 x3 TM x2 23...
Page 8: ...Assembly 1 2 8 x6 x6 x6 1 4 6 x2 x2 x2 9 TM...
Page 9: ...Assembly 3 4 9 x10 x10 x10 3 5 8 VidabyPADERNO com 1 800 263 9768...
Page 10: ...Assembly 5 6 10 x2 x2 x2 x2 x2 x2 7 TM...
Page 11: ...Assembly 7 8 11 8 12 11 VidabyPADERNO com 1 800 263 9768...
Page 12: ...Assembly 9 10 12 x6 x6 x6 20 23 x2 x2 x2 15 17 18 TM...
Page 13: ...Assembly 11 12 13 10 x2 x2 x2 x2 22 TO CLOSE VidabyPADERNO com 1 800 263 9768...
Page 14: ...Assembly 13 14 14 13 2 TM...
Page 15: ...15 Assembly 15 16 19 21 VidabyPADERNO com 1 800 263 9768...
Page 16: ...Assembly 17 16 14 18 16 TM...
Page 17: ...17 Assembly VidabyPADERNO com 1 800 263 9768...
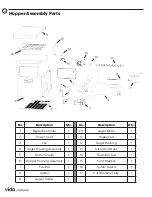
Page 32: ...Grill Assembly Parts 1 2 3 4 5 6 7 8 9 10 11 12 13 16 17 18 19 14 15 20 21 22 23 24 32 TM...


