background image

7

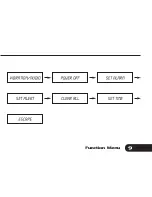
Press the 

FUNCTION

button and hold for more

than 2 seconds to enter into the function menu
mode.
Press the 

FUNCTION

button to scroll through the

menu prompts until “

SET TIME? 

” prompt is displayed.

Press the 

READ

button to enter into the set time

mode.
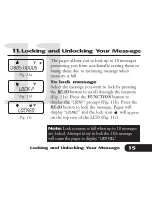
Pager will display with the year field blinking.
Press the 

READ

button to increase this field (Fig. 7a).

Press the 

FUNCTION

button to move to the date

and time field (Fig. 7b).
Press the 

READ

button to increase the digits in 

each field.
Proceed to complete setting the time field (hour,
minute and AM/PM). Pager returns to standby
upon completing all the fields.

11

7. To Set the Time and Date

To Set the Time and Date

1999

09

-01 05:00P

Fig. 7a

Fig. 7b

Summary of Contents for Odyssey

Page 1: ...USER S GUIDE Numeric Pager PageMart Odyssey...

Page 2: ...lp you keep in touch while on the move be it business related or leisure The PageMart Odyssey Pager is designed with ease of operation in mind and it aims to provide you many years of reliable service...

Page 3: ...TION MENU 8 6 TURNING OFF THE PAGER 10 7 TO SET THE TIME AND DATE 11 8 SET VIBRATION AUDIBLE ALERT 12 9 ALERT SETTING MODE 13 10 RECEIVING AND READING MESSAGES 14 11 LOCKING AND UNLOCKING YOUR MESSAGE...

Page 4: ...oring up to 20 digits per slot Backlight Real time clock 12 hr with calendar date display Reminder alert Message lock Up to 10 message slots Message time stamping Low battery indicator Individual dele...

Page 5: ...tton Use to enter into function menu mode Use to lock and unlock the message Use to turn on the back lighting display READ button Use to turn on the pager Use to read received messages Use to select d...

Page 6: ...3 6 3 Definition and Types of Icons Definition and Types of Icons Audio alert icon Alarm icon Battery low icon Message lock icon In service range indicator Message continuation icon Top Row Icons...

Page 7: ...power up with full display of all LCD segments and emit a short audible alert with date and time display To turn on the pager from the power off state press and hold the READ button for more than 2 se...

Page 8: ...rompts Pressing the FUNCTION button allows you to scroll the menu prompts as illustrated Page 9 Note Menu prompt CLEAR ALL will not appear if no message is received Pressing the READ button allows you...

Page 9: ...9 Function Menu VIBRATION AUDIO SET ALERT ESCAPE POWER OFF CLEAR ALL SET ALARM SET TIME...

Page 10: ...n to turn off the pager In the pager off state pager displays only the date and time alarm feature will operate as normal though the alarm icon is not displayed Pager will not be able to receive any m...

Page 11: ...mode Pager will display with the year field blinking Press the READ button to increase this field Fig 7a Press the FUNCTION button to move to the date and time field Fig 7b Press the READ button to i...

Page 12: ...y either Fig 8a or Fig 8b depending on the initial state of alert mode it is in Press the READ button to select the audible or vibration mode In the audible mode pager will display the speaker icon on...

Page 13: ...d Fig 9a Press the READ button to enter into the set alert mode Fig 9b Next Press the READ button twice to scroll through the choice alerts available Beep1 Beep2 Beep3 Beep4 Melody1 Melody2 Melody3 Ch...

Page 14: ...play as Fig 10a Press the READ button to display the first message Fig 10b Press the READ button again to advance to the next screen of the same message to display the message arrival time Fig 10c In...

Page 15: ...Fig 11a Press the FUNCTION button to display the LOCK prompt Fig 11b Press the READ button to lock the message Pager will display LOCKED and the lock icon will appear on the top row of the LCD Fig 11c...

Page 16: ...e The locked message can be unlocked in a similar way Press the READ button to display the message you wish to unlock Fig 11d Press the FUNCTION button to display the UNLOCK prompt Fig 11e Press the R...

Page 17: ...want to delete by pressing the READ button to scroll through the memory Press the FUNCTION button twice on the desired message screen to display CLEAR prompt Fig 12a Press the READ button to delete t...

Page 18: ...tandby screen press the FUNCTION button and hold for more than 2 seconds to enter into the function menu mode Press the FUNCTION button to scroll through the menu prompt until CLEAR ALL prompt is disp...

Page 19: ...prompt is displayed Fig 13a Press the READ button to enter into alarm setting mode Pager will display the ALARMON prompt Fig 13b Press the FUNCTION button to set the alarm This will cause the hour fi...

Page 20: ...indicate alarm is active To Turn Off Alarm While in standby mode press the FUNCTION button and hold for more than 2 seconds to enter into the function menu mode Press the FUNCTION button to scroll th...

Page 21: ...ON button to turn on the backlight The backlight will go off automatically after 8 seconds 21 14 Backlighting 09 01 05 00P Setting the Alarm Backlighting Fig 13g Next press the FUNCTION button to retu...

Page 22: ...d Fig 14 In Service Range Indication When the pager is within the coverage area the In Service Range Indicator icon will appear on the line of the display screen Low Battery Indicator The low battery...

Page 23: ...Place the pager face down in the palm of your hand Push to slide the battery door out Place the new battery into the battery compartment 23 Pager Standard Features Note Do not use carbon zinc battery...

Page 24: ...or compliance could void the user s authority to operate the equipment All PageMart Wireless Services are provided by WebLink Wireless Inc FLEX and the FLEX logo are registered trademarks of Motorola...

Reviews: