background image

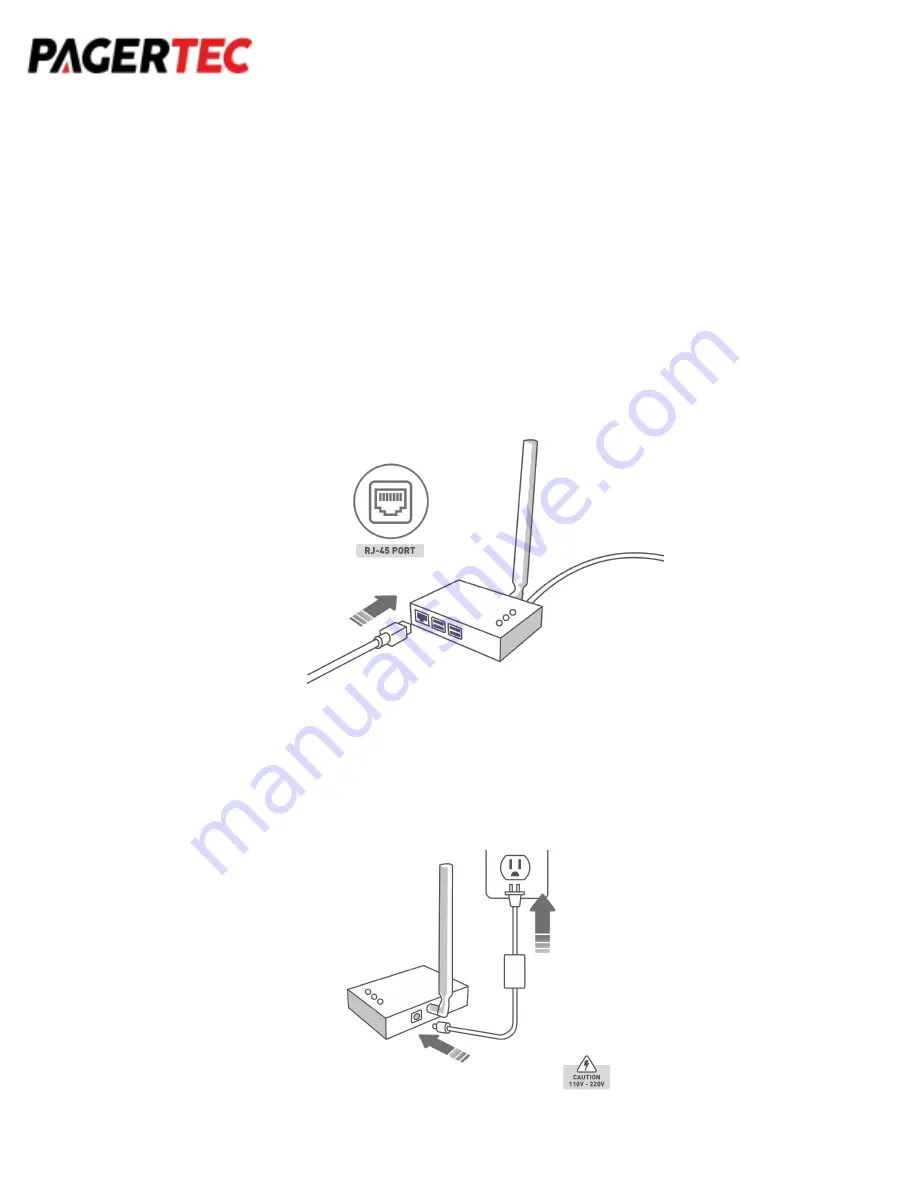
Connecting Data Collector to LAN

When Connecting your data collector via LAN it is important to Connect the RJ-45
Cable to your network. (RJ-45 is not included)

1. Connect the RJ-45 from your data collector to your Router or Switch. The Data

Collector will automatically receive an IP address from the router. Make sure your
router/switch settings allow a DHCP Connection.

2. To Start, Connect the Data Collector to the power with the included Power supply.

Summary of Contents for DELUX

Page 1: ...DELUX SERVICE CALL SYSTEM WITH DATA COLLECTOR...

Page 2: ...tion of Service Call System LCD monitor To connect the gateway to the LCD monitor please follow the steps in the picture below Setting Up Data Collector via HDMI 1 To set up your Data collector to a d...

Page 3: ...connected to the Display it will show the main live view set by factory settings Settings will depend on what was requested at the time of order Note In this mode you will not be able to page the tra...

Page 4: ...our network RJ 45 is not included 1 Connect the RJ 45 from your data collector to your Router or Switch The Data Collector will automatically receive an IP address from the router Make sure your route...

Page 5: ...h Google Chrome When you are ready open a Google Chrome Browser on any device that is connected to the network via LAN or WLAN 1 Type the IP address of the Data Collector in the Address bar on any dev...

Page 6: ...the Data Collector internal settings To do this you will need to connect a USB Keyboard and mouse to the ports of the Data Collector And a display will need to be directly connected to the HDMI port o...

Page 7: ...3 You will need to escape the Table Location Program by Pressing Ctrl F4 4 Right Click on the top right the up and down settings 5 Click on Wireless Wired Network Settings...

Page 8: ...6 Select the following in Configure select Interface eth0 7 Remove the check mark on Automatically Configure empty options 8 Select and fill out the IPv4 or IPv6 Address you would like...

Page 9: ...the Router settings you can add your Gateway IP 10 Then click on Apply 11 After settings are applied then you will need to reboot your Data Collector To do this escape the Table Location software agai...

Page 10: ...12 Click on the Raspberry Pi logo on the top right of the screen 13 Select Shutdown 14 Select Reboot 15 After the system reboots it should be set to the Static IP address you set it to...

Page 11: ...ng the call button for 3 seconds or by clicking on the tile Note If your call is not appearing on the display Your call button may be out of range Please contact Pagertec for more information on how t...

Page 12: ...min 3 From these settings you will be able to see more setting options Adding Multiple Pages When there are too many call points in one site then it is probably best to add multiple pages The pages ca...

Page 13: ...he system code is provided by Pagertec 6 Then set a Username and password to log in to that page 7 Then press save You can now log in to that page by logging out of the admin page and using your new p...

Page 14: ...s The INFO area is the message you would like for it to appear on the display There is a max of 5 characters for this section ADVANCED MENU SITE BASE The Site Base area allows you to change the title...

Page 15: ...ist Time Down The Call with the shortest time waiting would be at the top of the list STATES COLORS Setting up your states allows calls to change its color on the live view This makes it easy to see t...

Page 16: ...If this equipment does cause harmful interference to radio or television reception which can be determined by turning the equipment off and on the user is encouraged to try correct the interference b...

Reviews: