6
LED light type 300 Classic
MA50-06 GB 2018
ENGLISH
Art.no.
Rev.no.
Scale
Designed by:
Approved by:
Revised by: Date
Drawn by: Date
Drawing number
Assembly drawing no.
Surface treatment
part of ISO 2768-1
The tolerance class in accordance with this
E
Box 728, SE-194 27 Upplands Väsby, Sweden
Phone +46 8 59411050, Fax +46 8 59086880
12255X*
ASA 2009-05-26
ASA 2014-06-27
Belysningsinsats typ 300/LED
M11038 2
Th
is
d
oc
um
en
t a
nd
it
s
co
nt
en
ts
a
re
th
e
ex
cl
us
iv
e
pr
op
er
ty
o
f P
ah
lé
ns
a
nd
m
ay
n
ot
b
e
co
pi
ed
,
re
pr
od
uc
ed
, t
ra
ns
m
itt
ed
o
r c
om
m
un
ic
at
ed
to
a
th
ird
pa
rty
, o
r u
se
d
fo
r a
ny
p
ur
po
se
w
ith
ou
t w
rit
te
n
pe
rm
is
si
on
.
Plastbit
ingår i lampan
Plastdistans
1
8
DIN 933 - M5 x 20
19901221
A4
Skruv M6S M5x20
2
7
12461
12461
POM
Knopp räfflad SR6127 typ 1
2
6
ISO 7045 - M4 x 12 - 4.8 - H
19909215
A4
Skruv MRX M4x10
2
5
M11042
123401
EN 1.4404 (SS2348)
Bygel till LED-lampa
1
4
LED
123241 alt. 123341
LED lampa Spectravision 700, multi alt. vit
1
3
U-list
12272
PVC
U-list PVC GV-1-5, L=550mm
1
2
M10604
122716
EN 1.4404 (SS2348)
Frontring
1
1
Drawing.no:
Art_nr
Material
Title/ Name
Qty.
Item.
1,
5m
(3
m
)
*Art.nr
Belysningsinsats
Pos 3
LED-lampa
Anm
122552
123241
röd/grön/blå
122553
123341
vit
Pos 8 är bipackad lampan
8
1
2
3
4
5
7
6
Circuit diagram for LED-lamps 28W
L1
TR1 60W alt. 300W
N
E10077-0
2010-06-03 ASA
IN
230V AC
OUT
12V AC
LA1
LA2
LA3
LA10
28W
28W
28W
28W
alt.
alt.
Circuit diagram for LED-lamps
L1
TR1 60W alt. 300W
N
E10016-0
2007-07-11ASA
IN
230V AC
OUT
12V AC
LA1
LA2
LA3
LA6
50W
50W
50W
50W
50W
alt.
alt.
Item no. 123261
Spare part LED light red/green/blue
Item no. 123361
Spare part LED light white
Technical specification
Standard input voltage: 12V AC
Effective output:
See rating plate on the lamp (max 50W)
Installation
This light is suited for most PAR56 standard pool lights. It is only for use under water. The pool light shall be connected through
an isolation transformer 12V 60W/300W. If you have more than one LED light PAR56 in your pool, make sure all these lights are
installed on the same transformer, circuit and switch.
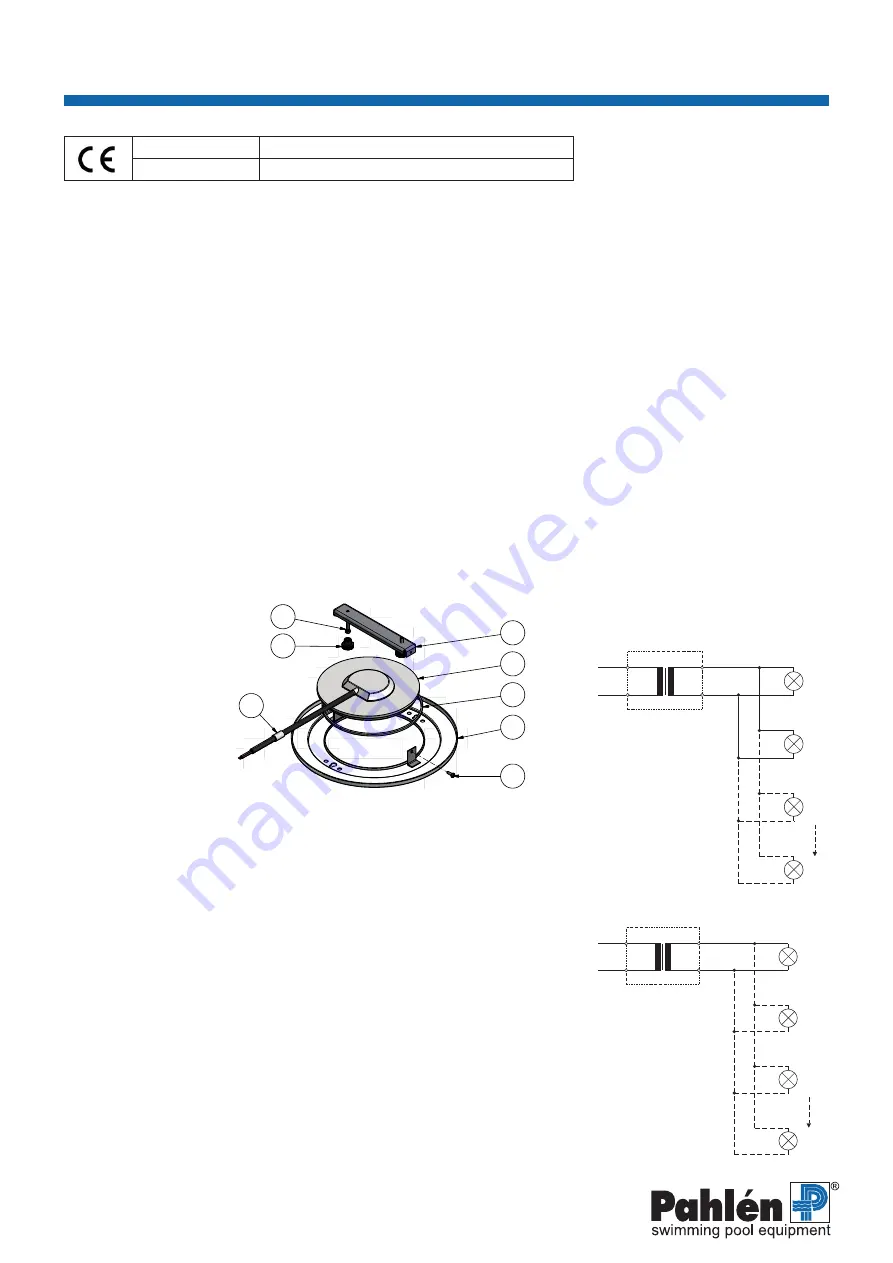
Both types of lights are connected the same way. See circuit diagram below and installation drawing on the next page.
The spacer (pos 9) shall be placed where the cable meets the cable gland.
If the external cable or cord of the light is damaged, it shall be replaced by a service agent or other qualified person.
Start-up
Make sure that each light is installed correctly.
Synchronizing multiple lights
1. To synchronize the lights to the same program, turn the lights on, wait for a few seconds.
2. Turn off the lights and wait for a minimum of 12 seconds, then switch back on.
3. Change the colour/program 2 times. Now they are synchronized.
Once the lights are synchronized, they will stay that way until one of the LED lights is replaced or one light is switched on
separately from the others.
Changing colour/program:
Turn the lamps off and quickly back on (max 10 sec. off).
Memorizing the last colour/program:
1. Select the desired colour/program.
2. Turn the lamps off for minimum 12 seconds. The chosen program has now been memorized.
Assembly order LED light unit
1. Front ring
2 U-list
3 Lamp
4 Bracket
5 Screw M4
6 Foot
7 Screw M5
8 Spacer
Spare part LED light typered/green/blue or white
The red/green/blue light
The LED light PAR56 is a very advanced electronic controlled light based on
LED’s in three colours: red, green and blue. Together these three colours can
produce many other colours.
With the on/off switch for your pool lights, one of the 16 preprogrammed light
effects can be selected.
16 program
1. Whitish
fixed colour warm white
2 Red
fixed colour red
3 Green
fixed colour green
4 Blue
fixed colour blue
5 Green-blue
fixed colour green/blue
6 Red-green
fixed colour red/green
7 Blue-red
fixed colour blue/red
8 Evening sea
slow change of colour red/blue
9 Evening river
slow change of colour red/green
10 Riviera
slow change of colour green/blue
11 White
fixed colour neutral white
12 Rainbow
slow change of colour blue/red/green
13 River of colours program 12 followed by program 15
14 Disco
rapid change of colour
15 Four seasons
slow change of colour red/blue/green/violet
16 Party
rapid change of colour
Circuit diagram
Example 1: Lamp - effective output 28W
Example 2: Lamp - effective output 50W
Summary of Contents for LED 300A Classic
Page 2: ......


