background image

CONNECTING TO THE TRACK ROCKER FUSE/RELAY 

CENTER (PAINLESS #58100) 

 Step 10: Route the Switch Panel Wires to the Switch Control Wires 

coming  from  your  Track  Rocker  Fuse/Relay  Center  (

Painless 

#58100

). A 

10-pin, male connector housing

 was provided in the 

Fuse/  Relay  Center’s  parts  kit. 

Terminals 

are  provided  in  the 

parts kit in order to install the wires in this connector. 


Step  11:  It  may  help  to  familiarize  yourself  with  the  wiring  diagram 

below before installing the wires from the Switch Panel into the 

10-pin connector housing 

in Step 15. 


Summary of Contents for Track Rocker series

Page 1: ...Panel w Panel Dash Mount 58104 6 Switch Customizable Track Rocker Switch Panel w Panel Dash Mount 58107 4 Switch Customizable Track Rocker Switch Panel w Panel Dash Mount Manual 90638 Painless Perfor...

Page 2: ......

Page 3: ...se instructions please call or email us our contact information can be found at the top of this page or online at www painlessperformance com We sincerely appreciate your business Painless Performance...

Page 4: ...OLS NEEDED 3 INSTALLING FACTORY STYLE TERMINALS 4 SWITCH PANEL INSTALLATION 9 CONNECTING TO THE TRACK ROCKER FUSE RELAY CENTER PAINLESS 58100 13 SWITCH WIRING 15 DOUBLING SWITCH CONTROL WIRES 16 ECM C...

Page 5: ...s This manual 90638 SMALL PARTS Painless harnesses include parts kits that contain the terminals fuses screws and nuts necessary for a professional installation Many of the terminals are non insulated...

Page 6: ...thru 20 These are available from just about any local auto part store electrical supply shop home improvement store or can be purchased online 4 Electric Drill Drill Bits 1 Electric Power Drill sugges...

Page 7: ...ed by Strap 1 but short enough that only insulation is crimped by Strap 2 The photo to the left best demonstrates this Using the appropriate jaw on the crimpers crimp Strap 1 The appropriate jaw depen...

Page 8: ...installation Painless recommends removing the dash panel or other surface on which you re mounting the Track Rocker Switch Panel On some applications this may not be possible Therefore be careful to...

Page 9: ...h this kit to create the appropriately sized hole for your switch panel To do this cut out the pattern tape it to your location and trace it onto your mounting surface Step 4 Then use your cutting too...

Page 10: ...he end of the loom with a zip tie Note It isn t necessary to loom the entire wiring harness as you will cut these wires to length later Simply loom a few feet and make sure the end near the switches i...

Page 11: ...7 Step 7 Put the Switch Panel in place on the mounting surface and use a sharpie to mark your drill points Step 8 Remove the Switch Panel and use a 13 64 or 7 drill bit to create the 4 mounting holes...

Page 12: ...l back in place and secure it to the mounting surface using 4 10 lock washers 4 10 flat washers 4 10 32 hex nut and 4 10 32 x 1 button head screws Use the small hex key provided in the parts kit and a...

Page 13: ...Relay Center Painless 58100 A 10 pin male connector housing was provided in the Fuse Relay Center s parts kit Terminals are provided in the parts kit in order to install the wires in this connector St...

Page 14: ...Secure the end of the loom with a zip tie provided or a large piece of heat shrink not provided Step 13 Strip each of the Switch Panel Wires 3 16 and install a female pin terminal from the parts kit o...

Page 15: ...e locating tab for orientation Step 15 Insert the newly pinned wires into the 10 pin connector housing Make sure while inserting the pins that once connected the wire color matches the one across from...

Page 16: ...connector should appear as it does to the left below Step 17 Link the two connectors and join the wiring harness from the Fuse Relay Center to the Switch Panel Use zip ties to secure the wires up unde...

Page 17: ...he lighted rocker switches included in your kit are wired as shown in the diagram below This kit also contains an optional Momentary On Switch for various applications such as a starter nitrous purge...

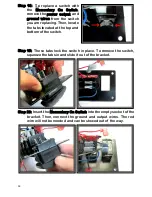
Page 18: ...e tabs located at the top and bottom of the switch Step 19 These tabs lock the switch in place To remove the switch squeeze the tabs in and slide it out of the bracket Step 20 Insert the Momentary On...

Page 19: ...Steps 21 22 are optional and only for those who wish to control multiple functions for one switch Step 21 Normally we recommend doubling the switches at the Ground Output terminal However the back of...

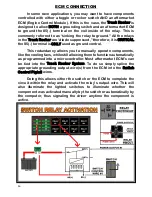
Page 20: ...as ground control This redundancy allows you to manually operate components like the cooling fans while still allowing them to function automatically as programmed into a microcontroller Most afterma...

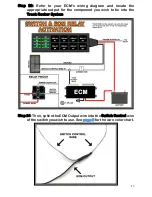
Page 21: ...iagram and locate the appropriate output for the component you wish to tie into the Track Rocker System Step 24 Then splice the ECM Output wire into the Switch Control wire of the switch you wish to u...

Page 22: ...18...

Page 23: ...to the original purchaser to be free from defects in material and workmanship under normal use Painless Performance will repair or replace defective products without charge during the first 12 months...

Page 24: ...Painless Performance Products LLC 2501 Ludelle Street Fort Worth TX 76105 Phone 817 244 6212...

Reviews: