background image

13

13

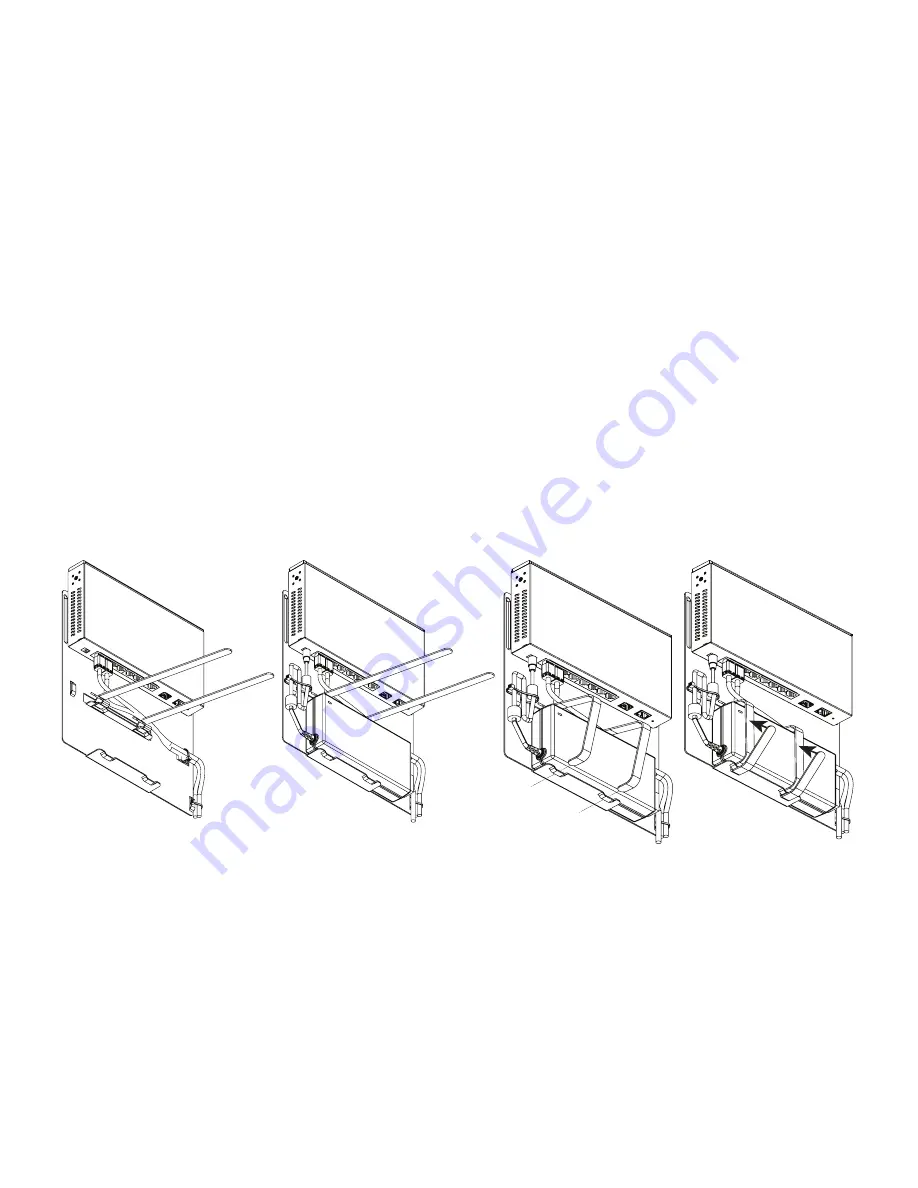
Plug in the appropriate Ethernet cables to the switch. Route cables as shown and secure 

them to the power adapter bracket with the supplied cable ties, if desired. 

Plug in the power adapter to the switch and place the power adapter on the power adapter 

bracket, as shown. Secure the power adapter cable to the power adapter bracket with the 

supplied cable ties, if desired. 

10 

Insert the Velcro strips into the anchor points on the power adapter bracket, as shown. 

11 

Loop the Velcro strips back up and around the anchor points and secure the Velcro strip to 

itself. Make sure that the power adapter is secured to the power adapter bracket. 

Summary of Contents for SX-8P

Page 1: ...SX 8P Managed Gigabit Switch with 8 Rear Facing PoE PoE Ports QUICK START GUIDE...

Page 2: ...2 2...

Page 3: ...bracket 8 Installing a wall mount with optional power adapter bracket 11 Logging in to the switch 14 Changing the IP address of the switch 15 Pakedge Zone VLAN setup 16 Manually configuring VLANs 17 C...

Page 4: ...ng needs The SX Series switches are encased in high end AV housings to appeal to customers demand for aesthetics The following chart defines the features of the SX 8P Port speeds 10 100 1000 Mbps SFP...

Page 5: ...9 port or USB to DB9 adapter may be necessary in order to use the console interface Ethernet cable Installation 1 Remove the switch from the box 2 Optional If mounting the switch in a standard 19 AV r...

Page 6: ...ecure the rack brackets to the faceplate bracket 2 Slide the switch into the center opening of faceplate bracket 3 Secure the rack bracket or faceplate bracket assembly to the switch Installing a rack...

Page 7: ...ter bracket with three threaded holes on the bottom of the switch as shown Secure the power adapter bracket to the bottom of the switch 2 Insert the Velcro strips into the anchor points on the power a...

Page 8: ...Ethernet cables to the switch Route the cables as shown and secure them to the power adapter bracket with the supplied cable ties if desired 6 Connect the power adapter to the switch and place the po...

Page 9: ...nto the anchor points on the power adapter bracket as shown 8 Loop the Velcro strips back up and around the anchor points and secure the Velcro strip to itself Make sure that the power adapter is secu...

Page 10: ...centerlines of the two mounting points should be 5 inches 140 mm 2 Install the supplied drywall anchors at marked locations Screw drywall screws into the drywall anchors leaving at least a 9 64 inch...

Page 11: ...e sure that the smooth side of the Velcro strip is facing the switch side of the power adapter bracket 2 Loop the Velcro strips around the anchor points and thread the Velcro strip through the opening...

Page 12: ...r adapter bracket with three threaded holes on the bottom of the switch as shown Secure the power adapter bracket to the bottom of the switch Note There are two mounting options Align the appropriate...

Page 13: ...the power adapter on the power adapter bracket as shown Secure the power adapter cable to the power adapter bracket with the supplied cable ties if desired 10 Insert the Velcro strips into the anchor...

Page 14: ...be left blank and then open any browser 4 In the browser enter the switch s default IP address of 192 168 1 205 into the address bar and press Enter A web page will appear asking you for a Username an...

Page 15: ...er the Subnet Mask and Gateway settings for your network By default on a Pakedge network the subnet mask is 255 255 255 0 and the Gateway is 192 168 1 99 3 Click Apply at the bottom of the page The sw...

Page 16: ...e the Pakedge Zones Pakedge Zones provide a simple way to configure the switch to match the specialized VLAN settings of a Pakedge network This new VLAN configuration page allows for very quick implem...

Page 17: ...uration Advanced 2 Under the Manage VLANs section click Add to input a new VLAN ID number and name then click Apply to save that VLAN to the switch VLAN IDs 1 6 are color coded to match the Pakedge Zo...

Page 18: ...5 To set ports in Hybrid mode one default VLAN and multiple tagged VLANs click the symbol under Hybrid You will then be in the Hybrid profile configuration mode 6 Select the untagged default VLAN to...

Page 19: ...l port You will also need to have either PuTTY or Terra Term to connect to the switch s command line console 2 Open PuTTY or Terra Term and enter the COM port that your computer is using and then set...

Page 20: ...interface 4 Type ip address 192 168 1 205 mask 255 255 255 0 and press Enter 5 Type ip default gateway 192 168 1 99 and press Enter optional The switch should now be accessible on its default IP addre...

Page 21: ...21 21...

Page 22: ...22 22...

Page 23: ...23 23...

Page 24: ...hnical inquires customerservice pakedge com 650 385 8701 For regulatory information www pakedge com regulatory DOC 00237 A 2016 08 23 MS 3847 Breakwater Avenue Hayward CA 94545 3606 Main 650 385 8700...

Reviews: