background image

Ke

ypad M

enu

Page 12

© JVA Technologies Pty. Ltd.  www.jva-fence.com

5.8.4 

Sub-menu programming

Sub-Menu Options Screen

Some programming options have to ‘>>‘ symbols displayed. To alter these 

settings, press the Right arrow when selected. This will open a sub-menu.

Selecting Options in the Sub-Menu Screen

These sub-menus have On/Off settings. Move the cursor using the Up or 

Down arrows and change the value using the Left or Right arrows. When 

finished, move the cursor to the top heading where the ‘<<’ symbol is dis

-

played and press the Left arrow.

Summary of Contents for JVA PTE0240

Page 1: ...JVA TECHNOLOGIES www jva fence com 4 Line LCD Keypad ...

Page 2: ...nu 8 5 2 MUTE SIREN 9 5 3 Event Log 9 5 4 Test Menu 9 5 5 Keypad Options 10 5 6 Setting the Clock 10 5 7 Remember User PIN 10 5 8 Program Device 11 5 8 1 Detection 11 5 8 2 Device Selection Menu 11 5 8 3 Device Programming 11 5 8 4 Sub menu programming 11 5 8 5 Save Cancel changes 12 5 8 6 Exiting Programming 12 5 9 Program this Keypad 12 5 9 1 Exiting Keypad Programming 12 5 9 2 Changing the Mess...

Page 3: ...eypad Manual Contents 7 1 Factory Reset 18 7 2 The Keypad is Un responsive 18 7 3 Non master Programming Issue 18 7 4 The Zone names are corrupted 18 7 5 an Energiser is always in coms fail 18 8 Common Keypad Commands 20 ...

Page 4: ...keypad to configure the JVA Security devices to the customer s needs 2 FEATURES AND BENEFITS The PTE0240 LCD keypad is a second generation Z Series Keypad Control monitor and program any Z Series device Displays arm disarmed status and any trouble or alarm Displays fence voltages for Z Series electric fence devices 4 line Backlit Liquid Crystal Display Programmable zone names Key area glows red on...

Page 5: ...HE KEYPAD Push the 4 side tabs in to release the cover from the base This can be done one side at a time Now the keypad hardware will slide up to release it from the base 3 2 WIRING The keypad only requires three wire connections to JVA energizers or mon itors as indicated ...

Page 6: ...achieved after each En ergiser Monitor has been configured and wired together in a group The display will show Analysing Group it will then list the discovered devices NOTE For this to work the Energizers need to be Disarmed 4 2 ARMING DISARMING THE FENCE Button Function Site Arm Press this followed by your user PIN to arm the site Site Disarm Press this followed by your user PIN to disarm the sit...

Page 7: ...scription 1 The Name of the Zone Zone Label 2 The Energizer Voltages 3 Alarms Troubles are displayed here Sincetherecanbemanythingstodisplay thekeypadautomatically scrolls through all relevant information Each screen is shown for approximately 5 seconds You can pause the auto scrolling for 20 seconds by pressing the key Pressing the key again will advance the display one screen If a new alarm or t...

Page 8: ...Power Mode Test Menu See 5 4 Test Menu on page 9 Keypad options See 5 5 Keypad Options on page 10 Set Clock See 5 6 Setting the Clock on page 10 Show Shortcuts Displays commonly used Key Sequences for refer ence Remember User PIN Saves the PIN so that the Menu Arm and Disarm buttons will not ask for a PIN Exit Exits the Keypad Menu Menu The following Menu items are only visible when the Installer ...

Page 9: ...essing the Up or Down key To exit the Event Log press the key The most recent entry is displayed when the log is first opened 5 4 TEST MENU Menu Function when key is pressed Analyse Group Discovers the Energizers connected to the Keypad Siren Test Turns on the Energiser Monitor Siren Outputs for 2 seconds Battery Test Triggers the Battery Test in connected Energizers Monitors See the LCD display o...

Page 10: ...eys to set the new value for the current cursor location Each number pressed will move the cursor to the right If the keypad de tects an error the cursor will return to the first location and the original date time will be displayed again The entire Time and Date needs to be entered before the new value is saved Pressing the Key at any time during the process will cancel the update 5 7 REMEMBER US...

Page 11: ...ttings Please refer to your Energizer Monitor user manuals for more information 5 8 2 Device Selection Menu Device Selection Screen Use the Up and Down arrows on the keypad to select the device you want to program Once highlighted press the key To exit programming press the Menu key 5 8 3 Device Programming The Keypad will display the current settings The flashing block on the right indicates the ...

Page 12: ... To alter these settings press the Right arrow when selected This will open a sub menu Selecting Options in the Sub Menu Screen These sub menus have On Off settings Move the cursor using the Up or Down arrows and change the value using the Left or Right arrows When finished move the cursor to the top heading where the symbol is dis played and press the Left arrow ...

Page 13: ...ress the key Cancelling Changes Screen Press the key to exit this device without making changes If you want to proceed press the key a second time If you want to continue editing press the key 5 8 6 Exiting Programming Exit Programming Screen Press the Menu key at any time while in device programming and the key pad will ask if you want to exit Programming mode Pressing will exit you back to the m...

Page 14: ...Dealer Service messages to be altered It also contains the Keypad Address The Local Settings order is SERVICE MESSAGE DEALER MESSAGE ZONE NAMES 1 16 BAUD RATE should be left at 2400 KEYPAD ADDRESS 5 9 1 Exiting Keypad Programming Function Key 1 Key 2 Exit Keypad Programming Note The keypad will also exit if you do not press a key in five minutes ...

Page 15: ...f the Multi Touch system using a web browser Access jva fence com multi 1 1 2 A B C 2 3 D E F 3 Emergency Move Cursor Left 4 G H I 4 5 J K L 5 6 M N O 6 Arm Move Cursor Right 7 P Q R S 7 8 T U V 8 9 W X Y Z 9 Disarm Upper Case Character Don t save and display previous 0 space 0 Save and display next setting Menu Lower Case Character Text Setting Multi Touch Entry The Multi Touch entry system is ba...

Page 16: ...essing the Key will Save the message and move on to the next message Pressing the Key will discard any changes to the current message and move to the last message 1 2 Up Arrow Increase Value 3 Emergency 4 5 6 Arm 7 8 Down Arrow Decrease Value 9 Disarm Don t save and display previous 0 Save and display next setting Menu Number Setting Arrow Entry The Keypad BAUD Keypad ID options can be changed usi...

Page 17: ...ess all can be connected to the system A recommendation is that one keypad is kept at address 1 If the security system is to use a PC based interface such as Perimeter Pa trol keypad address 2 should not be used by a keypad The PC software uses this address to control the Z Series devices The Z Series master device now needs to be introduced to all of these key pads This is achieved by resetting t...

Page 18: ...Group Connection Page 18 JVA Technologies Pty Ltd www jva fence com 6 2 WIRING ...

Page 19: ...pad Be patient Wait a few seconds and try again 7 3 NON MASTER PROGRAMMING ISSUE Connecting directly to a Energiser Monitor that is not the Master device requires the Keypad to have a Keypad Address of 1 The Keypad Address is displayed when power is connected to it 9 will also display this 7 4 THE ZONE NAMES ARE CORRUPTED Something has gone wrong with the Keypad s Internal Memory Suggest performin...

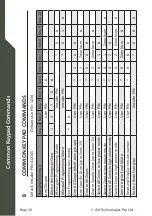
Page 20: ...N 0 1 Exit Programming any mode Arm All Zones Multi zone groups User PIN 1 0 Arm Specific Zone up to Zone 15 User PIN 1 Zone Num Disarm All Zones User PIN 2 0 Disarm Specific Zone up to Zone 15 User PIN 2 Zone Num Switch All Zones to low power mode User PIN 4 1 Switch Zone to low power mode User PIN 4 1 Zone Num Switch All Zones to high power mode User PIN 4 2 Switch Zone to high power mode User P...

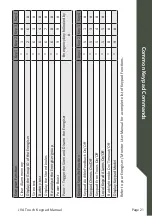
Page 21: ...alyse the Energiser group 6 8 Power Boost 9 9 Panic Trigger the Siren and Disarm the Energiser Emergency key followed by Keypad Specific Function Key 1 Key 2 Key 3 Key 4 Keypad Audible Feedback On Off 5 1 Keypad Chimes On Off 5 3 Keypad Error Tones On Off 5 4 Local Keypad Alarms On Off 5 5 Backlight mode On Timeout Off 8 Display Keypad Model 9 Refer to your Energiser Monitor User Manual for a comp...

Page 22: ...DEALER www jva fence com ...

Reviews: