23
51-4771
MAINTENANCE
REPLACING BRUSH SECTIONS
1.
Remove four klik pins securing motor to sweeper. Remove motor bucket mount with
motor. Retain hardware for reinstallation.
2.
Remove bearing assembly: Remove three klik pins, center capscrew and idler shaft.
Retain hardware for reinstallation.
3.
Lift sweeper body leaving core on ground.
4.
Remove the core retainer plate. Retain hardware for reinstallation.
5.
Remove old sections.
6.
Stand the core on end and install new sections:
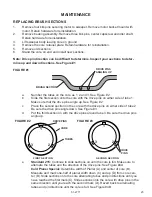
Note: Drive pin direction can be difficult to determine. Inspect your sections to deter
-
mine up and down directions. See Figure #1
e.
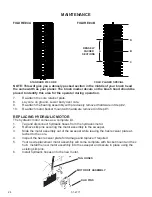
Standard 215:
Continue to slide sections on until the core is full. Make sure to
alternate the tubes and the direction of the drive pins. See Figure #4A
Cold Planer Special:
Determine width of Planer (A) and center of core (B).
Measure and mark one-half of planer width down (C) and up (D) from core cen
-
ter (B). Slide sections onto the core alternating tubes and pin directions until you
have reached the first mark (C). Slide sections onto the core with drive pins in the
same direction until you reach the second mark (D). Revert back to alternating
tubes and pin directions until the core is full. See Figure #4B
FIGURE #2
FIGURE #1
FIRST SECTION
DRIVE PINS
CORE
TUBES
1
2
3
SECOND SECTION
FIGURE #3
DRIVE
PINS
1
2
3
BRUSH SECTION
DRIVE PINS
ANGLING UP
a.
Number the tubes on the core as 1, 2 and 3. See Figure #2
b.
Slide the first section onto the core with the drive pins on either side of tube 1.
Make sure that the drive pins angle up. See Figure #2
c.
Place the second section on the core with the drive pins on either side of tube 2.
Be sure the drive pins angle down. See Figure #3
d.
Put the third section on with the drive pins around tube 3. Be sure the drive pins
angle up.


