ECOFORNO
cod.
004722380
- 11/2009
11/16
2
MANUTENZIONE E PULIZIA
2.1
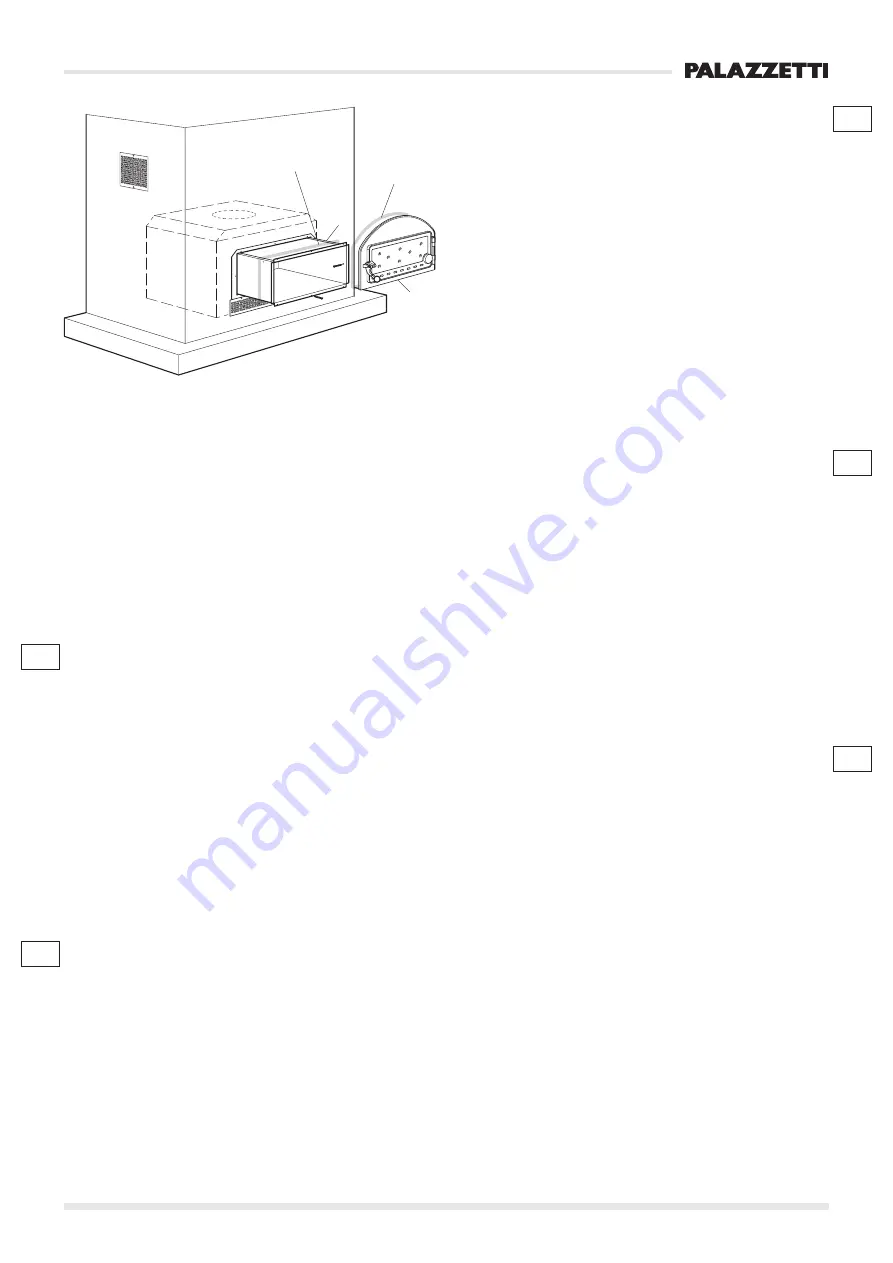
PULIZIA DELLO SCAMBIATORE GIROFUMI (Fig. 2)
(ANNUALE O SECONDO NECESSITÀ)
• Togliere la portina (P) aprendo l’anta e svitando le
due viti poste lateralmente alla cornice interna.
• Estrarre il vano forno (F) in acciaio inox svitando le viti
poste sulla cornice quindi le viti di fissaggio dei
supporti interni della leccarda.
• Aspirare le eventuali ceneri depositate e rimontare il
tutto facendo attenzione che la guarnizione di tenuta
portina ritorni in sede.
Fig 2: (A) guarnizione vano forno; (B) guarnizione
portina.
2
MAINTENANCE AND CLEANING
2.1
CLEANING THE BAFFLE PLATE EXCHANGER
(FIG. 2) (YEARLY OR AS NEEDED)
• Remove the door (P) by opening it and unscrewing
the two screws on the side of the inner frame.
• Extract the oven chamber (F) in stainless steel by
unscrewing the screws on the frame, then the screws
that secure the internal supports of the drip pan.
• Vacuum up any ashes and reassemble all. Make
sure the door gaskets are put back in their place.
Fig 2: (A) oven chamber gasket; (B) door gasket.
Fig. 2
F
P
B
A
2
WARTUNG UND REINIGUNG
2.1
REINIGUNG DES AUSTAUSCHER DER
RAUCHROHRZÜGE (ABB. 2) (JÄHRLICH ODER
NACH BEDARF)
Die Klappe (P) entfernen: Die Tür öffnen und die
beiden seitlich am Innenrahmen befindlichen
Schrauben abschrauben.
Das Backfach (F) aus Edelstahl herausziehen, indem
Sie zuerst die Schrauben am Rahmen und dann die
Befestigungsschrauben der Innenhalterungen der
Fettpfanne abschrauben.
Abgelagerte Aschenreste aufsaugen und das Ganze
wieder montieren, darauf achten, dass die Dichtung
der Klappe wieder in ihrem Sitz untergebracht wird.
Abb. 2: (A) Dichtung Backofenfach; (B)
Klappendichtung.
2
ENTRETIEN ET NETTOYAGE
2.1
NETTOYAGE DE L'ÉCHANGEUR DES FUMÉES
(FIG. 2) (ANNUEL OU SELON LES NÉCESSITÉS)
• Retirer la porte (P) en ouvrant la porte et en dévissant
les deux vis placées latéralement au cadre interne.
• Extraire l'enceinte du four (F) en acier inox en
dévissant les vis placées sur le cadre, puis celles de
fixation des supports internes de la lèchefrite.
• Aspirer les éventuelles cendres déposées et
remonter le tout en faisant attention à ce que le joint
d'étanchéité de la porte retourne dans son logement.
Fig 2: (A) joint de l'enceinte du four; (B) joint de la
porte.
2
MANTENIMIENTO Y LIMPIEZA
2.1
LIMPIEZA DEL INTERCAMBIADOR DEL
CIRCUITO DE HUMOS (FIG. 2) (ANUAL O
CUANDO SEA NECESARIO)
• Extraiga la puerta (P) abriendo la hoja y
desenroscando los dos tornillos colocados a los
lados del marco interior.
• Extraiga el compartimento del horno (F) de acero
inoxidable desenroscando los tornillos colocados en
el marco y luego los tornillos de fijación de los
soportes internos de la grasera.
• Aspire las cenizas que se puedan haber depositado
y vuelva a montar el conjunto con cuidado de que la
junta hermética de la puerta vuelva a su alojamiento.
Fig 2: (A) junta del compartimento del horno; (B) junta
de la puerta.
IT
GB
D
F
ES


