48
004779040 - 21/03/2022
8 OPERATION
When handling hot parts (e.g. door)
use the supplied glove.
8.1 Power on
• Open the door using the cold handle, inserting
it into the appropriate slot and turning it up-
wards.
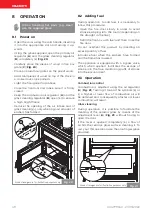
• Using the glove supplied, open the primary air
regulator (
A
) and the glass cleaning regulator
(
B
) completely (
+
) (
Fig. 20
).
• Carefully place the pieces of wood in fire box
grate (
C
) (
Fig. 20
).
• Place a natural fire-igniter on the pile of wood.
• Add small pieces of wood on top of the stack in
a crossed over-type pattern.
• Light the fire-igniter from above.
• Close the fire door and make sure it is firmly
closed.
• Keep the combustion air regulator (
A
) and the
glass cleaning regulator (
B
) open (
+
) to ensure
a high, bright flame.
• Reduce the opening of the air intake and of
glass cleaning (
-
) only when a good amount of
embers has formed.
-
+
+
-
C
B
A
Product images are for illustrative purposes only
Fig. 20
8.2 Adding fuel
During operation, to add fuel, it is necessary to
follow this procedure:
• Open the fire door slowly in order to avoid
smoke escaping into the room (depending on
the draught in the flue).
• Refill the fire box with fuel and then close the
fire door.
Do not overheat the product by inserting an
excess quantity of fuel.
Introduce fuel when the embers have formed
and the flame has lowered.
The appliance is equipped with a bypass valve,
which, when opened, facilitates the escape of
smoke into the flue, minimising puffs of smoke
into the environment.
8.3 Operation
Combustion control
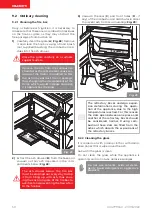
Combustion is adjusted using the air regulator
(
A
) (
Fig. 21
). Turning it toward the symbols (
+
) or
(
-
) a higher or lower flow of combustion air will
be obtained and consequently a faster or slower
combustion will result.
Glass cleaning
During operation, it is possible to facilitate the
cleaning of the ceramic glass by means of the
adjustment lever (
A
) (
Fig. 21
) without having to
open the door.
If the lever is opened completely (
+
) a flow of
air hits the ceramic glass surface, cleaning it. To
carry out this operation, use the one-finger glove
provided.
A
Product images are for illustrative purposes only
Fig. 21

