4
Cod. 004771660 - 05/2012 - Palazzetti - PN - Italy
CARATTERISTICHE SPECIFICHE DEL MODELLO
MODEL SPECIFIC FEATURES - CARACTÉRISTIQUES SPÉCIFIQUES DU MODÈLE - BESONDERHEI-
TEN DES MODELLS - CARACTERÍSTICAS ESPECÍFICAS DEL MODELO
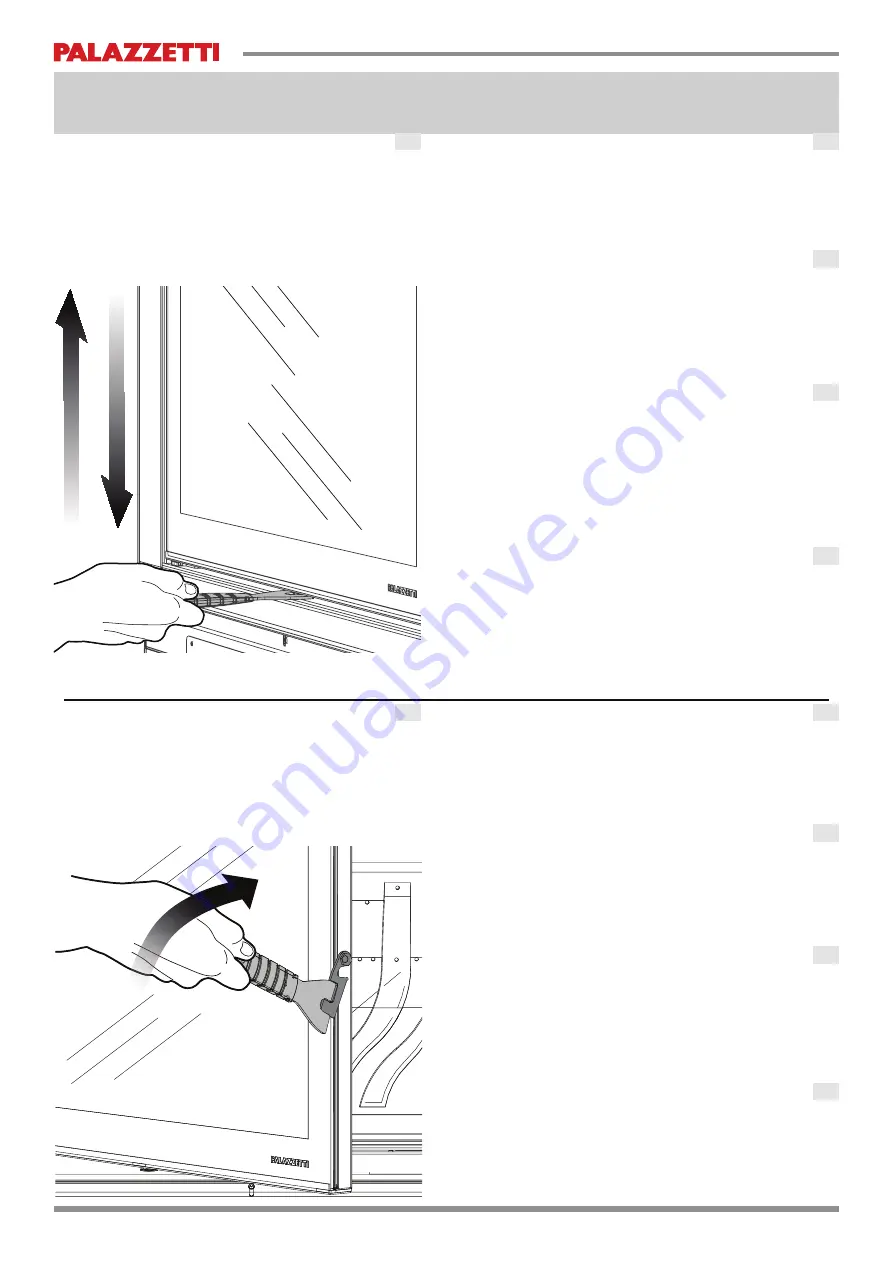
OPENING THE DOOR
To clean the glass, it is necessary to open the door by
using the handle provided. Insert the handle in the pin
on the right side of the glass, and rotate to unlock the
mechanism. Rotate in the opposite direction to close
the door.
OUVERTURE DE LA PORTE
Pour effectuer le nettoyage du verre est nécessaire pour
ouvrir la porte à charnière agissant avec la poignée
disposée sur la broche sur le côté droit de la vitre et
tourner pour déverrouiller le mécanisme. Répétez dans
l’autre sens pour fermer la porte.
TÜR-ÖFFNUNG
Um die Glasscheibe zu reinigen, öffnen Sie die Flügeltür
durch den mitgelieferten Griff: stecken Sie den Griff an
dem Stift auf der rechten Seite des Glases ein und drehen
Sie den Werkzeug, um die Schließung zu öffnen. Um die
Flügeltür wieder zu schließen, drehen Sie den Griff in die
Gegenrichtung.
APERTURA DE LA PUERTA
Para llevar a cabo la limpieza del vidrio, abrir la puerta
abatible, actuando, con la llave suministrada, en el
pasador, en el lado derecho del cristal y girar para
desbloquear el mecanismo. Repita en la otra dirección
para cerrar la puerta.
COME USARE LA PORTINA
Se non si è scelto di montare la maniglia estetica,
l’apertura e la chiusura dell’anta scorrevole si ottiene
inserendo l’apposita maniglia fredda in dotazione, nel
perno centrale posto alla base della portina, e spingendo
in alto o in basso l’anta.
APERTURA DELLA PORTINA
Per effettuare la pulizia del vetro è necessario aprire l’anta
a battente agendo con la maniglia in dotazione sul perno
il meccanismo. Ripetere l’operazione al contrario per
richiudere l’anta.
USING THE DOOR
If you chose not to install the aesthetic handle, to open
and close the sliding door, insert the supplied cold handle
in the central pin at the base of the door, and then push
the panel up or down.
COMMENT UTILISER LA PORTE
Si on choisit de ne pas monter l’esthétique de poignée,
l’ouverture et la fermeture de la porte coulissante est
obtenu par l’insertion de la poignée fournie à froid, dans
l’axe central à la base de la porte, et en poussant vers
le bas ou l ‘porte.
TÜR-BEDIENUNG
Wenn man nicht den ästhetischen Handgriff montieren
möchte, erfolgt die Öffnung und Schließung der
Schiebetür durch das Einführen des mitgelieferten Griffs.
Dieser Griff muss in den Tür-Stift (unten in der Mitte
der Tür) eingesteckt werden. Durch das Schieben nach
oben oder unten kann die Tür geöffnet oder geschlossen
werden.
COMO USAR LA PUERTA
Si ha elegido no montar la manilla, la apertura y el cierre
de la puerta corredera se realiza insertando el mango
frío, suministrado en dotación, en el eje central de la
base de la puerta, y empujando hacia arriba o hacia
abajo la puerta.
ES
ES
DE
DE
FR
FR
EN
EN
IT
IT


