background image

60


ALLGEMEINE KONZEPTE


  Vom Hersteller werden ausschließlich die oben 

genannte Zweckbestimmung und die vorgesehenen 

.RQ¿JXUDWLRQHQGHV2IHQVJHQHKPLJW'HU2IHQGDUI

nicht in Abweichung von diesen Vorgaben benutzt 
werden.

1.3  ZWECK UND INHALT DES HANDBUCHS

Dieses Handbuch enthält die wesentlichen und 

JUXQGOHJHQGHQ5HJHOQIUHLQHNRUUHNWH,QVWDOODWLRQ

Wartung und Benutzung des Produkts. Durch 

GLH JHQDXH %HIROJXQJ GHU GDULQ EHVFKULHEHQHQ

Anleitungen wird ein Höchstmaß an Sicherheit und 

3URGXNWLYLWlWGHV2IHQVJDUDQWLHUW

1.4  AUFBEWAHRUNG DES HANDBUCHS

A

UFBEWAHRUNG


UND

 N

ACHSCHLAGEN

'DV +DQGEXFK PXVV VRUJIlOWLJ YHUZDKUW ZHUGHQ

und jederzeit sowohl dem Benutzer als auch 
den Installations- und Wartungstechnikern zum 

1DFKVFKODJHQ]XU9HUIJXQJVWHKHQ

Das Installationshandbuch ist ein wesentlicher 

%HVWDQGWHLOGHV2IHQV

B

ESCHÄDIGUNG


ODER

 V

ERLUST

,P%HGDUIVIDOONDQQEHLGHU)LUPD3$/$==(77,HLQH

.RSLHDQJHIRUGHUWZHUGHQ

V

ERÄUSSERUNG


DES

 O

FENS

%HL 9HUlX‰HUXQJ GHV 2IHQV LVW GHU %HQXW]HU

YHUSÀLFKWHW GHP .lXIHU DXFK DQGEXFK

auszuhändigen.

1.5  AKTUALISIERUNG DES HANDBUCHS

Das vorliegende Handbuch entspricht dem Stand 
der Technik zum Zeitpunkt des Inverkehrbringens.

1.6 ALLGEMEINES

I

NFORMATIONEN

%HL$XVWDXVFKYRQ,QIRUPDWLRQHHUVWHOOHU

GHV2IHQVVLQGGLH6HULHQQXPPHUVRZLHGLHDXIGHP

7\SHQVFKLOG GHV 3URGXNWV DXIJHIKUWHQ .HQQGDWHQ

anzugeben.

A

USSERORDENTLICHE

 W

ARTUNG

$X‰HURUGHQWOLFKH :DUWXQJVDUEHLWHQ PVVHQ YRQ

TXDOL¿]LHUWHP )DFKSHUVRQDO GXUFKJHIKUW ZHUGHQ

GDV ]X (LQJULIIHQ DQ GHP LQ DQGEXFK

EHVFKULHEHQHQ2IHQPRGHOOEHIlKLJWLVW

V

ERANTWORTUNG


FÜR


DIE

 I

NSTALLATIONSARBEITEN

)U GLH ,QVWDOODWLRQVDUEHLWHQ GHV 2IHQV LVW

die Firma PALAZZETTI nicht verantwortlich. 
Diese Verantwortung liegt und bleibt beim 

,QVWDOODWLRQVWHFKQLNHU GHU IU GLH 3UIXQJHQ

GHV 6FKRUQVWHLQURKUV XQG GHV /XIWHLQODVVHV

sowie der Richtigkeit der vorgeschlagenen 
Installationslösungen zuständig ist. Außerdem sind 

VlPWOLFKHYRQGHQHLQVFKOlJLJHQLP,QVWDOODWLRQVODQG

GHV 2IHQV JOWLJHQ *HVHW]HQ YRUJHVFKULHEHQHQ

6LFKHUKHLWVEHVWLPPXQJHQ]XEHIROJHQ

G

EBRAUCH

'HU 2IHQ GDUI QXU JHPl‰ GHQ LP +DQGEXFK

HQWKDOWHQHQ 9RUVFKULIWHQ XQG XQWHU (LQKDOWXQJ

GHU HLQVFKOlJLJHQ YRQ GHQ LP ,QVWDOODWLRQVODQG

GHV 2IHQV JOWLJHQ *HVHW]HQ YRUJHVFKULHEHQHQ

Sicherheitsbestimmungen benutzt werden.

1 ALLGEMEINES 

VORWORT

Die Heizgeräte von PALAZZETTI werden unter 

%HIROJXQJGHULQGHQHXURSlLVFKHQ%H]XJVULFKWOLQLHQ

JHQDQQWHQ 6LFKHUKHLWVYRUVFKULIWHQ JHEDXW XQG

JHSUIW

Dieses Handbuch ist wesentlicher Bestandteil 

GHV 3URGXNWV XQG IU GLH (LJHQWPHU GHV 2IHQV

VRZLH IU GLH ,QVWDOODWLRQVWHFKQLNHU %HWUHLEHU XQG

:DUWXQJVWHFKQLNHUYRQgIHQ,P=ZHLIHOVIDOOXQGIU

HYHQWXHOOH5FNIUDJHQZHQGHQ6LHVLFKELWWHDQGHQ

Hersteller oder an den Vertragskundendienst unter 

$QJDEHGHU1XPPHUGHVEHWUHIIHQGHQ.DSLWHOV
'UXFN hEHUVHW]XQJ XQG GHU DXFK DXVVFKQLWWZHLVH

Nachdruck dieses Handbuchs sind nur nach 
Genehmigung von PALAZZETTI zulässig. Die 
in diesem Handbuch enthaltenen technischen 

,QIRUPDWLRQHQ

JUD¿VFKHQ

'DUVWHOOXQJHQ

XQG

6SH]L¿NDWLRQHQGUIHQQLFKWDQ'ULWWHZHLWHUJHJHEHQ

werden.

'HU2IHQGDUIQLFKWEHGLHQWZHUGHQZHQQQLFKWDOOH

im Handbuch enthaltenen Angaben verstanden 

ZXUGHQELWWHQ6LHLP=ZHLIHOVIDOOLPPHUXP5DWRGHU

IRUGHUQ6LHGHQ(LQJULIIYRQ)DFKSHUVRQDOGHU)LUPD

PALAZZETTI an.

3$/$==(77,EHKlOWVLFKGDV5HFKWYRU6SH]L¿NDWLRQHQ

XQGWHFKQLVFKHXQGRGHUIXQNWLRQHOOH0HUNPDOHGHV

2IHQVMHGHU]HLWXQGRKQH9RUDQNQGLJXQJ]XlQGHUQ

1.1 VERWENDETE 

SYMBOLE

Besonders wichtige Punkte sind im vorliegenden 

+DQGEXFKPLWIROJHQGHQ6\PEROHQJHNHQQ]HLFKQHW


HINWEIS:

 Hinweise zum korrekten Gebrauch des 

2IHQVXQG]XU9HUDQWZRUWXQJGHU%HGLHQXQJVSHUVRQHQ


ACHTUNG

 'LHVHU 3XQNW HQWKlOW HLQHQ EHVRQGHUV

wichtigen Hinweis.


GEFAHR

 :LFKWLJH$QOHLWXQJ ]XU 9HUPHLGXQJ YRQ

8QIlOOHQRGHU0DWHULDOVFKlGHQ

1.2 ZWECKBESTIMMUNG


Das erworbene Produkt ist eine Feuerstätte zum 

9HUNOHLGHQIUGHQLQWHUQHQKlXVOLFKHQ*HEUDXFK

DOV 5DXPKHL]XQJ ZHOFKH PLW +RO] RGHU 3HOOHWV

EHIHXHUW ZHUGHQ NDQQ PLW $XWRPDWLNEHWULHE IU

3HOOHWV VRZLH $XWRPDWLNEHWULHE XQG PDQXHOOHP

%HWULHEIU+RO]
'HU +HL]RIHQ IXQNWLRQLHUW QXU PLW JHVFKORVVHQHU

)HXHUUDXPWU
'LH 2IHQWU GDUI ZlKUHQG GHV 2IHQEHWULHEV QLH

JH|IIQHW ZHUGHQ DX‰HU EHL +RO]EHWULHE ]XP

Nachlegen von Holz.  


 'LHVHV *HUlW LVW QLFKW GDIU EHVWLPPW GXUFK

3HUVRQHQHLQVFKOLH‰OLFK.LQGHUPLWHLQJHVFKUlQNWHQ

SK\VLVFKHQVHQVRULVFKHQRGHUJHLVWLJHQ)lKLJNHLWHQ

RGHUPDQJHOV(UIDKUXQJXQGRGHUPDQJHOV:LVVHQ

EHQXW]W]XZHUGHQHVVHLGHQQVLHZHUGHQGXUFKHLQH

IU LKUH 6LFKHUKHLW ]XVWlQGLJH 3HUVRQ EHDXIVLFKWLJW

RGHUHUKLHOWHQYRQLKU$QZHLVXQJHQZLHGDV*HUlW

zu benutzen ist.

Summary of Contents for MULTIFIRE BIO 9

Page 1: ...on Wartung und Verwendung dieAnleitungen stets aufmerksam durchlesen Le pr sent manuel fait partie int grante du produit Il est conseill de lire attentivement les consignes avant l installation l entr...

Page 2: ...ous avez accord e en achetant notre produit et vous f licitions pour votre choix Q GH YRXV SHUPHWWUH GH SUR WHU DX PLHX GH YRWUH QRXYHDX SRrOH QRXV YRXV LQYLWRQV j suivre attentivement les instruction...

Page 3: ...LAMENTO DELLA STUFA 6 2 ALLACCIAMENTO AGLI IMPIANTI 6 3 CONFIGURAZIONE INIZIALE 7 DESCRIZIONE DELLA STUFA 7 1 PANNELLO COMANDI 7 2 USO DEL PANNELLO COMANDI 7 3 PARAMETRI DI FUNZIONAMENTO 8 OPERAZIONI...

Page 4: ...collaudate seguendo le prescrizioni di sicurezza indicate nelle direttive europee di riferimento Questo manuale indirizzato ai proprietari della stufa agli installatori utilizzatori e manutentori ed p...

Page 5: ...TTI declina ogni responsabilit sia civile che penale diretta o indiretta dovuta a LQVWDOOD LRQH QRQ FRQIRUPH DOOH QRUPDWLYH vigenti nel paese ed alle direttive di sicurezza LQRVVHUYDQ D SDU LDOH R WRW...

Page 6: ...ttriche elettroniche e connettori 2 3 AVVERTENZE PER L UTILIZZATORE Predisporre il luogo d installazione della stufa secondoiregolamentilocali nazionaleedeuropei D VWXID HVVHQGR XQ SURGRWWR GD ULVFDOG...

Page 7: ...o di legna possiede carat WHULVWLFKH GLYHUVH FKH LQ XHQ DQR DQFKH LO UHQGL mento della combustione L uso delle conifere pino abete sconsigliato contengono elevate quantit di sostanze resinose che inta...

Page 8: ...VLFKH H GHYH YHUL FDUH FKH L GLVSRVLWLYL DQWLQIRUWXQLVWLFL individuali e personali siano integri e perfettamente funzionanti C deve indossare i guanti antinfortunistici D deve indossare scarpe antinf...

Page 9: ...attraverso una SUHVD G DULD HVWHUQD DO ORFDOH VWHVVR J Se la parete posteriore della stufa una parete esterna realizzare un foro per l aspirazione dell aria comburente ad una altezza dal suolo di cir...

Page 10: ...mo in proiezione orizzontale non maggiore di 2 metri Utilizzare sempre un raccordo con tappo di ispezione ad ogni variazione orizzontale e verticale del percorso di scarico fumi Ancorare le tubazioni...

Page 11: ...1 1 Messa a terra obbligatorio che l impianto sia provvisto di messa a terra e di interruttore differenziale in ottemperanza alle leggi vigenti Fig 6 2 Il condotto di scarico fumi deve essere dotato...

Page 12: ...razione si rende necessaria anche nell eventualit che ci sia una interruzione di alimentazione elettrica o qualora l apparecchio venga spento manualmente Onde evitare sovrapposizioni di fasce orarie d...

Page 13: ...ermare RSR DYHU PRGL FDWR OD FRQ JXUD LRQH SRWUHEEH DSSDULUH XQ PHVVDJJLR GL HUURUH GL FRPXQLFD LRQH SHU qualche secondo Ignorarlo e spegnere l apparecchio dall interruttore di sicurezza attendere qua...

Page 14: ...14 USO E MANUTENZIONE USO E MANUTENZIONE...

Page 15: ...r la conferma del parametro o della selezione 7XWWL L WDVWL VRQR GL WLSR FDSDFLWLYR SHUWDQWR QRQ QHFHVVLWDQR GL XQD SUHVVLRQH SHU HVVHUH DWWLYDWL ma q VXI FLHQWH V RUDUQH OD VXSHU FLH 7 1 1 Led di sta...

Page 16: ...ella quale la stufa si riaccende solo in FRQ JXUD LRQH 0 5 5 0 C 9 Temperatura antigelo Temperatura minima al di sotto della quale la stufa si DFFHQGH VROR LQ FRQ JXUD LRQH OFF 3 20 C 10 Blocco tastie...

Page 17: ...DORUH FRQ L WDVWL OFF esclude completamente la ventilazione e la stufa funzioner solo a convezione naturale solo nei modelli dove previsto 1 minimo 5 massimo Auto funzionamento automatico la stufa imp...

Page 18: ...unghi periodi di inutilizzo si consiglia di posizionare l interruttore in posizione di OFF 0 Fig 8 2 Assicurarsidinontoccareilpannellodicomandonel momento in cui viene data alimentazione alla stufa Il...

Page 19: ...Viene visualizzata la temperatura letta dalla sonda ambiente 3 Viene visualizzata l ora corrente 4 Viene visualizzata l autonomia in ore prima di dover ricaricare il serbatoio se la funzione rifornime...

Page 20: ...caricamento del pellet 3 accendere la legna 4 richiudere la portina La stufa regola automaticamente il fabbisogno di aria comburente PERICOLO Per accendere il fuoco non usare mai alcool benzina cheros...

Page 21: ...tione della legna la stufa effettuer un ciclo automatico di pulizia del braciere Per effettuare una nuova accensione si consiglia di attendere che la stufa si sia completamente raffreddata 9 5 2 Spegn...

Page 22: ...emere il tasto i DPSHJJHUj LO YDORUH GHOOD WHPSHUDWXUD GHVLGHUDWD PRGL FDUQH LO YDORUH FRQ L WDVWL e j Premere il tasto per confermare i dati impostati 10 1 2 Assegnare i programmi ai giorni RQ TXHVWD...

Page 23: ...rd 7 con il tasto e confermare con il tasto c Selezionare il sottomenu 8 e confermare con il tasto d DPSHJJHUj LO YDORUH PRGL FDUOR FRQ L WDVWL e 0 5 5 0 C e Premere il tasto per confermare il dato im...

Page 24: ...il tasto per confermare il dato impostato 10 9 ATTIVAZIONE MANUALE DEL SISTEMA DI CARICAMENTO PELLET All atto della prima accensione o qualora il serbatoio risulti completamente vuoto possibile una v...

Page 25: ...5 Allarme sonda pellet Sonda pellet scollegata o difettosa E106 Malfunzionamento sonda di temperatura Sonda aria difettosa E107 Malfunzionamento sonda camera di combustione Sonda difettosa E108 Errore...

Page 26: ...USL HVWUDQHL GDO EUDFLHUH 6H TXHVWL VRQR ULPDVWL EORFFDWL q QHFHVVDULR SURFHGHUH FRQ O WWLYD LRQH 0DQXDOH GHO 6LVWHPD 0HFFDQLFR GL SXOL LD GHO UDFLHUH a Agendo sui tasti freccia portarsi sul menu setu...

Page 27: ...ALL UTILIZZATORE 12 2 1 Pulizia interna del focolare La stufa necessita di una semplice ma frequente ed accurata pulizia per poter garantire sempre XQ HI FLHQWH UHQGLPHQWR HG XQ UHJRODUH funzionamento...

Page 28: ...r vetri di stufe Non pulire il vetro durante il funzionamento della stufa e non utilizzare spugne abrasive Non inumidire la guarnizione della portina perch potrebbe deteriorarsi 12 2 4 Pulizia della c...

Page 29: ...aciere X Condotto di evacuazione fumi X Ventilatori X a cura del centro di Assistenza Tecnica Autorizzato 13 DEMOLIZIONE E SMALTIMENTO La demolizione e lo smaltimento della stufa sono ad esclusivo car...

Page 30: ......

Page 31: ...CONNECTIONS 6 3 INITIAL CONFIGURATION 7 STOVE DESCRIPTION 7 1 CONTROL PANEL 7 2 USING THE CONTROL PANEL 7 3 OPERATING PARAMETERS 8 PRELIMINARY OPERATIONS 8 1 LOADING THE PELLETS 8 2 POWER SUPPLY 8 3...

Page 32: ...in accordance with the safety requirements VSHFL HG E WKH UHOHYDQW XURSHDQ GLUHFWLYHV This manual is intended for owners installers users and maintenance personnel and is an integral part of the prod...

Page 33: ...By providing this manual PALAZZETTI declines all liability both civil and criminal direct or indirect deriving from installation not in compliance with the standards in force in the country concerned...

Page 34: ...INGS FOR THE USER Prepare the stove installation site in accordance with local national and European regulations As the stove is a heating appliance it has very hot outside surfaces For this reason ma...

Page 35: ...sually contains high quantities of resinous VXEVWDQFHV WKDW TXLFNO EORFN WKH XH The following cannot be burned wood scrap bark painted wood panels charcoal plastics in these cases the warranty on the...

Page 36: ...sure that personal protective equipment is in perfectly working order C always wear safety gloves D always wear safety shoes E always use electrically insulated tools F make sure that the area being...

Page 37: ...opening to the outside from the room J If the wall behind of the stove is an outside wall make an opening for drawing in combustion air DURXQG FP DERYH WKH RRU REVHUYLQJ WKH dimensions shown on the p...

Page 38: ...KH ZDOO XVLQJ VSHFLDO FROODUV 7KH XH JDV H KDXVW DWWDFKPHQW 0867 127 connected to a chimney used by other heat generators ERLOHUV VWRYHV UHSODFHV HWF air exhaust systems range hoods vents etc even if...

Page 39: ...ed E WKH WHFKQLFDO VHUYLFH RU D TXDOL HG WHFKQLFLDQ to prevent any kind of risk 6 2 1 1 Earth 7KH V VWHP PXVW EH HDUWKHG DQG WWHG ZLWK D residual current circuit breaker in accordance with legislation...

Page 40: ...LQJ WKH WLPHU WKHUPRVWDW WKH VWRYH needs to be switched on manually while the timer thermostat is in call status This operation is also required in the event of power failures or if the stove is switc...

Page 41: ...RQ D FRPPXQLFDWLRQ HUURU PHVVDJH PD EH GLVSOD HG IRU D IHZ seconds Ignore this and switch the stove off using the safety switch wait a few seconds and switch it back on TWO DIFFERENT CONFIGURATIONS AR...

Page 42: ...42 USE AND MAINTENANCE USE AND MAINTENANCE...

Page 43: ...he settings All the buttons are capacitive therefore the functions are activated without needing to press hard on the buttons rather by just touching the surface 7 1 1 Status leds ICON WARNING DESCRIP...

Page 44: ...Difference in degrees from room temperature below which WKH VWRYH VZLWFKHV RQ DJDLQ RQO LQ FRQ JXUDWLRQ 0 5 5 0 C 9 Frost protection temperature Minimum temperature below which the stove switches on R...

Page 45: ...the value by pressing OFF the fan is completely excluded and the stove will work with natural convection only only on models where featured 1 minimun 5 maximum Auto automatic functioning the stove wil...

Page 46: ...e sure not to touch the control panel while plugging the stove into the power supply If not using the appliance for an extended period the switch should be moved to position OFF 0 J The stove will onl...

Page 47: ...yed cyclically 2 The room probe temperature is shown 3 The current time is shown 4 7KH RSHUDWLQJ DXWRQRP LQ KRXUV EHIRUH KDYLQJ WR UH OO WKH KRSSHU LV VKRZQ If the function OOLQJ KDV EHHQ DFWLYDWHG LQ...

Page 48: ...be 3 ignite the wood 4 close the door again The stove automatically adjusts the combustion air intake DANGER 1HYHU XVH DOFRKRO SHWURO NHURVHQH RU RWKHU OLTXLG IXHOV WR LJQLWH WKH UH HHS VXFK VXEVWDQFH...

Page 49: ...H Wait until the stove has completely cooled down before starting it again 9 5 2 Switching off in pellet mode To switch the stove off in pellet operating mode hold the EXWWRQ IRU D IHZ VHFRQGV WKH DPH...

Page 50: ...WHPSHUDWXUH YDOXH ZLOO DVK VHW WKH YDOXH XVLQJ WKH buttons and press j Press WR FRQ UP WKH VHWWLQJV 10 1 2 VVLJQLQJ WKH SURJUDPV WR VSHFL F GD V This function can be used to assign up to three differe...

Page 51: ...u and then press b Use the button to select the password 7 and then press WR FRQ UP c Select submenu 8 and press WR FRQ UP d 7KH YDOXH ZLOO DVK FKDQJH LW XVLQJ WKH and buttons 0 5 5 0 C e Press the EX...

Page 52: ...t submenu 9 DQG FRQ UP E SUHVVLQJ d 7KH YDOXH ZLOO DVK FKDQJH LW XVLQJ WKH buttons OFF 3 20 C e Press WR FRQ UP WKH VHWWLQJV 10 9 MANUAL ACTIVATION OF THE PELLET LOADING SYSTEM KHQ RX UVW VWDUW XS WKH...

Page 53: ...y is stopping the brazier cleaning system from operating E105 Pellet probe malfunction Pellet probe disconnected or faulty E106 Temperature probe malfunction Faulty air temperature probe E107 Combusti...

Page 54: ...Remove any foreign bodies inside the brazier If this is not possible run the manual mechanical brazier cleaning procedure a Use the arrow keys to enter the setup menu and press key b Enter the passwo...

Page 55: ...tove requires simple yet frequent and thorough FOHDQLQJ LQ RUGHU WR JXDUDQWHH HI FLHQW DQG FRUUHFW operation at all times Clean the stove only when it s off and has cooled down 8VH WKH KDQGOH WR RSHQ...

Page 56: ...g and never use abrasive sponges Do not wet the door gasket as this may be damaged 12 2 4 Cleaning WKH XH This should be performed at least twice a year at the start of and half way through winter and...

Page 57: ...Centre 13 DECOMMISSIONING AND DISPOSAL Decommissioning and disposal of the stove are the exclusive responsibility of the owner who must act in accordance with the laws in force in the country where t...

Page 58: ......

Page 59: ...ANSCHLUSS AN DIE ANLAGEN 6 3 ANF NGLICHE KONFIGURATION 7 BESCHREIBUNG DES OFENS 7 1 BEDIENPANEL 7 2 BENUTZUNG DES BEDIENPANELS 7 3 BETRIEBSPARAMETER 8 ERSTE SCHRITTE 8 1 PELLETZUF HRUNG 8 2 STROMVERS...

Page 60: ...DWLRQVODQG GHV 2IHQV J OWLJHQ HVHW HQ YRUJHVFKULHEHQHQ Sicherheitsbestimmungen benutzt werden 1 ALLGEMEINES VORWORT Die Heizger te von PALAZZETTI werden unter HIROJXQJ GHU LQ GHQ HXURSlLVFKHQ H XJVULF...

Page 61: ...GHQ lOOH DXVJHVFKORVVHQ Installation in Abweichung von den im Installationsland geltenden Bestimmungen und YRQ GHQ 6LFKHUKHLWVYRUVFKULIWHQ Teilweise oder g nzliche Missachtung der in diesem Handbuch e...

Page 62: ...U 6WHFNYHUELQGHUQ GLH 6SDQQXQJV XIXKU unterbrechen 2 3 HINWEISE F R DEN BENUTZER HUHLWHQ 6LH GHQ XIVWHOOXQJVRUW GHV 2IHQV JHPl GHQ ORNDOHQ QDWLRQDOHQ XQG HXURSlLVFKHQ Bestimmungen vor D GHU 2IHQ DOV H...

Page 63: ...n Jede Holzart weist unterschiedli FKH LJHQVFKDIWHQ DXI GLH DXFK GLH UHQQOHLVWXQJ EHHLQ XVVHQ 9RQ GHU 9HUZHQGXQJ YRQ 1DGHOK O HUQ LHIHU 7DQQH ZLUG DEJHUDWHQ VLH HQWKDOWHQ JUR H 0HQ JHQ DQ DU ZRGXUFK G...

Page 64: ...IDVVXQJ VHLQ XQG VLFK YHUJHZLVVHUQ GDVV GLH SHUV QOLFKHQ 6FKXW DXVU VWXQJHQ YROOVWlQGLJ XQG IXQNWLRQVW FKWLJ VLQG C muss er Schutzhandschuhe tragen D muss er Sicherheitsschuhe tragen E muss er elektri...

Page 65: ...HQ EE HQQ GLH DQG KLQWHU GHP 2IHQ HLQH X HQZDQG LVW PXVV HWZD FP EHU GHP RGHQ HLQH gIIQXQJ XP QVDXJHQ GHU 9HUEUHQQXQJVOXIW angebracht werden dabei die Ma angaben im technischen Datenblatt des Produkts...

Page 66: ...tungen mit Rohrschellen an der Wand EHIHVWLJHQ Der Rauchstutzen DARF NICHT angeschlossen ZHUGHQ DQ HLQHQ 6FKRUQVWHLQ GHU DXFK YRQ DQGHUHQ lUPHHU HXJHUQ HL NHVVHO gIHQ DPLQH usw genutzt wird DQ QWO IWX...

Page 67: ...Q 7HFKQLNHU DXVZHFKVHOQ XP MHGHV Risiko auszuschlie en UGXQJ Die Anlage muss obligatorisch geerdet und gem den geltenden Gesetzen mit einem Fehlerstromschutzschalter ausgestattet sein Abb 6 2 Die Rauc...

Page 68: ...DWLRQ GHV 8KUHQWKHUPRVWDWV PXVV GHU 2IHQ YRQ DQG HLQJHVFKDOWHW ZHUGHQ ZlKUHQG GHU 8KUHQWKHUPRVWDW DXI GHQ 6WDWXV QIUDJH HLQJHVWHOOW LVW LHVHU 9RUJDQJ LVW DXFK GDQQ HUIRUGHUOLFK ZHQQ HLQ 6WURPDXVIDOO D...

Page 69: ...en ein paar Sekunden lang eine Kommunikations Fehlermeldung Meldung ignorieren und den Ofen mit dem Sicherheitsschalter aus und nach ein paar Sekunden wieder einschalten ES K NNEN ZWEI VERSCHIEDENE KO...

Page 70: ...70 VERWENDUNG UND WARTUNG BEDIENUNGS UND WARTUNGSANLEITUNG...

Page 71: ...Q V G eine Eingabetaste U GLH HVWlWLJXQJ GHV Parameters oder der Auswahl OOH 7DVWHQ VLQG NDSD LWLY G K XU NWLYLHUXQJ P VVHQ VLH QLFKW JHGU FNW VRQGHUQ OHGLJOLFK EHU KUW ZHUGHQ 7 1 1 Status led SYMBOL...

Page 72: ...UDWXU EHL GHUHQ 8QWHUVFKUHLWXQJ GHU 2IHQ ZLHGHU HLQJHVFKDOWHW ZLUG QXU LQ GHU RQ JXUDWLRQ 9 Frostschutztemperatur 0LQGHVWWHPSHUDWXU EHL GHUHQ 8QWHUVFKUHLWXQJ GHU 2IHQ HLQJHVFKDOWHW ZLUG QXU LQ GHU RQ...

Page 73: ...ZLUG PLW QDW UOLFKHU RQYHNWLRQ IXQNWLRQLHUHQ QXU EHL 0RGHOOHQ EHL GHQHQ GLHV YRUJHVHKHQ LVW 0LQLPXP 0D LPXP XWR DXWRPDWLVFKHV HWULHE GHU 2IHQ ZLUG GLH HVFKZLQGLJNHLW GHV 5DXPOXIWJHEOlVH DQKDQG GHU Ra...

Page 74: ...Q 6FKDOWHU DQ GHU 2IHQU FNVHLWH DXI 2 0 Abb 8 2 zu stellen 9HUJHZLVVHUQ 6LH VLFK GDVV 6LH GHU LQVFKDOWHU QLFKW EHU KHQ ZHQQ 6LH GHQ 2IHQ DQ GDV 6WURPQHW anschlie en LH XQNWLRQVW FKWLJNHLW GHV 2IHQV Kl...

Page 75: ...atur wird gezeigt Raum von der Raum Sonde abgelesen 3 Die aktuelle Zeit wird gezeigt 4 LH HWULHEVDXWRQRPLH ZLUG JH HLJW ZHOFKH DXI GLH IHKOHQGHQ 6WXQGHQ YRU GHU LHGHUI OOXQJ vom Pelletsbehaelter hinwe...

Page 76: ...FNXQJVNDQDO GHU 3HOOHWV QLFKW YHUVWRSIW ZLUG 3 GDV RO DQ QGHQ 4 GLH 7 U ZLHGHU VFKOLH HQ HU 2IHQ UHJHOW GHQ 9HUEUHQQXQJVOXIWEHGDUI DXWRPDWLVFK GEFAHR XP Q QGHQ GHV HXHUV QLH ONRKRO HQ LQ HURVLQ RGHU V...

Page 77: ...I DXWRPDWLVFK HYRU GHU 2IHQ HUQHXW HLQJHVFKDOWHW ZLUG VROOWH JHZDUWHW ZHUGHQ ELV HU YROOVWlQGLJ DEJHN KOW LVW 9 5 2 Ausschaltung bei Pelletbetrieb XP XVVFKDOWHQ GHV 2IHQV LP 3HOOHWEHWULHE GLH 7DVWH HL...

Page 78: ...Taste antippen i HU HUW GHU JHZ QVFKWHQ 7HPSHUDWXU EOLQNW GHQ HUW PLW GHQ 7DVWHQ und ndern j Die eingegebenen Daten mit der Taste best tigen 10 1 2 Zuordnen der programme an die tage Mit dieser Funkt...

Page 79: ...er Taste best tigen c DV 8QWHUPHQ 8 anw hlen und mit der Taste best tigen d Der Wert blinkt den Wert mit den Tasten und ndern 0 5 5 0 C e Die Taste GU FNHQ XP GHQ HLQJHJHEHQHQ HUW X EHVWlWLJHQ 10 4 FU...

Page 80: ...AKTIVIERUNG DES PELLETNACHF LLSYSTEMS HLP HUVWPDOLJHQ LQVFKDOWHQ RGHU ZHQQ GHU HKlOWHU YROOVWlQGLJ OHHU LVW EHVWHKW GLH 0 JOLFKNHLW QDFK GHP HI OOHQ GHV HKlOWQLVVHV PLW 3HOOHWV GDV 1DFKI OOV VWHP PDQX...

Page 81: ...LH XQNWLRQVW FKWLJNHLW GHV Reinigungssystems des Kohlenbeckens E105 Pellet Sonde Fehler 3HOOHW 6RQGH QLFKW DQJHVFKORVVHQ RGHU GHIHNW E106 HKOEHWULHE GHV 7HPSHUDWXUI KOHUV XIWWHPSHUDWXUI KOHU GHIHNW E1...

Page 82: ...H QLFKW X HQWIHUQHQ VLQG IDKUHQ 6LH PLW GHU PDQXHOOHQ NWLYLHUXQJ GHV PHFKDQLVFKHQ RKOHQEHFNHQUHLQLJXQJVV VWHPV IRUW a 5XIHQ 6LH EHU GLH 3IHLOWDVWHQ GDV LQVWHOOXQJVPHQ DXI XQG GU FNHQ 6LH GLH Taste b G...

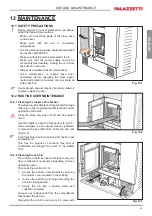
Page 83: ...WARTUNG 12 2 1 Reinigung des feuerraums Um immer eine optimale Leistung und einen HLQZDQGIUHLHQ HWULHE X JHZlKUOHLVWHQ LVW HLQH HLQIDFKH DEHU KlX JH XQG VRUJIlOWLJH 5HLQLJXQJ GHV 2IHQV HUIRUGHUOLFK Di...

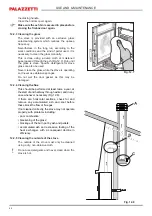
Page 84: ...IHQ YHUZHQGHW ZHUGHQ DV ODV QLFKW UHLQLJHQ VRODQJH GHU 2IHQ LQ HWULHE LVW HLQH 6FKHXHUVFKZlPPH EHQXW HQ LH LFKWXQJ GHU 7 U QLFKW DQIHXFKWHQ sie k nnte besch digt werden 12 2 4 Reinigung des Schornstei...

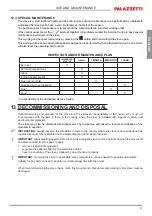
Page 85: ...ndendienst 13 VERSCHROTTUNG UND ENTSORGUNG LH 9HUVFKURWWXQJ XQG QWVRUJXQJ GHV 2IHQV VLQG DXVVFKOLH OLFK YRP LJHQW PHU XQG DXI GHVVHQ 9HUDQWZRUWXQJ GXUFK XI KUHQ GHU XQWHU HIROJXQJ GHU LQ VHLQHP DQG JH...

Page 86: ......

Page 87: ...MENTS 6 3 CONFIGURATION INITIALE 7 DESCRIPTION DU POELE 7 1 CLAVIER DE COMMANDE 7 2 UTILISATION DU CLAVIER DE COMMANDE 7 3 PARAM TRES DE FONCTIONNEMENT 8 OPERATIONS PRELIMINAIRES 8 1 REMPLISSAGE DES P...

Page 88: ...a charge de PALAZZETTI 6HXO O LQVWDOODWHXU HVW FKDUJp G HIIHFWXHU OHV contr les sur l existence d une entr e d air de 1 PR AMBULE Les appareils de chauffage d nomm s ci apr s po les granul s PALAZZETT...

Page 89: ...omp tences n cessaires cet effet Lenonrespectdesinstructionsetrecommandations des exigences contenues dans ce manuel a pour effet d annuler imm diatement la garantie 1 9 LIMITES DE RESPONSABILIT DU FA...

Page 90: ...DESTINEES A L UTILISATEUR 3UpYRLU XQ OLHX G LQVWDOODWLRQ GX SRrOH FRQIRUPH j OD l gislation locale nationale et europ enne S agissant d un appareil de chauffage les surfaces externes du po le sont par...

Page 91: ...s de h tre ou de bouleau bien sec Chaque type de bois poss de des caract ris tiques diff rentes y compris dans le rendement de la combustion L utilisation de conif res pin sapin est d con seill e ils...

Page 92: ...s minimales en centim tres respecter lors de l installation du po le par rapport aux cloisons HW DX REMHWV LQ DPPDEOHV Q FDV GH FORLVRQV REMHWV LQLQ DPPDEOHV FHV GLPHQVLRQV SHXYHQW rWUH divis es par d...

Page 93: ...rtemental Type RSDT au 23 1 VSpFL H OHV FRQGLWLRQV G HQWUpH G DLU GDQV OHV logements et signale que les entr es d air ne doivent pas tre obstru es par l usager Si il y a d autres appareils de chauffag...

Page 94: ...tirage 5 6 1 Evacuation par le toit travers un conduit traditionnel Le conduit de chemin e pour les gaz G pFKDSSHPHQW GRLW rWUH FHUWL p VHORQ OHV QRUPHV EN 1856 1 2 EN 1857 EN 1443 EN 13384 1 3 EN 12...

Page 95: ...ion du po le et doit rester visible Si le cordon d alimentation est endommag il doit rWUH UHPSODFp SDU XQ WHFKQLFLHQ TXDOL p D Q G pYLWHU tout risque 6 2 1 1 Mise la terre Il est imp ratif que l insta...

Page 96: ...KH RQ JXUDWLRQ initiale Apr s avoir install le chrono thermostat le premier allumage du po le doit s effectuer manuellement pendant que le chrono thermostat est en mode appel Proc der de m me apr s un...

Page 97: ...FRQ UPHU O HVW SRVVLEOH TX XQ PHVVDJH G DODUPH V DI FKH SHQGDQW TXHOTXHV VHFRQGHV DSUqV DYRLU PRGL p OD FRQ JXUDWLRQ LJQRUHU HW pWHLQGUH OH SRrOH HQ DSSX DQW VXU O LQWHUUXSWHXU WWHQGUH TXHOTXHV VHFRQ...

Page 98: ...98 EMPLOI ENTRETIEN USE AND MAINTENANCE...

Page 99: ...UH ou la s lection 6 DJLVVDQW G XQ FODYLHU FDSDFLWLI WDFWLOH LO VXI W MXVWH d appuyer les touches pour les activer 7 1 1 Leds d tat ICONE MESSAGE DESCRIPTION Pellets en cours d puisement Elle signale...

Page 100: ...le le po le se rallume XQLTXHPHQW HQ FRQ JXUDWLRQ 0 5 5 0 C 9 Temp rature hors gel Temp rature minimum en dessous de laquelle le po le s allume XQLTXHPHQW HQ FRQ JXUDWLRQ OFF 3 20 C 10 Verrouillage cl...

Page 101: ...t compl tement exclu et le po le ne fonctionne qu avec la convection naturelle uniquement sur certains mod les 1 Minimum 5 maximum Auto fonctionnement automatique le po le mets en place de mani re aut...

Page 102: ...errupteur sur OFF J En branchant le po le une prise de courant s assurer de ne pas toucher le panneaux de commande Le fonctionnement du po le n cessite une alimentation lectrique correcte En l absence...

Page 103: ...am tres 2 Vous allez visualiser la temp rature lue par la sonde ambiante 3 Vous allez visualiser l heure actuelle 4 Vous allez visualiser les heures d autonomie avant de recharger le r servoir d alime...

Page 104: ...porte Le po le r gle automatiquement les besoins en air comburant DANGER Pour allumer le feu ne jamais utiliser d alcool d essence de k ros ne ou autres combustibles liquides Stocker ceux ci loin du...

Page 105: ...compl tement refroidi 9 5 2 Arr t lors du fonctionnement granul s Pour teindre le po le quand il est en fonctionnement granul s appuyer sur la touche pendant quelques VHFRQGHV O LF QH HQ IRUPH GH DPPH...

Page 106: ...j FOLJQRWHU PRGL HU OH SDUDPqWUH DYHF OHV WRXFKHV puis appuyer la touche i H SDUDPqWUH GH OD WHPSpUDWXUH VRXKDLWpH VH PHW j FOLJQRWHU PRGL HU OH SDUDPqWUH DYHF OHV WRXFKHV puis appuyer la touche j App...

Page 107: ...r le mot de passe 7 avec la touche HW FRQ UPHU DYHF OD WRXFKH c S lectionner le sous menu 8 HW FRQ UPHU DYHF OD WRXFKH d H SDUDPqWUH VH PHW j FOLJQRWHU OH PRGL HU DYHF OHV WRXFKHV et 0 5 5 0 C e Appuy...

Page 108: ...OFF 3 20 C e Appuyer la touche SRXU FRQ UPHU OD PLVH DX SRLQW 10 9 ACTIVATION MANUELLE DU SYSTEME DE CHARGEMENT DE PELLETS Au premier allumage ou si le r servoir est totalement vide il est possible a...

Page 109: ...6 Dysfonctionnement sonde de temp rature Sonde air d fectueuse E107 Dysfonctionnement de la sonde dans la chambre de combustion Sonde dans la chambre de combustion d fectueuse E108 Erreur de s curit t...

Page 110: ...YHQWXHOV GX FROOHFWHXU GH FHQGUHV Q FDV GH EORFDJH SURFpGHU j O DFWLYDWLRQ PDQXHOOH GX V VWqPH PpFDQLTXH GH QHWWR DJH GX FROOHFWHXU GH cendres a 8WLOLVHU OHV qFKHV SRXU DWWHLQGUH OH PHQX GH FRQ JXUDWL...

Page 111: ...du foyer Le po le requiert un nettoyage simple mais fr quent pour pouvoir assurer un rendement HI FDFH HW XQ IRQFWLRQQHPHQW UpJXOLHU Ce nettoyage doit s effectuer avec le po le teint et froid Agir su...

Page 112: ...vitr e pendant la marche du po le et ne pas utiliser d ponges abrasives 1H SDV KXPLGL HU OH MRLQW GH OD SRUWH FDU FHOD acc l rerait son usure 12 2 4 Nettoyage du conduit de fum e Le conduit de fum e d...

Page 113: ...ffectuer par un centre SAV agr 13 DESTRUCTION ET MISE AU REBUT Le d sossement et la mise au rebut du po le sont la charge et sous la responsabilit exclusive du propri taire qui devra agir dans l obser...

Page 114: ......

Page 115: ...N DE LA ESTUFA 6 2 CONEXI N A LAS INSTALACIONES 6 3 CONFIGURACI N INICIAL 7 DESCRIPCI N DE LA ESTUFA 7 1 PANEL DE MANDO 7 2 PAR METROS DE FUNCIONAMIENTO 8 OPERACIONES PRELIMINARES 8 1 CARGA DE LOS PE...

Page 116: ...se instala 1 PREMISA GENERAL Los aparatos de calefacci n PALAZZETTI se fabrican y prueban siguiendo las indicaciones de seguridad de las directivas europeas de referencia Este manual est dirigido a l...

Page 117: ...esente manual PALAZZETTI declina cualquier responsabilidad civil o penal directa o indirecta debida a Instalaci n no conforme con las normativas vigentes en el pa s y con las directivas de seguridad I...

Page 118: ...tar la alimentaci n el ctrica antes de intervenir en las partes el ctricas electr nicas y conectores 2 3 ADVERTENCIAS PARA EL USUARIO Preparar el lugar de instalaci n de la estufa seg n los reglamento...

Page 119: ...de haya abedul bien seca Cada tipo de le a posee caracter sticas dis WLQWDV TXH WDPELpQ LQ X HQ HQ HO UHQGLPLHQWR GH OD combusti n No se recomienda el uso de con feras pino abe to contienen elevadas...

Page 120: ...que los dispositivos de prevenci n de accidentes individuales y personales est n en buen estado y en perfectas condiciones de funcionamiento C Debe llevar los guantes de protecci n D Debe llevar calza...

Page 121: ...una toma de aire externa al local Fig 5 2 Si la pared posterior de la estufa es una pared H WHUQD UHDOL DU XQ RUL FLR SDUD OD DVSLUDFLyQ GHO DLUH comburente a una altura del suelo de aprox 20 30 cm r...

Page 122: ...ar las tuber as a la pared utilizando abrazaderas HVSHFt FDV El acople de la salida de humos NO DEBE ESTAR conectado Con una chimenea utilizada por otros generadores calderas estufas chimeneas etc A s...

Page 123: ...ra prevenir cualquier tipo de riesgo 6 2 1 1 Conexi n a tierra Es obligatorio que la instalaci n disponga de una conexi n a tierra y de un interruptor diferencial en cumplimiento con las leyes vigente...

Page 124: ...mente mientras el cronotermostato est en el estado llamada Esta operaci n se vuelve necesaria ante la posibilidad que se produzca un corte de alimentaci n el ctrica o cuando la estufa se apaga manualm...

Page 125: ...Q SRGUtD DSDUHFHU XQ PHQVDMH GH HUURU GH FRPXQLFDFLyQ SRU DOJXQRV segundos Ignorarlo y apagar la estufa con el interruptor de seguridad esperar algunos segundos y volverla a encender ES POSIBLE PROGRA...

Page 126: ...126 USO Y MANTENIMIENTO USO Y MANTENIMIENTO...

Page 127: ...u selecci n Todos los botones son de tipo capacitivo por lo tanto no necesitan ser presionados para su activaci n HV VX FLHQWH WRFDU OD VXSHU FLH 7 1 1 Led de estado ICONO AVISO DESCRIPCI N Pellet aca...

Page 128: ...ratura ambiente por debajo de la cual la estufa se vuelve a encender 0 5 5 0 C 9 Temperatura anticongelaci n Temperatura m nima por debajo de la cual la estufa se HQFLHQGH VyOR HQ OD FRQ JXUDFLyQ OFF...

Page 129: ...HV OFF exclue totalmente la turbina de aire y la estufa s lo funcionar por convecci n natural s lo para los modelos que lo tienen 1 m nima 5 m xima Auto funcionamiento autom tico la estufa seleccionar...

Page 130: ...icionar el interruptor en la posici n OFF 0 J Asegurarse de no tocar el panel de mando cuando se conecta la estufa a la red el ctrica El funcionamiento de la estufa est supeditado a una alimentaci n e...

Page 131: ...mperatura le da por la sonda ambiente 3 Se visualiza la hora actual 4 Se visualizan las horas de autonom a que faltan antes de recargar el dep sito de alimentaci n Si la funci n abastecimiento a sido...

Page 132: ...volver a cerrar la puerta La estufa regula autom ticamente la necesidad de aire comburente PELIGRO 3DUD HQFHQGHU HO IXHJR QXQFD XVH DOFRKRO JDVROLQD TXHURVHQR X RWURV FRPEXVWLEOHV OtTXLGRV 0DQWpQJDORV...

Page 133: ...UHDOL DUi XQ FLFOR DXWRPiWLFR GH OLPSLH D GHO EUDVHUR Para realizar un nuevo encendido se aconseja esperar a que la estufa est completamente enfriada 9 5 2 Apagado con pellet Para apagar la estufa cu...

Page 134: ...bot n i 3DUSDGHDUi HO YDORU GH OD WHPSHUDWXUD GHVHDGD PRGL FDU HO YDORU FRQ ORV ERWRQHV y presionar el bot n j Presionar el bot n SDUD FRQ UPDU ORV GDWRV SURJUDPDGRV 10 1 2 VLJQDU ORV SURJUDPDV D ORV...

Page 135: ...Q HO ERWyQ c Seleccionar el submen 8 FRQ UPDU FRQ HO ERWyQ d 3DUSDGHDUi HO YDORU PRGL FDUOR FRQ ORV ERWRQHV y 0 5 5 0 C e Presionar el bot n SDUD FRQ UPDU HO GDWR SURJUDPDGR 10 4 FUNCI N AUTONOM A Con...

Page 136: ...RWRQHV OFF 3 20 C e Presionar el bot n SDUD FRQ UPDU HO GDWR SURJUDPDGR 10 9 ACTIVACI N MANUAL DEL SISTEMA DE CARGA DE PELLET En el momento del primer encendido o si el dep sito est totalmente vac o u...

Page 137: ...ento sonda pellet Sonda pellet defectuosa o desconectada E106 Mal funcionamiento sonda de temperatura Sonda aire defectuosa E107 Mal funcionamiento sonda de la c mara de combusti n Sonda c mara de com...

Page 138: ...cuerpos extra os del brasero Si est n bloqueados es necesaria la activaci n manual del sistema mec nico de limpieza del brasero a 0HGLDQWH ODV WHFODV HFKD ir al men Setup y pulsar la tecla b Seleccion...

Page 139: ...IO 12 2 1 Limpieza interna del hogar La estufa necesita una simple pero frecuente y atenta limpieza para garantizar siempre un UHQGLPLHQWR H FLHQWH XQ IXQFLRQDPLHQWR UHJXODU Efectuar la limpieza con e...

Page 140: ...ales de estufas No limpiar el vidrio durante el funcionamiento de la estufa y no utilizar esponjas abrasivas No humedecer la guarnici n de la portezuela porque podr a deteriorarse 12 2 4 Limpieza de l...

Page 141: ...a y braseros X Conducto de evacuaci n humos X Ventiladores X a cargo del centro de Asistencia T cnica Autorizado 13 DESGUACE Y ELIMINACI N El desguace y la eliminaci n de la estufa quedan exclusivamen...

Page 142: ......

Page 143: ......

Page 144: ...s Recht vor die Eigenschaften ihrer Produkte ohne Vorbescheid zu ndern Palazzetti d cline toute responsabilit en cas d erreurs dans la pr sente documentation et conserve la facult de modi er sans pr a...

Reviews: