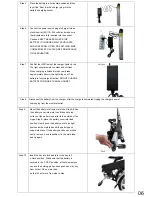
Step 5 Place the battery in a horizontal position and then
insert the “Easy E-bike” charger plug into the
battery’s charging socket.
Step 6 Connect the power source plug of charger into an
electric outlet (AC 110~240 volts) and make sure
that all poles are fully inserted into the socket.
Caution: KEEP THE AREA WHERE THE
BATTERY IS CHARGED WELL VENTILATED
AND FREE FROM LITTER OR ANYTHING ELSE
COMBUSTIBLE TO AVOID FIRE FROM SPARKS
OR OVERHEATING.
Step 7 Confirm that LED lamp of the charger lights up red.
The light should remain constant and not flash.
When charging is finished (which could take
approximately 6hours) the light will go out. The
battery is fully charged. Caution! DO NOT CHARGE
BATTERY FOR MORE THAN 24 HOURS!!
Step 8 Disconnect the battery from the charger, after the charge is completed. Unplug the charger’s power
source plug from the electrical outlet.
Step 9 Mount the battery into frame main tube. Step A:Slide
the battery cover into main tube. Make sure top
surface of the battery is parallel to the outside of the
hinge. Step B: place the battery cover into fixed
position. Gently push the battery pack to an right
position inside main tube until the battery pack
snaps into place. If the battery pack does not slide
easily, remove it and reposition it in the main tube
and try again.
Step 10 Insert the key into lock and turn to the key to 3
o’clock position , Make sure that the battery is
secured in the “LOCK” position, at that moment you
can see the holding pin has been pushed out by key
from hole of Pin on main tube
so that it can’t move from side to side.
06
Summary of Contents for Easy EK2.0
Page 1: ...EASY OWNER S MANUAL ...
Page 18: ......


