background image

PTV 33/44/55/66 


                  Owne

r’s Manual 

Rev. 1.0


24


7.6 

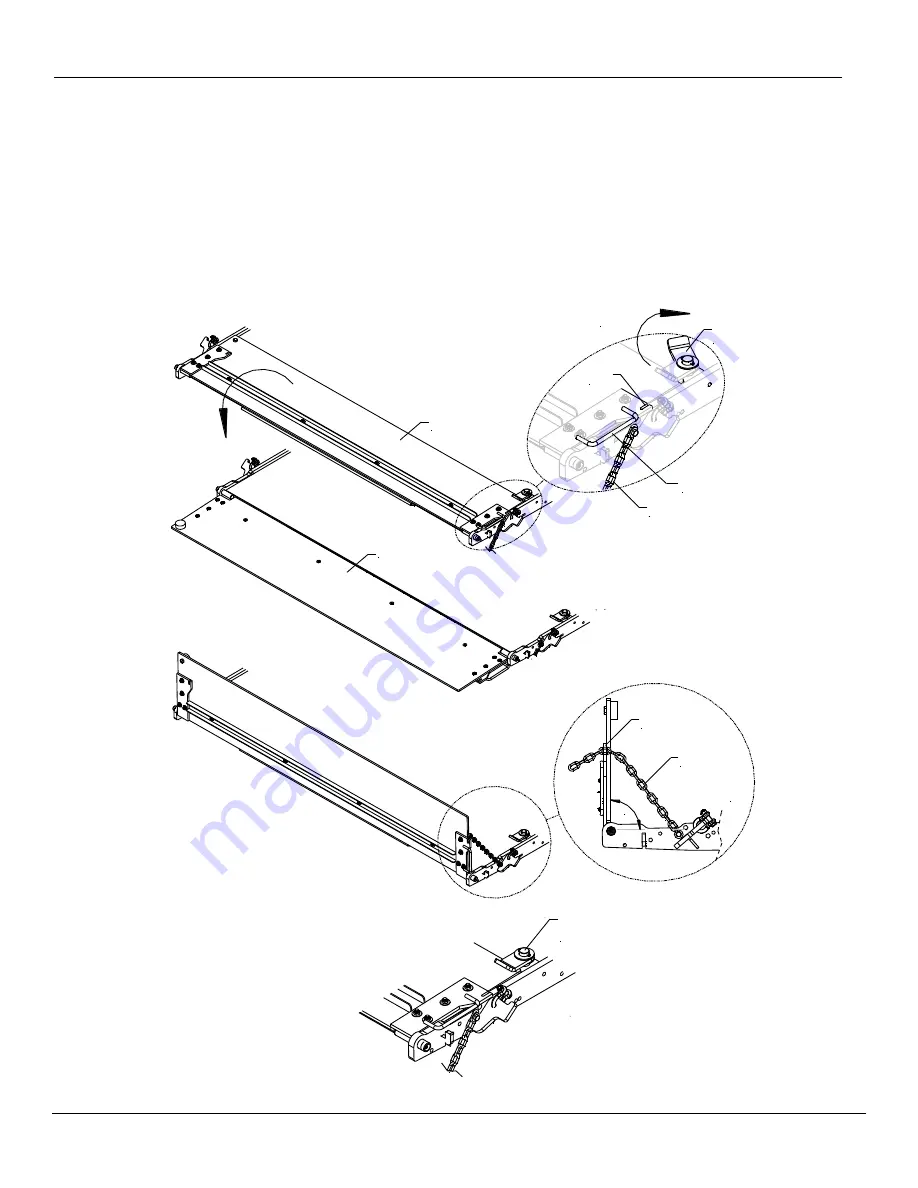
Aluminum Retention Ramp 

1. Lower the platform to the ground. Turn the retainer latch clockwise to release the ramp. Use the ARR handle 
on the side to open the retention ramp.  
2. Load platform. To use the ramp as a load retention, stop, place the ramp 90° to the platform and use the 
chain to secure the ramp. 
3. Lower the platform down to the ground and remove the chain from the retaining notch. Place the ARR back 
in its original position and turn the retainer latch enough to allow the ramp to lay between the platform and 
retainer. Proceed to storing the platform. 


Stored
ARR

ARR 
Retainer
Latch

ARR 
Chain

ARR 
Handle

Turn
Clockwise

ARR 
Chain

Chain 
Notch

90°

Opened 
ARR

ARR laying
between
platform and 
retainer latch

Chain
Notch

Summary of Contents for PTV 35

Page 1: ...PTV OWNER S MANUAL 04 21 ...

Page 2: ...sit www palfinger com for up to date information and notifications If you received this product with damaged or missing parts contact Palfinger Liftgates at 888 774 5844 Parts Order liftgateparts palfinger com Technical Support technicalapplications palfinger com 15939 Piuma Ave Cerritos CA 90703 Tel 888 774 5844 Fax 562 924 8318 www palfinger com 572 Whitehead Road Trenton NJ 08619 Tel 609 587 42...

Page 3: ...e department Monday to Friday 7 am to 5 pm Pacific Time or reach Palfinger Liftgates 24 hours a day 7 days a week through the internet home page www palfinger com or voice message system Providing quality value and service to the customers is what our business is all about Read this manual carefully to learn how to operate and how to take care of your liftgate properly Maintenance other than the s...

Page 4: ...dard Units 15 7 3 Dock Loading Lowering Platform Standard Unit 20 7 4 Auxiliary 3 Button Hand Held Control 21 7 5 Cart Stops 22 7 6 Aluminum Retention Ramp 24 8 Preventative Maintenence and Quick Check 25 8 1 Quick Check List 25 8 2 Maintenance and Care 26 8 3 Trailer to Tractor Ground Test 27 8 4 Lubrication 28 8 5 Checking and Changing the Oil 29 8 6 Decal Placement and Inspection 31 9 Troublesh...

Page 5: ...PTV 33 44 55 66 Owner s Manual Rev 1 0 3 10 Required Information for Ordering Spare Parts and Repairs 42 10 1 Ordering Spare Replacement Parts 42 10 2 Repairs 42 11 Warranty 43 12 Contact Address 44 ...

Page 6: ...ruck Year Make Model Liftgate Information Liftgate Serial Number Liftgate Model Number Date of Purchase Date of Installation 15939 Piuma Ave Cerritos CA 90703 Tel 888 774 5844 Fax 562 924 8318 www palfinger com 572 Whitehead Road Trenton NJ 08619 Tel 609 587 4200 Fax 609 587 4201 www palfinger com ...

Page 7: ...PTV 33 44 55 66 Owner s Manual Rev 1 0 5 1 Manual Updates Revision Description v1 0 Initial Release ...

Page 8: ...t in death or serious injury WARNING indicates potentially hazardous situation which if not avoided could result in death or serious injury CAUTION indicates a potentially hazardous situation which if not avoided may result minor or moderate injury CAUTION without the safety alert symbol is used to address practices not related to personal injury In this manual we use it to alert you to potentiall...

Page 9: ...t attempt to modify or repair the liftgate unless performed by qualified personnel Please contact your nearest PALFINGER Liftgates distributor or PALFINGER Liftgates in California or New Jersey for assistance if you have any questions regarding installation operation or maintenance at 888 774 5844 This owner s manual applies to the following models PTV 35 44 55 66 Maximum Capacity for liftgate mod...

Page 10: ...il style liftgates have two rails mounted to the rear of your vehicle either by welding or bolting These rails support a platform which raises and lowers cargo The hydraulic power unit is easily accessible for service and exchange The piston rods are treated against corrosion The Hydraulic Power Unit is equipped with a built in pressure relief valve which prevents overloading when lifting The valv...

Page 11: ...Manual has been designed for use in conjunction with only the PTV series liftgates which are designed for different capacities There are four options available to determine the model and serial number of the installed liftgate 1 Refer to the serial number tag on the liftgate Located on Left Side Column shown below 2 Ask your employer or lessor 3 Call your PALFINGER Liftgates Authorized Service Cen...

Page 12: ...not have a copy of the instructions please obtain them from your employer distributor or lessor as appropriate before you attempt to operate the lift 2 Be certain the vehicle is properly and securely stopped before using the lift 3 Always inspect this lift for maintenance or damage before using it If there are signs of improper mainte nance damage to vital parts or a slippery platform surface do n...

Page 13: ...erator may travel on the platform Using the liftgate to clear snow Trying to use the liftgate as a launching pad Using force of the hydraulic system to bend shear or break objects Driving a forklift over the liftgate Driving the truck or trailer with the platform open Driving the truck or trailer with platform unsecured in the travel position Plowing with the platform Please read through the opera...

Page 14: ...n Arms Support Chains Right Side Column Traverse Main Control Switch Load Center Left Side Runner Right Side Runner Aluminum Retention Ramp Fixed Ramp Fixed Ramp w Cart Stops Ramp options shown below are steel platform ramps Same options are available for aluminum platforms Platform Tip Section Platform Main Section Toggle Switch Not Shown ...

Page 15: ...kers Auxiliary Remote Control Cable Entry Ports Hydraulic Enclosure Dual Pump Configuration Hydraulic Enclosure Single Pump Configuration Secondary Pump Motor Control Board Primary Pump Motor Battery Compartment Master Shutoff Switch Shipping Brace Enclosure Cover Carrier Frame Battery Voltage Gauge Manual Reset Circuit Breaker Auxiliary Remote Control Cable Entry Ports Security Lock Hole Security...

Page 16: ...increasing this distance the maximum load of the lift gate is decreasing Make sure not to overload the liftgate Place the cargo in the middle of the platform Operating a gate with a misplaced load may cause serious damages or even injuries to the operator Note that Maximum capacity is rated at 24 from the truck As the load is placed further away from the truck the overall capacity of the liftgate ...

Page 17: ...red by hydraulic power Activation of the control buttons opens the hydraulic valves and directs hydraulic fluid to extend the cylinder The downward force on the platform lowers it The platform is opened and closed hydraulically by the extension and retraction of the open close cylinder 7 2 Operating Instructions Standard Units Steps 1 Turn on power To activate power to the liftgate turn the master...

Page 18: ...around platform is clear before opening plat form Pushing the DOWN button and OPEN button together to power the platform open OPEN DOWN 3 Lower the platform to the ground Pushing the DOWN button lower the platform to the ground Note for power down operation push the down button twice within 3 seconds DOWN ...

Page 19: ...luminum Retention Ramp ARR Optional Skip this step if the platform has a fixed ramp Stored ARR ARR Retainer Latch ARR Chain ARR Handle Turn Clockwise ARR Chain Chain Notch 90 Opened ARR ARR laying between platform and retainer latch Chain Notch ...

Page 20: ...ush the UP button for thirty 30 seconds This will bypass hydraulic fluid through hydraulic poppet valves located in each of the lift cylinder pistons re turning hydraulic fluid back to the reservoir via the return lines UP 6 Closing and Storing of the Platform for transit With the platform open at bed level use the UP button and CLOSE button together power the platform closed UP OPEN ...

Page 21: ...own platform past the Travel Locks See Illustration DOWN 8 Raise the Platform Using the UP button raise platform up until travel ears clear the travel lock slot See Illustration UP 9 Lock the Platform Once the travel ear clears the slot use the down button twice within 3 seconds to power down travel ear into travel lock slot DOWN ...

Page 22: ...liftgate components Be sure to inspect the liftgate for damage Front View of Liftgate Dock Stops on Traverse Hooks on Side of Platform Sidebar 1 Using the UP button to power platform up so that it is completely out of the travel locks UP 2 To lower platform down push Down Button twice within 3 seconds until the platform passes the travel latch and is level with the vehicle floor and rests on the D...

Page 23: ... the liftgate in the same way as the main controls located at the column however the control is not intended for everyday use Pump Motor Side of Enclosure Lift Lower Push once for gravity down twice within 5 seconds for power down Open the Platform Two Button Operation Press Simultaneously Close the Platform Two Button Operation Press Simultaneously Battery Side of Enclosure Remote Holster 3 Butto...

Page 24: ...tch has been moved from its original position 2 To close the cart stops push the cart stop latch inward towards the street side After the latch is in place close each cart stop by pushing each stop down Cart Stops Closed Position Platform Tip Latch Latch Cart Stop Open Cart Stop Closed Latch Push Down to Close Platform Tip Cart Stops Open Position Push each cart stop down to close Platform Tip ...

Page 25: ...lly spring open once the latch has been pushed 2 To close the cart stop push and hold each cart stop down in close position and lock each cart stop with the retaining latch Cart Stop Closed Retaining Latch Push each cart stop down to close Cart Stops Open Position Cart Stops Closed Position Platform Tip Platform Tip Platform Tip Push Down to Close Retaining Latch Cart Stop Open Retaining Latch ...

Page 26: ...the ramp 90 to the platform and use the chain to secure the ramp 3 Lower the platform down to the ground and remove the chain from the retaining notch Place the ARR back in its original position and turn the retainer latch enough to allow the ramp to lay between the platform and retainer Proceed to storing the platform Stored ARR ARR Retainer Latch ARR Chain ARR Handle Turn Clockwise ARR Chain Cha...

Page 27: ...r pack Tighten or replace components if needed If you perform work on any hydraulic components bleed the air out of the system by operating all functions several times to self bleed the lift cylinders Run the gate all the way up and down to remove air from the fluid 8 Check all electrical connections Clean the battery terminals 9 Inspect all terminals on the solenoid operated valves at the port of...

Page 28: ...spection is to make sure that everything is working properly during the break in period Once this is complete return quaterly to your Authorized Service Center Do not operate the liftgate if any issues or damages are noticed during its daily inspection Liftgate malfunction may cause severe personal injury or death Liftgate should be inspected IMMEDIATELY by an Authorized Service Center Recommended...

Page 29: ...tractor including ground 2 Trailer Test Ground battery load tester on trailer chassis point C Connect positive cable on positive pole of single pole plug receptacle on trailer B Run load test This will test entire circuit on trailer including circuit breakers and ground between trailer batteries and trailer chassis 3 Tractor and Trailer Charging system test while connected Ground battery load test...

Page 30: ...PTV use is considered 25 cycles per day or 500 cycles per month Lubricate the gate at least every 3 months or 1500 cycles whichever comes first DO NOT grease the Slide Bearings or Columns or Runners as this will VOID your WARRANTY on the slide bearings Liftgates with Fixed Ramps have 9 grease fittings Liftgates with Aluminum Retention Ramps ARR have 11 grease fittings ARR Hinge Both Sides Chain Ar...

Page 31: ...p the Oil Reservoir with approved oil and secure the Oil Reservoir Cap Maintain the fluid level to the indicated marking on the Oil Level Decal See next page for recommended oil 6 Operate the gate through 3 cycles to disperse the oil 7 Reinstall the oil filler cap and the hydraulic enclosure cover Resevoir Ground Terminal Positive Terminal Solenoid Oil Filler Cap Oil Level Decal S5 S3 S4 S1 S2 Sec...

Page 32: ...F Density 15 C 59 F kg L 0 834 Viscosity cSt 40 C SUV 100 F cSt 100 C SUV 210 F cP 50 C 58 F 13 0 69 7 4 95 42 5 1 310 When changing fluids it is highly recommended to use Hydrex MV Arctic 15 fluid however the alternatives fluid brands listed below can be used Alternative Fluids Temperature Range Fluid Brand 30 TO 150 F EXXON UNIVIS J26 MOBIL DTE 13M CHEVRON AW MV32 ROSEMEAD MV 150 32 50 TO 150 MO...

Page 33: ...Do not use this lift gate for anything but it s intended use The lift gate is not equipped with a back up system to prevent falling in the event of a failure BEFORE OPERATING LIFT BE SURE YOU UNDERSTAND OPEN AND CLOSE LIFTGATE WITH PLATFORM FULLY RAISED 1 Power liftgate by turning the master disconnect switch to the ON position Switch is located on the pump box 2 Be certain operating area around p...

Page 34: ...55 66 Owner s Manual Rev 1 0 32 G A K C F D B H E G E D J N N M M You may obtain free replacement decals by contacting us at 888 774 5844 within the U S and Canada Please have your liftgate model and serial ready ...

Page 35: ...nd ed that the installer refer to the Code of Federal Regulations CFR which can be viewed at http ECFR gpoaccess gov H Dimension 15 H 60 from ground to center of tape Requirement 3 Red white reflective tape applied across the entire width of the rear under ride protection device Note Not required if no underride protection is equipped Requirement 2 On each corner Two 12 long white reflective piece...

Page 36: ...railer units you will find a toggle switch near rear curb side corner post to activate the gate Cab Shutoff Switch OFF ON Switch arrow point to OFF ON OFF Switch on Outside of Enclosure 2 Check the circuit breaker at the main batteries Every truck has a circuit breaker on top of the main battery Trailers and some trucks are equipped with an auxiliary battery kit as shown in the pictures below Truc...

Page 37: ...over After opening the Cover you will see the fuse in front of the Power Pack as shown in the following picture If the fuse is blowm replace with the same type DO NOT use higher amperage fuse Replace when metal bridge is broken Fuse Holders w 15A Fuses 5 Is the connection to the ground in the power pack OK Is the ground connection from the liftgate to vehicle OK 6 Check the oil level in the power ...

Page 38: ... Single Pump Aux Battery 40 ft 36 11 74 Circuit Breaker Flag Reset Positive Ground Charging Circuit Breaker Auto Reset Starter Solenoid 2 Motor 2 Motor 1 Auxiliary Batteries Master Shut Off Switch Ground to Chassis Ground to Chassis Truck Batteries 12V Truck Kit Dual Pump Aux Battery 40 ft 36 11 74 11 36 Circuit Breaker Flag Reset Positive Ground 40 ft 40 ft 42 Motor Circuit Breakers Flag Reset 42...

Page 39: ...ump Single Pole Aux Battery 40 ft 36 11 74 Charging Circuit Breaker Auto Reset Starter Solenoid Motor 1 Auxiliary Batteries Ground to Trailer Side Rail Master Shut Off Switch 12V Trailer Kit Single Pump Dual Pole Aux Battery 36 11 74 40 FT Trailer Socket Single Pole Trailer Socket Dual Pole Positive Ground Positive Ground Auxiliary Batteries 42 Motor Circuit Breakers Flag Reset 11 42 Motor Circuit...

Page 40: ...Trailer Socket Single Pole 40 ft 36 11 74 11 36 Positive Ground Charging Circuit Breaker Auto Reset Starter Solenoid 2 Starter Solenoid 1 Motor 2 Motor 1 12v Battery Ground to Trailer Side Rail Master Shut Off Switch 12V Trailer Kit Dual Pump Dual Pole Aux Battery Trailer Socket Dual Pole Motor Circuit Breakers Flag Reset 36 11 11 36 74 42 42 11 42 42 Motor Circuit Breakers Flag Reset 40 Ft 40 Ft ...

Page 41: ... CA 90703 70 1121 001_a PTV Electrical Schematic Power LED Volt Gauge Ground to Chassis Master Shut Off Switch Pump and Electric Motors 15 A Fuse 15 A Fuse Cab Shutoff Switch Optional Valves Power Source Auxiliary Hand Control Column Toggle Switch External Control Switch Yl gn 3 1 2 2 1 3 Yl gn BU BN ...

Page 42: ...sconnect bridge J11 2 4 or close tail lift 8 General short in electric wiring Cab switch off on or disconnect bridge J11 2 4 or voltage interruption MBB control 9 Defect at motor solenoid detected during lifting Automatically when the valves are back to normal A Voltage V02 J1 pin 2 is missing defective fuse Replace the fuse b Defect at opening valve S3 S4 or motor relay detected during opening Au...

Page 43: ...ve Cerritos CA 90703 M 207 BAR 3000 PSI A B 69 BAR 1000 PSI C D 1 72 CC REV 0 105 IN REV T1 P1 M 1 72 CC REV 0 105 IN REV S1 S2 S5 S4 S3 M S1 LIFT M S2 S5 POWER DOWN S5 GRAVITY DOWN M S4 TILT OPEN M S3 TILT CLOSE LIFT CYLINDER 1 LIFT CYLINDER 2 OPEN CLOSE CYLINDER SECONDARY PUMP UNIT OPTIONAL PRIMARY PUMP UNIT RESERVOIR 2 6 GPM ...

Page 44: ...s state the following information when making or ders 1 Liftgate model serial number 2 Designation and number of the spare part in accordance with the proper spare parts list 3 Designation and number marked on the individual component if available 10 2 Repairs Parts sent to PALFINGER Liftgates to repair must be accompanied by a letter in separate cover giving details and scope of the repairs requi...

Page 45: ...ion of the problem which must be filled out in full The parts that are sent back to PALFINGER Liftgates marked with serial number and address become PALFINGER Liftgates property if the warranty claim is accepted All warranty claims must be received within 30 days of repair or replacement Including the following infor mation 1 Liftgate model 2 Liftgate serial number 3 Description of problem 4 Itemi...

Page 46: ...Owner s Manual Rev 1 0 44 12 Contact Address 15939 Piuma Ave Cerritos CA 90703 Tel 888 774 5844 Fax 562 924 8318 www palfinger com 572 Whitehead Road Trenton NJ 08619 Tel 609 587 4200 Fax 609 587 4201 www palfinger com ...

Page 47: ...PTV 33 44 55 66 Owner s Manual Rev 1 0 45 ...

Reviews:

Related manuals for PTV 35