background image

7

Palmgren Operating Manual & Parts List                                                                                                                                                                                      9683314

OPERATION (CONTINUED)

BLADE GUIDES

Band saw blade has to be twisted relative to the plane in which it
rotates. Blade must be properly positioned relative to the workbed.

Blade guides hold the cutting portion of the blade in a plane which
is perpendicular to both the workbed and the stationary vise and
keeps the blade in line with its natural path around the blade
wheels.

Inner guide bearings on the left and right guide assemblies keep the
blade in line with the blade wheels. Outer guide bearings keep the
blade against the inner  bearings.

Entire guide assembly is positioned at the factory to produce the
proper twist and should not need adjustment, however, the position
of blade guides should be checked often.

NOTE: 

Since the blade position is related to both bed and the vise

jaws, the relative position of the jaw to the bed is important. When
assembled, the stationary jaw must be perpendicular to the surface
of the workbed.

CHECKING BLADE GUIDES

Refer to Figure 18.

    Check that the blade teeth are perpendicular to the base’s

machined surface.

    Spread the blade guides as far apart as possible.

    Check that vise jaws are parallel and set for 90° cutoff.

    Position the vise jaws to have the maximum separation that will

not interfere with the blade guides.

    With the head in horizontal position, use a square against face of

rear vise jaw and check that jaw is 90° to the side of blade.

    Check that the blade is in line with drive and tracking wheels

(Ref. Nos. 3 and 30).

    Raise the head.

    Look straight on at the cutting edge of the blade.

    Make sure that the blade sides are parallel to the sides of the

bearings.

    Make sure the bearings (Ref. No. 9) touch the blades and can still

be rotated by hand.

ADJUSTING GUIDE BEARINGS

Refer to Figure 18.

If the blade is not perpendicular to the bed or not in line with the
blade wheels, adjustment is necessary.

NOTE: 

There should be .000-.001” clearance between the blade and

the guide bearings.

The guide bearings are adjusted using an eccentric location system.
The inner guide bearings are fixed and cannot be adjusted. The outer
guide bearings are mounted to eccentric sleeves (Ref. No. 10) and
can be adjusted.

    Loosen socket head bolt (Ref. No. 6) with a wrench. Rotate the

eccentric shaft to locate bearings in desired positions.

    Maintain eccentric shaft position and tighten socket head bolt.

CHECKING THRUST BEARINGS

Refer to Figure 18.

The thrust bearings (Ref. No. 20) should be .003-.005” (average
thickness of a piece of paper) away from back of blade.

The thrust bearings are adjusted by moving the guide bracket.

ADJUSTING GUIDE BRACKETS

Refer to Figure 18.

    If the bearings are positioned properly and the blade is not

square, one or both blade guide brackets (Ref. Nos. 21 and 56)
must be adjusted.

    Loosen the socket head bolts (Ref. No. 23 and 58).

    Adjust the bracket to the correct position.

    Tighten the socket head bolt.

    Check the guide bearings. Repositioning the blade guide bracket

can alter the previous adjustments. Readjust if necessary.

BLADE SELECTION

Using the proper blade is important for setting up the correct
cutting conditions. Blades are made differently depending on the
specific application intended for the blade. Some simple rules can
still be applied to almost all blades.

    Always remember to have at least three teeth in contact with the

work during a cut. When three teeth are in contact, the blade
cannot straddle the work. This prevents a tooth that enters the
cut from encountering more material than it can remove.

    “Shocking” occurs when blade teeth contact too much material.

This can strip the teeth from the blade. When cutting harder
materials, the suggested minimum number of teeth in contact is
six because “shocking” on harder materials has a more
detrimental effect on the blade. Optimum number of teeth in
contact with workpiece distributes blade forces among more
teeth to increase cutting efficiency and reduces blade wear.

    Optimum range is from 6-12 teeth in contact for soft materials,

up to 12-24 teeth in contact for harder materials.

    Always have maximum number of teeth in contact with work to

prevent gullets of teeth from being clogged.

    When choosing a blade, overall size of the work is not as

important as the thickness average. Thickness average is the
average width of material which blade will contact during each
cut. Figure 10 describes how thickness average should be
 calculated. 

    Thickness average should be used when choosing a blade for the

optimum number of teeth in contact, however, the three teeth
rule should be applied to the minimum thickness, not thickness
average.

    Keeping a selection of sharp blades on hand will yield better

cuts. Blades may last longer because they are less likely to be
misused when proper blade is available.

    Every band saw should have at least one replacement blade of

each type used. Blade breakage is unpredictable. Consult a blade
manufacturer for detailed information about available blades for
specific uses.

REMOVING BLADE

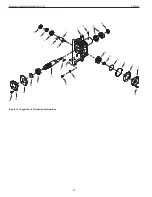
Refer to Figure 17.

WARNING: 

Disconnect band saw from power source when

changing or adjusting blades. Wear leather gloves when handling
band saw blades. Never wear gloves when operating saw.

    Prop open the blade wheel covers.

    Loosen the outer guide bearings on the left and right guide

assemblies. No other guide bearings should be moved.

    Remove knobs and blade guard (Ref. Nos. 17 and 18).

    With one hand, pinch the blade and the tracking wheel together

to protect against the possibility of the blade popping off when
tension is released.

    Release the tension by slowly revolving the hand wheel (Ref. No.

69) counterclockwise.

    Remove the blade.
Summary of Contents for 9683314

Page 1: ...operating manual parts list 9683314 9 X 16 METAL CUTTING BAND SAW Read carefully and follow all safety rules and operating instructions before first use of this product 9641488 01 1216...

Page 2: ...Amps Blade speeds 82 132 170 and 235 FPM Blade size 1 x 035 x 1191 2 Blade wheels 13 Diameter cast iron Overall dimensions 67 x 23 x 431 2 Weight 625 lbs Coolant pump 2 25 Gallons per minute Coolant...

Page 3: ...flat washers Figure 20 Ref Nos 30 31 and 32 from column Figure 17 Ref No 1 Secure control box Figure 20 Ref No 33 to column using hex head bolts lock washers and flat washers INSTALL MOTOR ASSEMBLY Re...

Page 4: ...Rewire main motor to 240V Refer to Figure 3 and motor nameplate for wiring schematic Rewire coolant pump to 240V Refer to Figure 4 and wiring schematic found on the inside of motor s junction box cov...

Page 5: ...perly grounded NOTE A temporary 3 prong to 2 prong grounding adapter is available only for 115 volt operation Do not use a 3 prong to 2 prong grounding adapter unless permitted by local and national c...

Page 6: ...kbed The limit switch should be activated as soon as the cut is finished IMPORTANT Make sure the action of the limit switch is not restricted by the horizontal stop LUBRICATION All ball bearings are p...

Page 7: ...e or both blade guide brackets Ref Nos 21 and 56 must be adjusted Loosen the socket head bolts Ref No 23 and 58 Adjust the bracket to the correct position Tighten the socket head bolt Check the guide...

Page 8: ...h hex head bolts For correct tracking refer to Figure 11 Turn 1 4 revolution at a time Check the blade tension and adjust if necessary Recheck the tracking Once the proper position has been found tigh...

Page 9: ...t metals become tough and more difficult to cut and blades become dull at an accelerated rate NOTE Because much of the built up heat comes from friction between the blade and the workpiece cutting flu...

Page 10: ...ration For proper maintenance Keep saw clean and dry Sweep off spots where chips have collected and wipe off spots where coolant splashed Lubricate the unpainted surfaces with a light application of m...

Page 11: ...ies 1 Motor overloaded 2 Air circulation around motor restricted 1 Adjust vise to be square with blade 2 Reduce pressure by increasing spring tension 3 Adjust guide bearings 4 Increase blade tension a...

Page 12: ...h too coarse 2 Too much speed 3 Inadequate feed pressure 4 Hard spots or scale in on material 5 Work hardening of material especially stainless steel 6 Blade installed backwards 7 Insufficient blade t...

Page 13: ...13 Palmgren Operating Manual Parts List 9683314 NOTES...

Page 14: ...9 4 5 6 15 16 11 25 26 26 26 10 10 35 14 20 20 20 20 53 9 2 7 17 24 29 29 45 31 30 30 30 3 46 47 19 19 48 27 27 18 55 22 21 21 54 60 64 65 66 63 62 61 57 58 59 52 21 51 50 1 41 40 67 38 39 34 44 27 37...

Page 15: ...1 38 3AMI 25 Retaining ring 9601900 00 2 39 Rivet 9601286 00 3 40 Angle scale 9615598 00 1 41 8 1 25 x 20mm Socket head bolt 2 42 10 1 5mm Hex nut 1 43 Plate 9615599 00 1 44 Limit switch with strain r...

Page 16: ...16 Palmgren Operating Manual Parts List 9683314 25 2 4 5 6 11 26 24 10 16 15 14 20 9 7 17 3 19 18 22 21 23 8 12 13 Figure 16 Repair Parts Illustration for Base 1...

Page 17: ...pump 9615621 00 1 11 Strain relief 9601601 00 1 12 6mm flat washer 2 13 6 1 0 x 16mm Pan head screw 2 14 Base 1 15 3 8 NPT Drain plug 1 16 Pump cord 9615623 00 1 17 Cover 9615624 00 1 18 6 1 0 x 8mm...

Page 18: ...Illustration for Head 42 57 49 43 34 2 2 15 14 4 5 8 4 6 6 11 25 26 10 7 20 53 9 9 9 7 17 17 24 29 45 31 16 30 3 46 47 19 48 72 18 55 56 22 54 61 65 66 67 69 70 71 64 63 62 58 59 60 52 68 21 21 51 50...

Page 19: ...0mm Key 9615648 00 1 40 Motor 9615649 00 1 41 8 1 25mm Hex nut 4 42 Motor mount plate 9615650 00 1 43 8 1 25 x 45mm Hex head bolt 4 44 Motor tilt plate 9615615 00 1 45 8 1 25 x 25mm Socket head bolt 1...

Page 20: ...lade Guide 2 15 54 4 5 5 42 49 45 45 46 46 39 27 11 7 11 11 11 11 11 25 25 24 26 26 10 16 16 62 16 13 16 14 14 14 14 14 20 20 9 9 7 7 7 7 7 7 17 29 31 31 30 3 19 18 22 21 40 43 38 41 34 37 36 28 28 28...

Page 21: ...2 8 1 25 x 16mm Socket head bolt 1 33 Blade guard 9615681 00 1 34 10 1 50 x 25mm Socket head bolt 2 35 Scale 9615682 00 1 36 Bracket 9615683 00 1 37 5 16 Hose clamp 9600131 00 1 38 5 0 8 x 10mm Pan he...

Page 22: ...22 Palmgren Operating Manual Parts List 9683314 Figure 19 Repair Parts Illustration for Gear Box 2 15 4 5 6 26 11 24 23 25 10 20 16 14 19 9 7 3 18 17 21 27 22 8 12 13 1...

Page 23: ...9615194 00 1 11 Gear 9615195 00 1 12 6206Z Bearing 1L019 1 13 Shim 9615196 00 1 14 Gasket 9615197 00 1 15 Output shaft cover 9615198 00 1 16 10 1 5 x 20mm Socket head bolt 4 17 2 5 x 12 9mm O ring 96...

Page 24: ...ual Parts List 9683314 Figure 20 Repair Parts Illustration for Controls 2 15 15 4 5 6 6 6 26 27 26 11 47 46 48 24 23 45 49 28 29 25 10 16 14 19 9 7 3 18 14 17 21 30 31 32 33 34 21 35 36 37 39 38 40 41...

Page 25: ...15564 00 1 25 5 16 x 37 Hose 9615565 00 1 26 Clamp 9615550 00 3 27 Tee fitting 9615566 00 1 28 Plate 9615567 00 1 29 Strain relief 9617505 00 1 30 6 1 0 x 12mm Hex head bolt 2 31 6mm Lock washer 2 32...

Page 26: ...26 Palmgren Operating Manual Parts List 9683314 NOTES...

Page 27: ...27 Palmgren Operating Manual Parts List 9683314 NOTES...

Page 28: ...Metal forming equipment 2 years Accessories 1 year The obligation of Palmgren is limited solely to the repair or replacement at our option at its factory or authorized repair agent of any part that sh...

Reviews: