background image

Install ION 2000

Set Up the ION 2000 with an Exisng Router

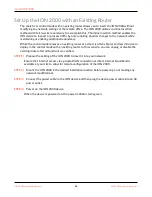
The analyc or control mode with an exisng router allows you to insert the ION 2000 without

modifying any network sengs at the remote office. The ION 2000 ulizes an inline inseron

method with fail-to-wire redundancy to accomplish this. The inline inseron method enables the

ION device to inspect or process traffic by only requiring physical changes to the network while

maintaining or enabling addional redundancy.
While the control mode removes an exisng router at a site, it is oen simpler and less intrusive to

deploy in the control mode with an exisng router. In this scenario, you can unplug or disable the

exisng router aer all funcons are verified.

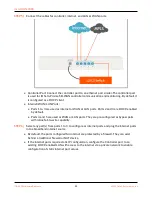
STEP 1 |

Prepare the cabling of the ION 2000 to insert it into your network.

Ensure that internet access via a private WAN connecon or direct internet broadband is

available at your site to allow for remote configuraon of the ION 2000.

STEP 2 |

Mount the ION 2000 in the desired installaon locaon before powering on or making any

network modificaons.

STEP 3 |

Connect the power cable to the ION device and then plug the device power cable into an AC

power outlet.

STEP 4 |

Power on the ION 2000 device.

When the device is powered on, the power indicator turns green.

ION 2000 Hardware Reference

28

©

2021 Palo Alto Networks, Inc.

Summary of Contents for ION 2000

Page 1: ...ION 2000 Hardware Reference docs paloaltonetworks com...

Page 2: ...ocs paloaltonetworks com search html Have feedback or ques ons for us Leave a comment on any page in the portal or write to us at documenta on paloaltonetworks com Copyright Palo Alto Networks Inc www...

Page 3: ...a ons 15 ION Device Compliance Statement 17 ION 2000 Fail to Wire Cabling Matrix 19 ION 2000 Installa on Kit Components 20 Power on the ION 2000 21 Shut Down the ION 2000 21 Reboot the ION 2000 21 Ins...

Page 4: ...Table of Contents ION 2000 Hardware Reference 4 2021 Palo Alto Networks Inc...

Page 5: ...ou install or service a Palo Alto Networks next genera on rewall or appliance The following topics apply to all Palo Alto Networks rewalls and appliances except where noted Tamper Proof Statement Thir...

Page 6: ...uct The tracking number provided to you electronically when ordering the product matches the tracking number that is physically labeled on the box or crate The integrity of the tamper proof tape used...

Page 7: ...egin Third Party Component Support Before you consider installing third party hardware read the Palo Alto Networks Third Party Component Support statement ION 2000 Hardware Reference 7 2021 Palo Alto...

Page 8: ...est raccord e la terre Use grounded and shielded Ethernet cables to ensure agency compliance with electromagne c compliance EMC regula ons French Transla on Des c bles Ethernet blind s reli s la terr...

Page 9: ...C or DC from the power inputs to fully de energize the hardware French Transla on Tous les appareils Palo Alto Networks avec au moins deux sources d alimenta on D branchez tous les cordons d alimenta...

Page 10: ...Before You Begin ION 2000 Hardware Reference 10 2021 Palo Alto Networks Inc...

Page 11: ...ork ION 2000 and plan your deployment ION 2000 ION 2000 Ports ION 2000 Front Panel with LEDs ION 2000 Speci ca ons ION Device Compliance Statement ION 2000 Fail to Wire Cabling Matrix ION 2000 Install...

Page 12: ...ipates in a bi direc onal communica on with the Prisma SD WAN controller enabling con gura on of devices applica ons and WANs providing analy cs on devices and applica ons You can deploy the ION 2000i...

Page 13: ...00 to communicate with the Prisma SD WAN controller Internet LAN WAN Ports Ports 1 5 are used for internet local area network LAN or private router or mul path label switching MPLS connec vity The WAN...

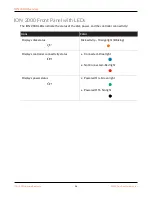
Page 14: ...and the controller connec vity Icons Color Displays disk status Disk ac vity Orange light Blinking Displays controller connec vity status Connected Blue light Not Connected Red light Displays power st...

Page 15: ...red with 1400 byte HTTP packets with all features turned on Power and Mechanical Type Wa s 1 36W Power Adapter Power Input AC 100 240 V 50 60 Hz Fan cooling Fanless Cer ca ons Cer ca ons FCC UL CE EMC...

Page 16: ...ss Access Point WAP Internet connec vity This connec vity is used to reach the Prisma SD WAN controller It can be in the form of a private connec on by an MPLS network through a corporate data center...

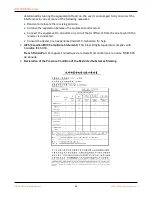
Page 17: ...CE European Union EU Electromagne c Compa bility Direc ve The ION devices that do not contain radios ION 1200 comply with the requirements set out in the Electromagne c Compa bility Direc ve 2014 30 E...

Page 18: ...o an outlet on a circuit that is di erent from the one to which the receiver is connected Consult the dealer or an experienced radio TV technician for help ICES Canadian EMC Compliance Statement This...

Page 19: ...ssover Ethernet Cable Hardcode to Match Both Devices Crossover Router PC NIC MDI Hub Switch HUB MDI Crossover Ethernet Cable Crossover Ethernet Cable Hardcode to Match Both Devices Straight Through Hu...

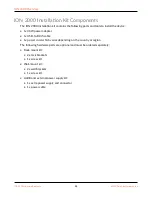
Page 20: ...5 cable 1x power cord which varies depending on the country or region The following hardware parts are op onal and must be ordered separately Rack mount kit 2x rack brackets 1x screw kit Wall mount ki...

Page 21: ...following ways Shut down using the Device Toolkit commands Run the device toolkit command debug shutdown to shut down the device Ensure the device is physically accessible to turn it back on before ex...

Page 22: ...ION 2000 Overview ION 2000 Hardware Reference 22 2021 Palo Alto Networks Inc...

Page 23: ...branch site verify the following physical installa on requirements the installa on kit wall mount and the rack mount components Rack Mount the ION 2000 Wall Mount the ION 2000 Set Up the ION 2000 wit...

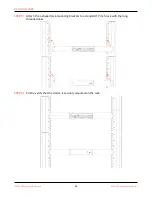
Page 24: ...a ach the brackets mount the ION 2000 on to any standard 19 inch rack using three appropriate screws STEP 1 Gather the L shaped rack moun ng brackets STEP 2 Locate the two 2 screw holes on each side o...

Page 25: ...ach the L shaped rack moun ng brackets to a standard 19 inch rack with the long threaded nails STEP 6 Finally verify that the device is securely mounted on the rack ION 2000 Hardware Reference 25 202...

Page 26: ...P 3 Place the brackets on each side of the device making sure to align the screw holes on the bracket and the device STEP 4 Insert the screws to secure the brackets STEP 5 Place the device on the wall...

Page 27: ...TEP 8 Hang the device onto the wall making sure to match the four 4 screw holes on the bracket with the four 4 threaded nails on the wall STEP 9 Tighten the screws to secure the device on the wall STE...

Page 28: ...rusive to deploy in the control mode with an exis ng router In this scenario you can unplug or disable the exis ng router a er all func ons are veri ed STEP 1 Prepare the cabling of the ION 2000 to in...

Page 29: ...as WAN or LAN ports They are pre con gured as bypass pairs with inline fail to wire capability STEP 6 Select any port s from ports 1 to 3 to con gure as internet ports and plug the internet ports into...

Page 30: ...ce It is best prac ce to execute this step during low tra c me or a network maintenance window where a 1 5 second network interrup on can be tolerated At this point the ION 2000 displays as Connected...

Page 31: ...Ensure that internet access via broadband or a temporary private network connec on is available at the site to allow for remote con gura on of the ION 2000 STEP 2 Mount the ION 2000 in the desired in...

Page 32: ...used as WAN or LAN ports They are pre con gured as bypass pairs with inline fail to wire capability STEP 6 Select any port s from ports 1 to 3 to con gure as internet ports and plug the internet port...

Page 33: ...e It is best prac ce to execute this step during low tra c me or a network maintenance window where a 1 5 second network interrup on can be tolerated At this point the ION 2000 displays as Connected a...

Page 34: ...Install ION 2000 ION 2000 Hardware Reference 34 2021 Palo Alto Networks Inc...

Reviews: