Service the M-300 or M-700 Appliance
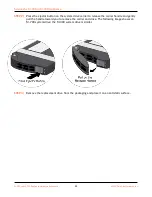
will cause the lever to close part way. When the drive carrier is almost fully inserted,
close the lever to seat the drive.
3. Copy the data from the exisng drive in the RAID 1 array to the replacement drive. In
this example, run the following command to copy the data from drive A1 to drive A2:
admin@hostname>
request system raid copy from A1 to A2
4. Connue to view RAID status by periodically re-entering the following command unl
you see that the disk pair (A in this example) shows
Available
admin@hostname>
show system raid detail
In this example, the output shows that Disk Pair A is
Available
.
At this point, drive A1 will show
notin use
because there is a drive model
mismatch.
5. Install the second replacement drive. In this example, physically remove the drive from
bay A1, install it in the carrier, and then install the second replacement drive in to bay A1
—one that is the same model as the new drive you installed in bay A2.
6. Add the second replacement drive to the RAID 1 array. In this example, run the following
command to add drive A1 to the array:
admin@hostname>
request system raid add A1
The system will automacally configure the new drive to mirror the contents of the other
drive (A2 in this example) in that RAID 1 array.
7. Connue to view RAID status by periodically re-entering the following command unl
you see that the disk pair (A in this example) shows
Available
and both drives show
the status
active sync
.
admin@hostname>
show system raid detail
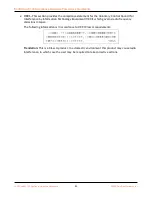
The following output shows that the RAID 1 array is funconing properly:
Disk Pair A Available
Status clean
Disk id A1 Present
model : ST8000NM0055-1RM
size : 7630885 MB
status : active sync
Disk id A2 Present
model : ST8000NM0055-1RM
size : 7630885 MB
status : active sync
M-300 and M-700 Appliance Hardware Reference
39
©
2022 Palo Alto Networks, Inc.

