background image

8

MISO 36 FIREBOWL CE Match-lit | Installation & Owner's Manual

CONNECTING TO GAS SUPPLY

 WARNING:

A qualified service person must connect 

the appliance to the gas supply. Follow all 

local codes.

CAUTION: 

Use only new black iron or steel pipe. 

Internally tinned copper tubing may be 

used in certain areas. Use pipe of 1/2” 

diameter or greater to allow proper gas 

volume to Outdoor Fire Pit Burner. If pipe 

is too small, undue loss of pressure will 

occur.

INSTALLATION ITEMS NEEDED:

Before installing the Outdoor

Fire Pit, make sure you have all items 

listed bellow:

•  piping (check local codes)

•  sealant

•  manual shutoff valve

•  adjustable (crescent) wrench or pliers

•  sediment trap

•  tee joints

•  pipe wrench

INSTALLATION REQUIREMENTS

This appliance must be installed and serviced by trained 

gas installation and service technician only. All pipework 

must be supported and installed in accordance with local 

and/or national regulations.

•  The gas supply to the appliance must terminate 

with an isolation cock and a flexible connector. 

This will allow the appliance to be disconnected for 

maintenance or repair. The appliance is supplied with 

a 1/2” BSP male pipe fitting.

•  Check that the main gas supply line is of proper 

diameter to supply the required fuel pressures. Pipes 

of a smaller size than the heater inlet gas connection 

must not be used.

•  If utilizing used pipe, verify that its condition is clean 

and comparable to a new pipe. Test all gas supply 

lines in accordance with local codes.

•  Test and confirm that inlet pressures are correct. 

Refer to the heater data plate and packaging to verify 

fuel type.

•  Install a sediment trap/drip leg for condensation 

which may occur at any point of the gas supply line. 

This will decrease the possibly of loose scale or dirt 

in the supply line entering the appliance’s control 

system and causing a malfunction.

CHECKING GAS CONNECTION

       WARNING: Test all gas piping and connections 

for leaks after installing or servicing. Correct all leaks 

immediately.

       WARNING: Never use an open flame to check for 

a leak. Apply a mixture of liquid soap and water to all 

joints. Bubbles forming on joints while the gas is running 

indicate a leak. Correct all leaks at immediately.

Test Pressures in Excess Of 37 mbar

This appliance and its individual shutoff valve must be 

disconnected from the gas supply piping system during 

any pressure testing of that system at test pressures in 

excess of 37 mbar.

Test Pressures Equal To or Less Than 37 mBar

This appliance must be isolated from the gas supply 

piping system by closing its individual manual shutoff 

valve during any pressure testing of the gas supply piping 

system at test pressures equal to or less than 37 mbar.

Summary of Contents for MISO

Page 1: ...oduce carbon monoxide which has no odor Using it in an enclosed space can kill you Never use this appliance in an enclosed space such as a camper tent car or home WARNING Improper installation adjustment alteration service or maintenance can cause injury or property damage Read the installation operating and maintenance instructions thoroughly before installing or servicing this equipment WARNING ...

Page 2: ...d piping system The installation must conform to local and or national codes 3 Never leave the fire unattended 4 Keep the appliance area clear and free from combustible materials gasoline and other flammable vapors and liquids 5 Use only the type of gas that is specified by the manufacturer 6 Do not burn solid fuel in this appliance Do not use this appliance to cook food or to burn paper or other ...

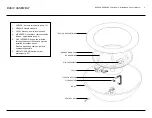
Page 3: ...TS Do not block ventilation holes in base if applicable see p 4 5 GAS PROPANE Supply line is routed through the base of the unit and must be installed by licensed trades Space is tight Keep risers as low and compact as possible 6 MEDIA TOPPINGS Review correct placement p 6 7 CONTROL KEY TOPPING SUPPORT RING PILOT ASSEMBLY BURNER RING BURNER MEDIA PAN PIPE ADAPTER FLEX CONNECTOR VALVE BODY ...

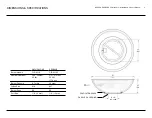
Page 4: ...IFICATIONS VENTILATION HOLES GAS SUPPLY OPENING 6 x 8 152 x 203 NATURAL GAS PROPANE Burner Model CIR M 18 CIR M 18P Nominal Heat Input G20 20mbar 25 kW G31 37mbar 25 kW 1770 gr h Burner Pressure 8 7 mbar 25 mbar Orifice Size 18 37 Burner Ports 68 68 Port Size 1 8 3 mm 1 8 3 mm ...

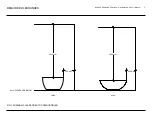
Page 5: ...5 MISO 36 FIREBOWL CE Match lit Installation Owner s Manual FIG 1 MINIMUM CLEARANCES TO COMBUSTIBLES REQUIRED CLEARANCES MISO SOBA 1829 mm 406 mm 305 mm 1829 mm 0 mm CLEARANCE BELOW ...

Page 6: ...during this time ASSEMBLY BURNER MEDIA DECORATIVE TOPPING LIGHTING PORT DO NOT OBSTRUCT CORRECT FLAME APPEARANCE TO ASSEMBLE THE FIRE PIT 1 Connect the Burner Assembly to the gas propane supply using the supplied flex connector and following the instructions on page 8 2 Leak test all connections following the procedure on page 8 Check the air shutter on venturi For NG it is sealed For LP it is ful...

Page 7: ...ILL TOPPING TRAY COVER BURNER MEDIA KEEP BELOW LID LINE BURNER MEDIA CRUSHED GLASS NG or LAVA ROCK LP FILL BURNER MEDIA TRAY COMPLETELY COVER BURNER RING VENTILATION HOLES DO NOT BLOCK CAUTION Do not use any media over the burner that have not been supplied by Paloform Landscape stone or other natural or manufactured materials may explode when heated ...

Page 8: ...ressures Pipes of a smaller size than the heater inlet gas connection must not be used If utilizing used pipe verify that its condition is clean and comparable to a new pipe Test all gas supply lines in accordance with local codes Test and confirm that inlet pressures are correct Refer to the heater data plate and packaging to verify fuel type Install a sediment trap drip leg for condensation whic...

Page 9: ...tenance can result in injury or property damage For assistance or additional information consult a qualified installer service agency or the gas supplier Do not store or use gasoline or other flammable vapors or liquids in the vicinity of this appliance INITIAL LIGHTING INSTRUCTIONS 1 Purge air from the supply line as follows Open the main shutoff valve Unscrew the main pressure test point Leave t...

Page 10: ...n clockwise until it stops 3 Push the control key in until it stops and hold in this position 4 Apply a flame to the lighting port with a barbecue lighter The pilot flame will ignite 5 Continue to hold the key down for up to thirty seconds after lighting the pilot 6 When the control key is released the pilot flame should continue to burn if the pilot goes out repeat the above steps 7 Rotate the ga...

Page 11: ...g guide page 12 BURNER ELEMENT AND PILOT Keep the burner and pilot area clean by vacuuming or brushing at least twice a year Make sure the burner porting and burner air openings are free of obstructions at all times Remove pilot cover to inspect pilot Remove topping from top of burner ring and Inspect area around the burner Remove any lint or foreign material with a brush or vacuum cleaner PILOT F...

Page 12: ... Check reset gas regulator pressure Gas odor even when manual valve is in the OFF position 1 Gas leak See Warning statement below 2 Main gas valve defective 1 Locate and correct all leaks see Checking Gas Connections pg 8 2 Replace gas valve Unit produces unwanted odors 1 Gas leak See Warning statement below 1 Locate and correct all leaks see Checking Gas Connections pg 8 Pilot cannot be lit 1 Gas...

Page 13: ...lator M REG RV47 NG M REG RV47 LP 7 3 8 Close Nipple 8 3 8 135 Street Elbow 9 Valve Bracket BEN32 BRA WR109 same 10 Main Gas Valve M VAL WR 764 109 same 11 Control Key M KEY WR109 same 12 Venturi CIR VEN 1 same 13 Orifice FIT ORI 18 FIT ORI 37 14 3 8 Street Elbow 15 Flex Connector CON SS 5MM 12 same 16 Burner Support MIS36 CHA same 17 Burner Media not shown Crushed Glass Lava Pebbles 18 Topping Me...

Page 14: ...ce is not operated and maintained according to the operating instructions supplied with the appliance and does not extend to 1 fire pit burner assembly damaged by accident neglect misuse abuse alterations negligence of others including the installation thereof by unqualified installers 2 the costs of removal reinstallation or transportation of defective parts on the appliance or 3 incidental or co...

Reviews: