background image

EN

   OLYMPIA PATIO COVERS - INFORMATION

 PATIO COVERS - INFORMATION

EN

SAFETY ADVICE

DURING ASSEMBLY

• 

• 

It is of utmost importance to assemble all of the parts according to the directions. Do not skip any steps.

• • 

Always wear work gloves during panel sliding. 

• • 

Always wear shoes and safety goggles when working with extruded aluminium.

• • 

If using a step ladder or power tools make sure that you follow the manufacturer’s safety advice.

• • 

Do not touch overhead power cables with the aluminium profiles.

• • 

Do not climb or stand on the roof.

• • 

Do not attempt to assemble the product in windy or wet conditions.

• • 

Dispose of all plastic bags. Keep them out of reach of small children.

• • 

Keep children away from the assembly area.

• • 

Do not lean against or push the products during construction.

• • 

Do not position your product in an area exposed to excessive winds.

• • 

Do not attempt to assemble this product if you are tired, have taken drugs or alcohol or if you are prone to dizzy spells.

• • 

Make sure there are no hidden pipes or cables in the ground before anchoring to foundation.

• • 

This product is designed to be used mainly as a patio cover.

• • 

Heavy snow load on the roof can make it unsafe to stand below or nearby.

• • 

The snow must be removed from the structure’s roof if the accumulated snow height exceeds 40 cm (1'4").

• • 

Make sure to anchor the product directly to a solid foundation to increase the product's stability and wind resistance, 
especially in areas with severe weather conditions. 

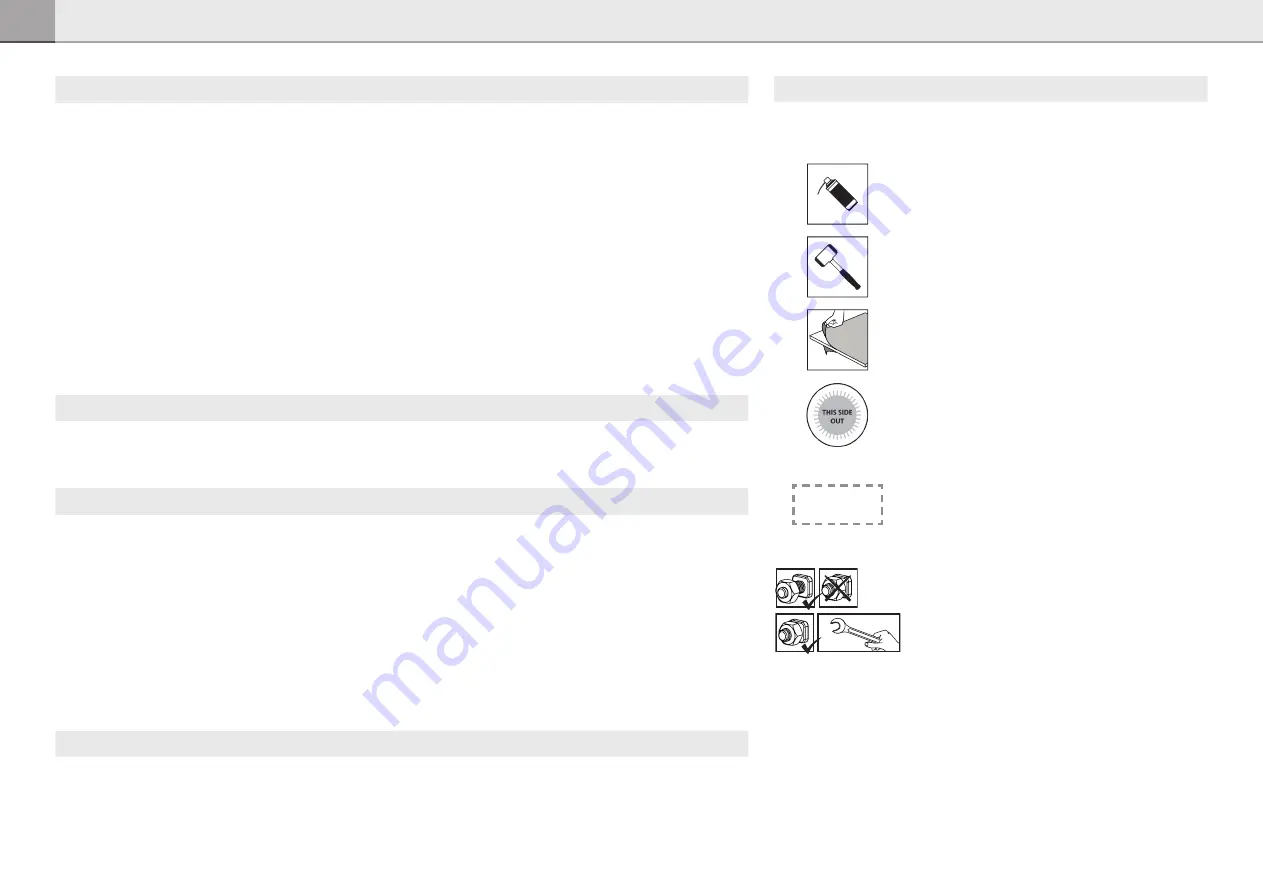
During assembly, you will encounter different icons for different products. 
Please see below for more information:

SILICONE

LUBRICANT SPRAY 

You may use silicone lubricant spray on the frame in order to help 

you slide the panels into the profiles. Do not spray the panels.

Use a rubber mallet if necessary.

Make sure you remove covering plastic film from both sides 

of the panel.

All panels with the stamped words “THIS SIDE OUT” must be 
facing out to create full UV protection. Remove plastic sticker 
as panels are locked in place.

Extension Kit

Steps marked with dashed outlines refer to Extensions only.
Some of the steps are irrelevant for an assembly of a single product.
When assembling a single or an extended product, 
some parts may be surplus.

These 2 icons below indicate if screw's tightening is 
required or not.
Temporary tightening of a few screws may be needed to 

prevent a profile from sliding out.

Tighten all screws once assembly is completed.

CARE & MAINTENANCE

• 

• 

When your product needs to be cleaned, use a mild detergent solution and rinse with cold clean water. 

• • 

DO NOT use acetone, abrasive cleaners or other special detergents to clean the panels. 

• • 

Clean the product once assembly is complete.

BEFORE ASSEMBLY

• 

• 

Selecting a site: 
- Choose your site carefully before beginning assembly.
- Choose a sunny position away from overhanging trees.

- The product must be positioned and fixed on a flat level surface.

• • 

The product must be secured directly to a solid foundation.

• • 

This is a multi-part assembly best achieved by two people. Allow at least half a day for the assembly process. 

• • 

Take all components & parts out of the packages. Sort the parts and check against the content parts list.

• • 

Parts should be laid out close at hand. Keep all small parts (screws etc.) in a bowl so they do not get lost.

• • 

Please note multi-sided profiles are used in this product. As a result some holes in the profiles are not used during assembly.

• • 

Please review entire instructions before starting. Carry out the assembly steps in exact order.

• • 

Please consult your local authorities if any permits are required prior to constructing the product.

• • 

Having purchased a long patio cover, make sure you received all boxes as shown on page 2 of the instruction manual (AVAILABLE MODELS).

• • 

Use only the parts registered in the content list, some parts may be surplus.

IMPORTANT!

• 

• 

Firmly connect the product to a level surface immediately after completion of the assembly.

• • 

Anchoring this product to the ground is essential to its stability and rigidity. It is required to complete this stage in order for your warranty to be valid.

• • 

During assembly use a soft surface below the parts to avoid scratches and damages.

• • 

We recommend checking for restrictions or covenants for building this product in your area.
In addition we advise to check if you need to submit any forms or if any permit is required prior to building the product.

Summary of Contents for CANOPIA MARTINIQUE 10x14/3x4.3

Page 1: ...nstructions carefully before starting assembly Keep these instructions in a safe place for future reference IMPORTANT HOW TO ASSEMBLE A member of Palram Industries Ltd 84865_22 07_MV 1 8 OLYMPIA 10x14...

Page 2: ...ch 10 mm 13 32 13 mm 1 2 AVAILABLE MODELS PRIMARY UNIT 10x10 3x3 PRIMARY UNIT 10x14 3x4 3 PRIMARY UNIT 10x18 3x5 5 1 BOX 1 BOX 1 BOX 10x24 3x7 4 10x28 3x8 6 10x32 3x9 8 PRIMARY UNIT 10x10 3x3 1 BOX PR...

Page 3: ...nicht gefunden wonach Sie suchen Auf der n chsten Seite finden Sie den Kontakt zu unserem lokalen Kundendienst TIENE ALGUNA INQUIETUD PODEMOS AYUDARLE Antes de retornar su compra No encontr lo que est...

Page 4: ...DENMARK 33 169 791 094 customer serviceFR palram com 04 848 6800 customer service palram com 07 575 42 70 post nshnordic com ITALY NETHERLANDS PORTUGAL SPAIN AUSTRIA LUXEMBURG LIECHTENSTEIN SOUTH AFR...

Page 5: ...EN STEVIGE BASIS VOOR DE MONTAGE Beton tegelvloer en betegelde wand Sterke houten basis vloer of muur IT IT PREPARARE UNA SUPERFICIE SOLIDA PRIMA DEL MONTAGGIO Cemento Pavimento e pareti in piastrelle...

Page 6: ...vilke festemidler som er egnet for andre overflater ikke inkludert Betong iser p gulv og islagt vegg Treover ate gulv eller vegg FI FI K YT ALUSTAAN SOPIVIA RUUVEJA Sarjan mukana toimitetut ruuvit ja...

Page 7: ...t alapzat vagy fal PL PL U YJ RUB ODPOWIEDNICH DO POD O A Do czone do zestawu ruby i kotwy nadaj si wy cznie do monta u na pod odze i cianach betonowych z p ytek Dob r odpowiedniego typu monta u nie d...

Page 8: ...stolpesiden Stolpene kan justeres fra 5 til 54 cm 2 til 21 3 fra sidekantene Juster stolper etter montering og f r forankring Pol til vegg dybde Polavstanden fra veggen kan justeres fra 226 til 286 cm...

Page 9: ...produktu mo e ulec lekkiej zmianie natomiast ud wig masy niegowej nie zmienia si Wysoko monta u na cianie Profil monta u na cianie tylna cz u g ry mo e by regulowany od 260 do 305 cm 102 4 to 120 mier...

Page 10: ...elig Som vist p side 2 TILGJENGELIGE MODELLER AVAILABLE MODELS Det forventes h y sn belastning Lett eller ingen tung last FI FI TARVITTAVIEN VIRKOJEN MUKAUTETTU M R Jos on odotettavissa suurta lumikuo...

Page 11: ...E DOBIERZ POTRZEBN LICZB S UP W W przypadku spodziewanego du ego obci enia niegiem zamontowa wszystkie dostarczone s upy W przypadku braku niegu lub niewielkiego obci zenia niegiem wystarczaj cy jest...

Page 12: ...steps are irrelevant for an assembly of a single product When assembling a single or an extended product some parts may be surplus These 2 icons below indicate if screw s tightening is required or no...

Page 13: ...sion Kit Les tapes marqu es en pointill s ne concernent que les extensions Certaines tapes ne sont pas n cessaires pour l assemblage d un produit unique Lors de l assemblage d un produit unique ou d u...

Page 14: ...rodukts nicht relevant Beim Zusammenbau eines einzelnen oder eines erweiterten Produkts k nnen einige Teile ber ssig sein Diese 2 Symbole unten zeigen an ob das Anziehen der Schrauben erforderlich ist...

Page 15: ...un producto individual o de una extensi n pueden sobrar algunas piezas Los siguientes 2 conos le indicar n si el ajuste de los tornillos es necesario o no en alg n paso puede ser necesario apretar de...

Page 16: ...OLYMPIA HE HE 1 4 40 SILICONE LUBRICANT SPRAY UV THIS SIDE OUT Extension Kit 2 2 AVAILABLE MODELS...

Page 17: ...av en enda produkt Vid montering av en produkt eller en ut kning av produkten kan en det bli ett verskott av delar Dessa tv ikoner anger om du beh ver dra t skruv eller inte I vissa steg kan emellerti...

Page 18: ...mmen et enkelt eller et utvidet produkt kan noen deler v re til overs Disse to ikonene indikerer om det er n dvendig stramme skruene TImidlertid kan v re n dvendig midlertidig stramme enkelte skruer f...

Page 19: ...s Poista muovitarrat kun paneelit on lukittu paikoilleen Extension Kit Katkoviivoilla ymp r idyt vaiheet ovat vain laajennuksia varten Jotkin osat ovat merkityksett mi yksitt isen tuotteen kokoamisess...

Page 20: ...nte for montering af et enkelt produkt Ved montering af et enkelt eller udvidet produkt kan nogle dele blive tilovers Disse 2 ikoner indikerer om skruerne skal strammes eller ej Midlertidig tilsp ndin...

Page 21: ...zijn irrelevant voor de montage van een enkel product Bij het monteren van een enkel of een uitgebreid product kunnen sommige onderdelen op overschot zijn Deze 2 icoontjes geven aan of het vastdraaie...

Page 22: ...ssi non sono necessari per l assemblaggio di un singolo prodotto Durante l assemblaggio di un singolo prodotto o di un estensione alcune parti possono essere rimanenti Queste 2 icone indicano se neces...

Page 23: ...veuillez vous r f rer l tape d assemblage correspondante pour d autres commentaires importants tape 7 Avant de commencer l assemblage il est important de bien pr parer la zone d installation de marque...

Page 24: ...Produkts im Untergrund ist wesentlich f r seine Stabilit t und Festigkeit Sie ist unabl sslich um diesen Arbeitsschritt zu beenden damit Ihre Garantie g ltig bleibt ES PASOS DE MONTAJE IMPORTANTES Al...

Page 25: ...nelerna med UV skyddad sida ut t markerad med THIS SIDE OUT Ta bort klisterm rken n r panelerna r p plats Endast f r m rka paneler Se till att du tar bort t ckande plastfilm fr n b da sidor om panelen...

Page 26: ...tets stabilitet er det essensielt forankre produktet i bakken Det er n dvendig fullf re dette steget for at garantien skal v re gyldig FI T RKE T ASENNUSVAIHEET Kun n et t m n tietokuvakkeen asennukse...

Page 27: ...Wanneer u dit informatiepictogram tijdens de opbouw tegenkomt raadpleeg dan de betreffende stap van de opbouw voor belangrijke bijkomende opmerkingen Stap 7 Het is belangrijk om het installatiegebied...

Page 28: ...assegnato con THIS SIDE OUT Rimuovi l adesivo di plastica mentre i pannelli sono in posizione Solo per pannelli scuri Assicurarsi di rimuovere la pellicola di plastica di copertura da entrambi i lati...

Page 29: ......

Page 30: ......

Page 31: ......

Page 32: ......

Page 33: ......

Page 34: ......

Page 35: ......

Page 36: ......

Page 37: ......

Page 38: ......

Page 39: ......

Page 40: ......

Page 41: ......

Page 42: ......

Page 43: ......

Page 44: ......

Page 45: ......

Page 46: ......

Page 47: ......

Page 48: ......

Page 49: ......

Page 50: ......

Page 51: ......

Page 52: ......

Page 53: ......

Page 54: ......

Page 55: ......

Page 56: ......

Page 57: ......

Page 58: ......

Page 59: ......

Page 60: ......

Page 61: ......

Page 62: ......

Page 63: ......

Page 64: ......

Page 65: ......

Reviews: