


Door Cover
Safety Advice
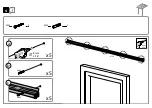
• Sort the parts and check against the content list.
• For safety purposes we strongly recommend the product be assembled by two people.
• We strongly recommend the use of work gloves during assembly.
• Do not attempt to assemble the Door Cover in windy or wet conditions.
• Always wear shoes and safety goggles.
• Dispose of all plastic bags safely - keep them out of reach of small children.
• Keep children away from the assembly area.
• Do not attempt to assemble the Door Cover if you are tired, have taken drugs, medication
or alcohol, or if you are prone to dizzy spells.
• When using a stepladder or power tools, make sure that you follow the manufacturers
safety advice.
• Be sure to check that there are no hidden pipes or cables in the wall before drilling.
• Please consult your local authorities if any permits are required to install a Door Cover.
• Before assembly, consider the door’s opening (inside or outside).
• Please apply silicone sealant to the rear edge in order to prevent water seepage.
• Tighten all screws when completing assembly.
• Keep roof and gutter clear of snow, dirt & leaves.
• Heavy snow load on roof can damage the product making it unsafe to stand below or
nearby.
Cleaning instructions
• Clean the product once assembly is complete.
• When your Door Cover needs cleaning, use a mild detergent solution and rinse with cold
clean water.
• Do not use acetone, abrasive cleaners or other special detergent to clean the panel.
Additional information
• The anchoring wall and ground kits supplied with this product are suitable only for concrete.
Other wall / ground types need an accordant wall fixation kit. (Contact your supplier)
• Please apply silicone sealant if needed
• You are solely responsible for determining whether the handling, storage, assembly,
installation or use of this product is safe and appropriate in any location or for any given
application. Palram is not responsible for any damages or injury to you, any other person or
any property resulting from the improper handling, storage, installation, assembly or use
of this product, or the failure to follow Palram’s written instructions regarding the handling,
storage, installation, assembly and use of this product. This product is intended for normal
residential use only. Do not use this product for any application that is not recommended
in these instructions or building codes in effect in location where this product will be used.
Always take care and use appropriate safety equipment (including eye protection) when
assembling or installing this product.
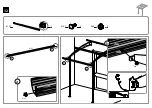
During Assembly
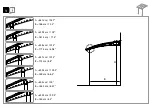
Step 1:
Before assembling this product, choose one of the 7 assembly options and refer to sizes
A & B of the chosen option.
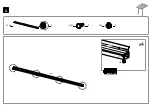
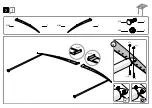
Step 3:
Important! Please make sure the
back beam
is perfectly centered before fixing,
height
A should be in accordance with your chosen option from step 1.
Step 4:
Please apply silicone sealants above beam
8158
, in order to prevent water from seeping
in.
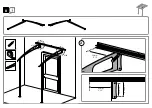
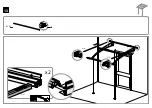
Step 7:
Assemble diagram a in accordance with your chosen option from step 1.
Step 8:
Brackets can be adjusted from 5 to 30 cm (2’’ to 12”) as suggested in diagram a.
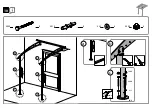
Step 10:
Before anchoring,
please tighten all screws (as shown in the close up diagrams
b & c),
level the profiles’ legs
(diagram a)
and adapt screws and plugs to your specific ground
type.
Please note:
Anchoring this product to the ground is essential to its stability and rigidity. It is
required to complete this stage
(Step 10)
in order for your warranty to be valid.
Step 19:
Please apply silicone sealants on the inner part of
Profile 8157,
and connect part
8167
as depicted in drawing a.
Attention!
Please read these instructions carefully before you start to assemble this product.
Please carry out the steps in the order set out in these instructions.
Keep these instructions in a safe place for future reference.
EN
When encountering the information icon, please refer to the relevant
assembly step for additional comments and assistance.
15.10_V2
Do not tighten screws and nuts until completion of assembly process.
These 2 icons indicate if screws’ tightening is required or not.
Summary of Contents for Vega 2000
Page 7: ...2 466 4 8192 4 8158 1 x4 466 8192 8158 8158...
Page 8: ...3 8070 8070 A A 100 cm 39 3 100 cm 39 3 8158 8158...
Page 9: ...4 a b c 8158 4009 4006 4006 4009 5 5 x5 x5 x5 8158 8mm 5 16 8 mm 5 16...
Page 10: ...5 a a a 8168 450 2 8 8160 2 450 8168 8160 8160 8160...
Page 11: ...6 a 450 8169 8160 450 8169 4 8 a a...
Page 12: ...7 a 8164 8163 410 466 1 1 4 4 8164 466 466 410 410 8163...
Page 13: ...8 a 8164 8163 5 30 cm 2 12 5 30 cm 2 12 15 cm 6 17 cm 6 7...
Page 15: ...10 4000 4010 433 5000 6 6 6 6 c b c b a a a b c 4010 5000 4000 433 90 10mm 3 8...
Page 16: ...11 8159 8159 8159 1 8159...
Page 17: ...12 b b b 466 8157 2 1 466 8157 a 8157 8192 8192 a a 8157 8192 2...
Page 18: ...13 8161 8161 8161 x2 8161 2...
Page 19: ...14 8162 2 8162 8162 8162 8162 x2...
Page 20: ...15 a b c c b b a 8192 8192 8192 466 466 466 8192 466 4 4...
Page 21: ...16 a a a a a 8192 466...
Page 22: ...17 8170 8170 8170 8170 8170 3...
Page 23: ...18 8192 466 4 4 a b c 8192 466...
Page 25: ...20 3009 6 a 3009 3009 3009 3009 3009 3009 3009 3009...
Page 26: ...21 7mm 9 32 7 mm 9 32 5001 3 8192 466 3 3 5001 466 8192...
Page 27: ...22 master_VEGA_cnp_V1 5 5001 22 5001 5001 5001 5001 5001...


