background image

26

3. Notes

a)This feature does not work in Program Play mode.

b) If PBC is on, it will turn off automatically when Search Playback starts.

c) When playing WMA, MP3 / JPEG discs, Search Feature does not work.

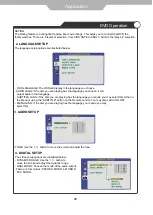
Changing the Sound track or Language

1. Compatible with DVD SVCD, VCD, CD, HD-CD, WMA, Digital Audio disc /JPEG discs.

2. Press the LANGUAGE button to display current sound track.

a) Press the button to switch sound tracks.

b) Press the button again on the remote to turn to next sound track.

3. When playing a SVCD or VCD disc, there are five sound tracks: Stereo (L/R), L/L, R/R, L/L Auto A/D

    Detect, and R/RAutoA/D Detect. With each consecutive press of the button, the sound track switches.

    If you press the button six times, sound track cycles back to Stereo.

4. When playing a CD, HD-CD, WMA, Digital Audio disc, there are three: Stereo (L/R), L/L, and R/R.

5. When playing a DVD or SVCD disc, press LANGUAGE button to display current language, press the

    button again to turn to next language if the disc has different languages.  

Subtitles

1. Compatible with DVD, SVCD discs.

2. Press the Subtitle button on the remote once, and the subtitle info banner appears.

3. When a DVD or SVCD is recorded with subtitles, you can use the Subtitle feature to view the subtitles

    on-screen. By default, subtitles are off. The info banner will display Subtitle Off.

4. To display subtitles, press the Subtitle button again. The default language with its responding serial

    number will be displayed in the info banner and subtitles will be displayed in that language. There are

    8 supported subtitles: Chinese, English, Japanese, French, Spanish, Portuguese, Germany and Latin.

    With each consecutive press of the Subtitle button, the subtitle switches.

    For example, "Language Icon: [1 English DTS 6CH] or [Off]" (the availability of the subtitles are

    disc-dependent).To turn subtitles off, press the Subtitle button until Subtitle Off is displayed.      

Mute the Audio Output

1. Compatible with DVD, SVCD, VCD, CD, HD-CD, WMA, Digital Audio disc / JPEG discs.

2. Pressing the Mute button allows you to reduce sound to an inaudible level, and the icon of "MUTE"

    will be displayed on screen. Press the button again or press the Vol +/- button to return to the normal

    condition.

3. If the player has no sound, check that the "Mute" is not on.  

Zoom In the Video Image

1. Compatible with DVD, SVCD, VCD, JPEG discs.

2. The Zoom Function allows you to enlarge the video image.

3. Press Zoom repeatedly to activate the function and choose the required zoom factor: Zoom 1, Zoom 2,

    Zoom 3, Zoom 4, Zoom 1 /2, Zoom 1 /3, Zoom 1/4, Zoom Off. 

Repeat a Specific Segment on the Disc that You Define

1. Compatible with DVD, SVCD, VCD, CD, HD-CD, WMA, Digital Audio disc.

2. During normal or fast playback, press the A-B button once. REPEAT "A" appears on the screen. This

    indicates the start point of the loop.

3. Press A-B again, REPEAT A-B will be shown, this indicates the end point of the loop.

4. The segment will now be repeated until you press the "REPEAT" button again to turn off the feature.

5. Press A-B again to cancel the loop points.

6. When playing a SVCD, VCD, or CD disc, you can repeat a specific segment only in one track. When

    the next track begins, A-B Repeat turns off automatically.

7. When playing a DVD disc, you can repeat a specific segment only in one title. 

Digital Audio Disc

1. Compatible with Digital Audio discs

2. The player will search the disc directory automatically and display the contents on screen.

Application

Summary of Contents for TFTV5532LED

Page 1: ...INSTRUCTION MANUAL TFTV5532LED 55cm 22 LCD TV COMBINATION WITH DVD PLAYER AND DVB T...

Page 2: ...Installation Precautions Installing an Antenna Remote control Precautions How to use remote control 6 7 8 9 10 11 12 Powering the LCD TV Selecting input source 13 Trouble shooting Specifications 30 3...

Page 3: ...lace heavy objects on it Be sure to ground the unit Failing to do may lead to electric shock when a short circuit overload occurs If necessary install a ground fault circuit breaker Never ground to a...

Page 4: ...losure such as a cabinet Do not run power cords near heat producing appliances such as radiators stoves or irons Do the antenna away from high voltage power lines and communication cables and make sur...

Page 5: ...e a year Contact the store of purchase or service centre for information Cautions When removing the batteries from the remote control make sure children do not swallow them Keep the batteries out of t...

Page 6: ...s or other apparatus including amplifiers that produce heat 9 Do not defeat the safety purpose of the polarized or grounding type plug A polarized plug has two blades with one wider than the other A g...

Page 7: ...titute a risk of electric shock to persons The exclamation point within an equilateral tri angle is intended to alert the user to the pres ence of Important operating and maintenance servicing instruc...

Page 8: ...the components may look different from the following illustration 4 TV AV button Input Source Select Button 1 MENU button OSD Menu Display Button 2 CH button Channel Program Button 3 VOL button Volume...

Page 9: ...2 Connect the mains cable between the power adaptor and the mains supply Power adaptor Mains cable Names of each part User Guidance Information DC POWER IN DC 12V 5A 1 5 HEADPHONE OUT 9 HDMI USB 2 6 R...

Page 10: ...with support area smaller than the LCD TV Please refer to the desktop stand manual for details of installation B Using the Stand Mounting on a wall Please secure enough space for safe use Please refer...

Page 11: ...ontrol to display the input source menu press button to select TV then press button to confirm Then you can receive the signal 9 Coaxial Round Antenna Cable User Guidance Information Installing an Ant...

Page 12: ...ress to see top half of page double size Press again to see the bottom half of page double size Press again for normal size SUBPAGE Press to subpage again to cancel INDEX Go to index Colour buttons Sh...

Page 13: ...Display the favourite program list 11 Buttons for DVD operating You could use the functions of the buttons only in DVD mode Load eject DVD disc Play pause DVD program Stop DVD program DVD fast forward...

Page 14: ...battery is replaced by an incorrect type Dispose of used batteries according to the national code Recycling program 1 Open the cover completely 2 Insert the two supplied batteries AA 1 5V Ensure that...

Page 15: ...V on Press POWER button on the LCD TV To turn the LCD TV off Press POWER button on the LCD TV Selecting Input Source You can select between the TV signal and the input signal of other equipment connec...

Page 16: ...ck options Select TV source OPTION MENU Allows you to setup a variety of setup options Select TV source CHANNEL MENU Allows you to search channels and set up a variety of channel options Select TV sou...

Page 17: ...sing the PICTURE Settings Application Controls the tint Control the colour Cycles among picture display modes Standard Dynamic Soft Personal Controls the overall brightness of the picture Controls the...

Page 18: ...tons to select the SOUND menu as the picture above press button to enter the menu Press or Direction buttons to change the settings Customising the SOUND Settings Application Allows you to select amon...

Page 19: ...also set the frequency volume and program Allows you to setup the sleep timer among 5min 10min 15min 30min 45min 60min 90min 120min 180min 240min and off Turn on off the auto sleep function Allows you...

Page 20: ...to select audio language Subtitle Language Could be selected in TV mode Allows you to select subtitle language Country Restore Factory Default Use the and buttons to select the OPTION menu as the pict...

Page 21: ...enu original code is 0000 Block Program 19 Parental Guidance Press button to enter the submenu and you could change the password here Press button to enter the submenu as the right picture select a pr...

Page 22: ...to enter the submenu DTV Manual Scan The CHANNEL menu includes the following options Auto Scan Recommended Use the and buttons to select the CHANNEL menu as the picture above press button to enter th...

Page 23: ...utton then you could use and buttons to change the position of the program press YELLOW again to confirm the change Skip Select a program and press BLUE button to sign the program while the program ha...

Page 24: ...lay specific video files USB Can read Mp3 Mpg Divx files and so on Your LCD TV is equipped with a simplified function multimedia player that allows you to play certain kind of files from any external...

Page 25: ...ROOT menu When playing a SVCD or VCD and PBC is on press the Menu or Return button to return to the disc menu Title Play 1 Compatible with DVD discs only 2 During DVD playback press Title button to di...

Page 26: ...cs 2 To skip forward to the beginning of the next title chapter track on a disc press Next on the remote or the right side of the player 3 To skip backward to the beginning of the preceding title chap...

Page 27: ...btitles or Off Angle the serial number of playing angle the amount of optional angles or Off Press the button for the third time the display menu fades out 3 Loading and playing SVCD discs two pages P...

Page 28: ...e Germany and Latin With each consecutive press of the Subtitle button the subtitle switches For example Language Icon 1 English DTS 6CH or Off the availability of the subtitles are disc dependent To...

Page 29: ...will be saved Menu specification 1 SYSTEM SETUP The system setup options are illustrated below SOURCE Select the source of the information you want to play AUTO DISC CARD USB TV SYSTEM According to th...

Page 30: ...this OFF MENU LANG If the disc you are playing has the language you require you may select this 3 AUDIO SETUP 4 DIGITAL SETUP The video setup options are illustrated below DYNAMIC RANGE Use the button...

Page 31: ...high density compressed data that needs proper handling 1 Hold the disc with fingers by outer edge and or the centre spindle hole Do not touch the discs surface 2 Do not bend or press the disc 3 Do no...

Page 32: ...air driers and electric drills The screen does not move Screen appears Voice is not heard 1 Press the MUTE button 2 Increase the sound level by pressing volume adjustment button 3 Check if sound termi...

Page 33: ...ed without prior notice for improving the performance Panel Size Brightness Contrast Ratio LCD Panel Max Resolution Input Connector Output Connector VIDEO YPbPr AUDIO L R PC AUDIO L R HDMI RF HEADPHON...

Page 34: ...PALSONIC 1 JOYNTON AVENUE WATERLOO NSW 2017 AUSTRALIA TEL 02 9313 7111 FAX 02 9313 7555 www palsonic com au PALSONIC CUSTOMER SERVICE TELEPHONE AUSTRALIA 1300 657 888...

Reviews: