background image

12

Lock Adjustment

Enter Password

Enable
Channel Locks
Parental Rating
Lock Keypad
New Password
Clear Lock

_ _ _ _

Off

None

Off

_ _ _ _

Move

0~9: Input MENU: Return    EXIT: Exit
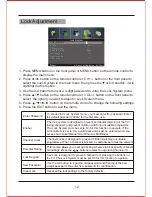
Lock System

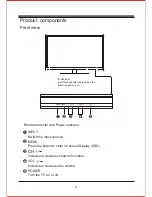
1. Press MENU button on the front panel or MENU button on the remote control to 

    display the main menu. 

2. Press           button on the remote control or             button on the front panel to 

    select the Lock System in the main menu, then press the     or OK boutton, it will

    highlihgt the first option. 

C

H+/

-

4. Press           button on the remote control or              button on the front panel to 

    select  the option you want to adjust in Lock System menu. 

3. Use the 0-9 buttons to input a 4-digit password to enter the Lock System menu. 

5. Press                      button on the remote control to change the following settings. 
6. Press the EXIT button to exit the menu. 

VOL

+/

-


Enabel

To access the Lock System menu, you must enter the password. Enter 

the default password “0000” for the first time use.

The lock system is designed to prevent accidental returning of the TV/

losing channels and prevent children watching unsuitable programme.

The Lock System must be set to On for this function to operate. If the 

Lock System is set to On, a valid password must be entered when you 

access Auto Scan/Manual Scan/Channel Edit/Reset. 

Reset all the lock settings to the factory defaults.

Use the 0-9 button to input the old password and then input the new 

4-digit password. Re-enter new password for confirmation.

Channel Locks is designed to prevent children watching unsuitable 

programmes. When a channel is blocked, a valid password must be entered.

Key Lock is designed to prevent children from pressing the buttons on 

the TV. The Lock System must be set On for this function to operate.

This function allows you to set up blocking schemes to block specific channels  

and ratings. Press the            buttons to select an age rating: None,4-18.

Enter Password

Channel Locks

Parental Rating

Lock Keypad

New Password

Clear Lock

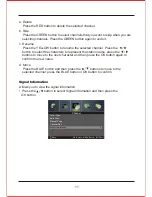
Summary of Contents for TFTV806LED

Page 1: ...User s Manual TFTV806LED 80cm 31 5 HD LED TV with DVB T...

Page 2: ...cleaners Use a soft cloth moistened with water for cleaning Use only the attachments recommended by the television equipment manufacturer Do not use this television equipment near water for example ne...

Page 3: ...ith safety ground wire Do not over load wall outlets and extension cords as this can result in re or electric shock Never push objects of any kind into this television equipment through cabinet slots...

Page 4: ...liquid which is toxic With bare hands that have cuts skin irritation or poisoning may result If any crystalline liquid gets into mouth or eyes rinse thoroughly with and consult your doctor CAUTION IF...

Page 5: ...g 1 Product components 2 Side View 2 Rear View 3 Remote control 4 Using the OSD menus 6 Picture Adjustment 6 Sound Adjustment 7 Channel Adjustment 9 Lock Adjustment 12 Setup Adjustment 13 USB Operatio...

Page 6: ...wide variety of features Color active matrix TFT LED TV with remote control Safe sturdy construction Audio Video support HDMI input PC input PC AUDIO input YPbPr input AV input RF input USB input On...

Page 7: ...Increase or decrease channel numbers MENU Press the button to enter on screen Display OSD VOL Increase or decrease the volume POWER Turn theTV on or off Remote Inductor and Power Indicator 2 IR Receiv...

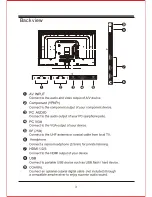
Page 8: ...Back view 3...

Page 9: ...the effective range will be shorter Do not hit or violently shake the remote control Never expose the remote control to high temperature or humidity If the remote is not used for an extended period o...

Page 10: ...ADIO mode 31 Press to display a list of favorite FAV Direction button 7 CH Press button to switch the channels 22 OK Make sure the adjustment setted previously REVEAL SUB SOURCE REC Start the subtitle...

Page 11: ...the picture mode directly Adjusts the saturation of the color based on your own like For Personal mode Cycles among color temperature Standard Cool Warm NR Noise Reduction Reduces the noise level of t...

Page 12: ...ck Pop Jazz User You can change the EQ under User mode Selects to turn On Off Sourround Sound Adjusts the relative volume of the speaker in a multiple speaker system Controls the relative intensity of...

Page 13: ...2 Press button on the remote control or button on the front panel to select the Channel in the main menu then press the or OK boutton it will highlihgt the first option CH 3 Press button on the remote...

Page 14: ...auto tuning Press the button to select Manual Scan and then press the OK button In the Manual Scan menu you can select Digital Manual Scan or Analog Manual Scan Auto Scan Allows you to make manaul fi...

Page 15: ...el number Color System Selects the color system Auto SECAM PAL Sound System Selects the sound system DK I BG AFC Auto Frequency control Select AFC On to lock the desired frequency Start Press the OK b...

Page 16: ...t c Rename Press the YELLOW button to rename the selected channel Press the button to select the characters to represent the station name press the buttons to move to the next character and then press...

Page 17: ...Enter the default password 0000 for the first time use The lock system is designed to prevent accidental returning of the TV losing channels and prevent children watching unsuitable programme The Lock...

Page 18: ...ge or turn off the subtitle Selects your desired digital teletext or decording page language Allows you to return to the first time setup menu Resets all settings to the factory defaults OSD Lanuage A...

Page 19: ...XIT button to return to the previous menu 1 Press button to select MUSIC in the main menu then press OK button to enter 2 Press button to select drive disk or music folder you want to listen then pres...

Page 20: ...ner 1 Number of channel 100 Standards B G D K Color system PAL SECAM AV Progressive scan 3 2 3 2 pull down Noise reduction Audio mute Audio Other 60W Dimensions W H D Use manual Packing size W H D 740...

Page 21: ...nd clean them to remove dust Remote control unit does not operate Check if the batteries are inserted with the polarity correctly aligned Check if the batteries are discharged Please replace with new...

Page 22: ......

Page 23: ......

Page 24: ......

Reviews: