background image

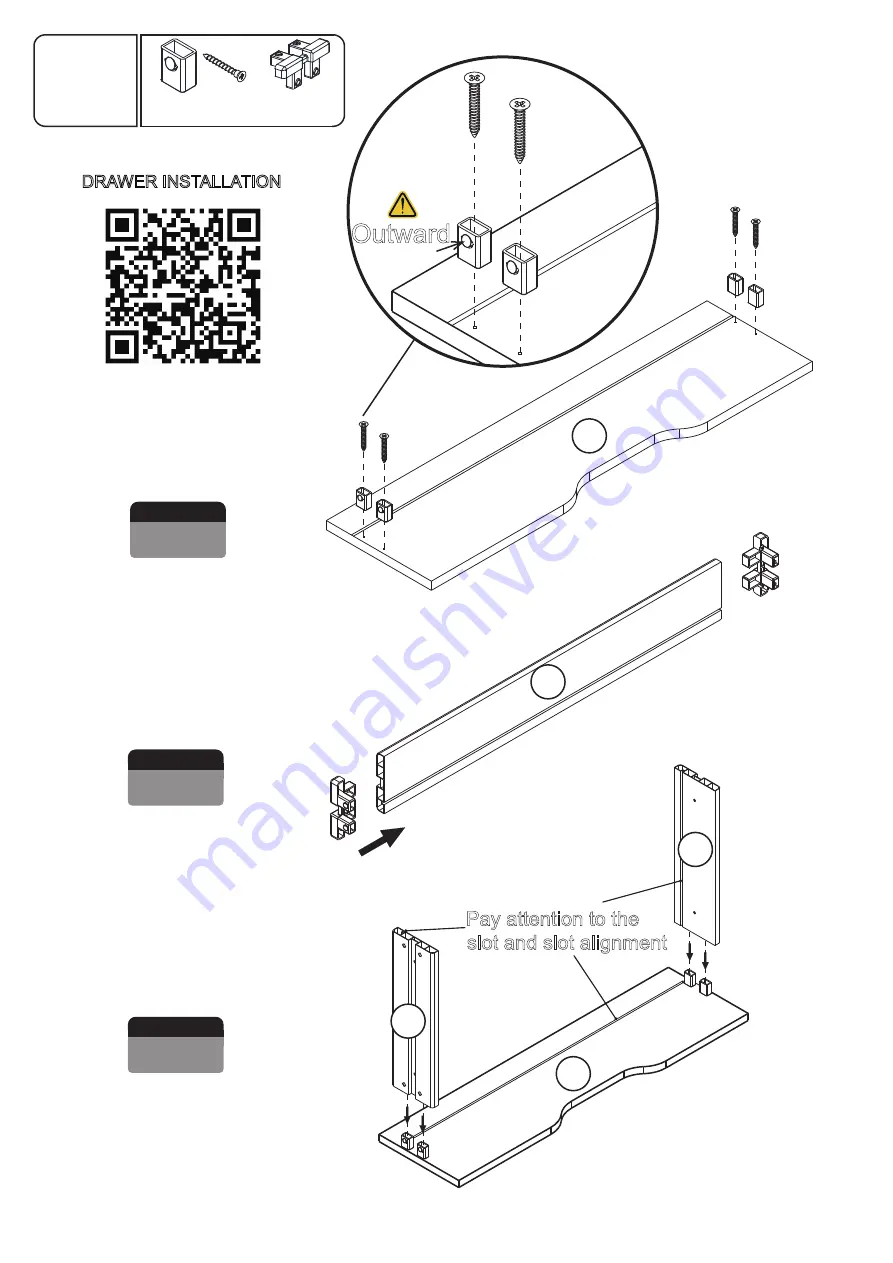
Outward

STEP 2

Drawer installation

STEP 3

Drawer installation

STEP 1

Drawer installation

Pay attention to the 

slot and slot alignment

11

9

10

10

9

K

1

×4

L×1

L×1

K

2

×4

K

1

K

2

K×20 L×10

13

Drawer Installation  ×5

SCAN QR CODE TO WATCH THE VIDEO

DRAWER INSTALLATION

01

02

03

04

05

06

07

08

09

10

11

12

13

14

15

16

17

18

19

20

Summary of Contents for CDA-07

Page 1: ...5 Drawer Chest with 1 Door CDA 07 Assembly Manual PAY LESS WAI T LESS 120 MIN APPROXIMATE ASSEMBLY TIME NUMBER OF PACKAGES 2 PEOPLE ASSEMBLE 2 1 01 ...

Page 2: ...Exploded View Drawer 5X C a r p e t Item no Qty 1 1 1 1 1 1 1 2 5 10 5 5 Please check the Panel list before installation Panel List 02 ...

Page 3: ...eference Image Qty C J 10 H 2 Please check the Accessories list before installation Accessories List KIT 5 D E F 6 58 12 46 G G1 G2 10 2 4 L M N J1 J2 K 20 Item no Reference Image Qty A 6 B 6 I 2 K1 K2 FRONT 03 ...

Page 4: ...B A C K A 6 When the thread is fully screwed in it is installed 1 1 A 6 04 ...

Page 5: ...2 C 5 E 15 3 3 BACK BACK T O P T O P 27 1 15 FRONT FRONT FRONT E 15 Pre drilled Please match pre drilled installation C 5 05 ...

Page 6: ...3 C 5 E 15 4 4 TOP TOP B A C K B A C K F R O N T F R O N T 27 1 15 FRONT E 15 Pre drilled Please match pre drilled installation C 5 06 ...

Page 7: ...2 3 4 4 D 12 D 12 BACK BACK BACK T O P T O P T O P 07 ...

Page 8: ...2 3 4 5 B 6 Arrow Unlocked B 6 Step1 Arrow Unlocked Step2 Arrow Locked Unlocked Step3 LEFT B A C K TOP 1 08 ...

Page 9: ...TOP 6 BACK LEFT 09 ...

Page 10: ...7 F 6 TOP BACK LEFT F 6 10 ...

Page 11: ... OPEN LOCK How to use H I 2 H 2 E 16 8 H H I I E 16 11 ...

Page 12: ...Put on corner guard to make the cabinet stable 90 90 90 90 G1 16 G2 16 9 G 16 G1 G2 12 ...

Page 13: ...M 2 E 4 10 Pre drilled 6 M 2 E 4 13 ...

Page 14: ...Pre drilled Pre drilled E 8 11 6 E 8 2 6 14 ...

Page 15: ...Non essential steps fine tune this method if needed Door hinge adjustment method and principle 2mm 2mm 2mm 2mm 2mm 2mm 15 ...

Page 16: ...Adjust the height to install according to your needs Fasten the notch of the active laminate to the laminate grain STEP 3 STEP 2 Tilt the movable shelf and enter the cabinet N 4 STEP 1 7 7 12 N 4 16 ...

Page 17: ...ation STEP 3 Drawer installation STEP 1 Drawer installation Pay attention to the slot and slot alignment 11 9 10 10 9 K1 4 L 1 L 1 K2 4 K1 K2 K 20 L 10 13 Drawer Installation 5 SCAN QR CODE TO WATCH THE VIDEO DRAWER INSTALLATION 17 ...

Page 18: ...er installation STEP 5 Drawer installation If you need to disassemble the drawer please follow the steps below 11 12 9 Step1 Step2 Drawer Installation 5 SCAN QR CODE TO WATCH THE VIDEO REMOVE DRAWER SIDE PANELS 18 ...

Page 19: ...Drawer Installation 5 Assembled effect G1 4 G2 4 14 G 20 G1 G2 M o u n t i n g t a b l e D r a w e r SCAN QR CODE TO WATCH THE VIDEO RIGHT ANGLE DETECTION 9 0 90 19 ...

Page 20: ...Step1 Step2 Step3 J1 10 J2 10 J 12 15 J1 J2 SCAN QR CODE TO WATCH THE VIDEO DRAWER ASSEMBLY 20 ...

Reviews: