background image

MWJG-09 Assembly Manual

09/26

Use Cam Screws 

Cam Lock Nuts

Dowel Kit(b)

IMPORTANT PRECAUTIONS

ENSU

RE

THER

E IS N

O

GAP B

ETW

EEN

THE P

ANEL

S

RIGHT TURN

 UNTIL TIGHT

RIGHT TURN

 UNTIL TIGHT

ENSURE THERE IS NO GAP

BETWEEN THE PANELS

B for cabinet body,

C(mini) for drawer

Pan

el A

Pan

el B

Step1

Step2

Align State


Locked State

3.

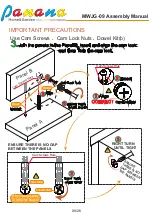
Join the panels:In the Panel B, insert and align the cam lock.

CORRECT

Insert

Align

1

Insert

2

3

3

Align


1

RIGHT TURN

 UNTIL TIGHT

3

Insert

2

and then Turn the cam lock.

Cam Screws Hole

Cam Screws Hole

Cam Screws Hole

Cam Lock Nuts

Cam Lock Nuts

Summary of Contents for MWJG-09

Page 1: ...lvents 2 If you are in a humid environment for a long time you must ventilate and exhaust moisture to avoid the furniture from being immersed in ater 3 Keep away from high temperature sources such as...

Page 2: ...ieces are fitted It is recommended to have 2 persons to complete the assembly CONTACT US You need to have a crosshead screwdriver and hammer beforehand Both not included in package hammer IMPORTANT Ti...

Page 3: ...ckage In order to facilitate installation the panel has pre drilled positioning holes for the accessories When installing only need to match the mounting holes of the accessories with the pre drilled...

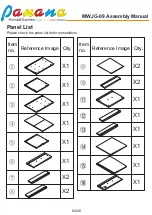
Page 4: ...MWJG 09 Assembly Manual 04 26 Please check the panel list before installation Panel List Item no Reference Image Qty Item no Reference Image Qty X1 X1 X1 X1 X1 X1 X2 X1 X2 X2 X2 X1 X1 X1 X1 X1...

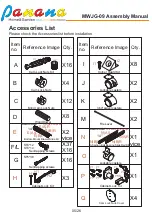
Page 5: ...ing Slide Rail Kit Detachable E X2 Bottom Mount Drawer Slide Kit Detachable 14 E A L E B L E A R E B R vice vice G X16 ST5 38 Self tapping screws J X2 360 swivel casters K X2 Lockable casters P Q X1 X...

Page 6: ...and pull out N B to separate the drawer slides The same method is used for the left and right slide rails Fixed to the bottom of the drawer side panel N A N B A A Section A A Fixed on the side panel o...

Page 7: ...Drawer side panel Drawer side panel IMPORTANT PRECAUTIONS E A L E A R E B L E B R E A E B Fixed on the side panel of the cabinet E A E B normal coordination effect B B E B E A Section B B Normal Statu...

Page 8: ...owel Hole Cam Screws Hole Cam Lock Nuts Hole Panel A Cam Screws A1 A A1 A2 A2 Panel A1 The thread is fully and vertically screwed in CORRECT ERROR A1 1 Screw the Cam Screws into the pre drilled holes...

Page 9: ...HT ENSURE THERE IS NO GAP BETWEEN THE PANELS B for cabinet body C mini for drawer Panel A Panel B Step1 Step2 Align State Locked State 3 Join the panels In the Panel B insert and align the cam lock CO...

Page 10: ...MWJG 09 Assembly Manual 10 26 1 AX4 P5x1 FX2 A1 A2 x1 A1 A2 A1 A2 A1 A2 A1 A2 F P5 F Pre drilled Front Direction mark Left...

Page 11: ...t until it stops At this time can see all the mounting holes Pre drilled Note The direction is based on the normal placement of the product as a reference the drawer will not be perfectly assembled E...

Page 12: ...th 1st 4th 8th 13th 1st 2th 8th 13th IMPORTANT PRECAUTIONS After the previous step is completed please check whether the accessories are in the position as shown in the figure if not please adjust the...

Page 13: ...MWJG 09 Assembly Manual 13 26 Top Top D 8X 3 D D D D D D D D x1 x1...

Page 14: ...Front MWJG 09 Assembly Manual 14 26 B 4X 4 x1 x1 x1 B B B B Direction mark Notch alignment Left Top...

Page 15: ...MWJG 09 Assembly Manual 15 26 5 Installation Note The direction is based on the normal placement of the product as a reference Front x1 x1 x1 Left Top...

Page 16: ...MWJG 09 Assembly Manual 16 26 6 Note The direction is based on the normal placement of the product as a reference GX4 QX4 G Direction mark Notch alignment Left Top G G G G Q...

Page 17: ...MWJG 09 Assembly Manual 17 26 7 OPEN LOCK How to use J Note The direction is based on the normal placement of the product as a reference LX16 KX2 JX2 K Lx4 K Lx4 K Lx4 Lx4 J Lx4 J Rotate 180...

Page 18: ...X4 GX4 E X1 STEP 1 Drawer installation STEP 2 Drawer installation STEP 3 Drawer installation STEP 4 Drawer installation C G A1 A1 A2 A2 A1 A1 A2 A2 C C C x1 x1 x1 x1 x1 x1 step 1 step 2 G G G F F F F...

Page 19: ...GX4 E X1 B A1 A2 9 STEP 1 Drawer installation STEP 2 Drawer installation STEP 3 Drawer installation STEP 4 Drawer installation C G G C C C x1 x1 x1 x1 step 1 step 2 G G F F F F F PULLEY BEHIND E B R...

Page 20: ...6 GX4 OX1 STEP 1 Drawer installation STEP 2 Drawer installation STEP 3 Drawer installation STEP 4 Drawer installation A A A A x1 x1 step 1 G G G G F 10 FX9 AX4 CX4 F X1 B Fx3 O x1 C C C C x1 step 2 F...

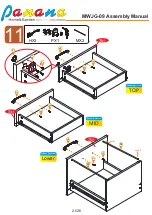
Page 21: ...MWJG 09 Assembly Manual 21 26 11 HX3 PX1 MX2 TOP Drawer placement MID Drawer placement Lower Drawer placement x1 P1 P2 P1 P1 P1 P3 P4 H1 H2 H1 H1 H2 H1 H1 H1 H1 H2 H2 P3 P2 P1 M M setp 1 setp 2 x1 x1...

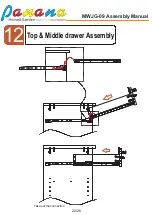
Page 22: ...MWJG 09 Assembly Manual 22 26 12 Take out the connection Top Middle drawer Assembly...

Page 23: ...MWJG 09 Assembly Manual 23 26 13 Lower drawer installation Effect After Assembly...

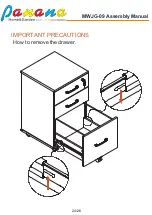
Page 24: ...MWJG 09 Assembly Manual 24 26 How to remove the drawer IMPORTANT PRECAUTIONS...

Page 25: ...PRECAUTIONS After installing the drawer it is found that the panels cannot be aligned Gently push the top panel of the cabinet to move it left and right until the drawer panel is flush then install co...

Page 26: ...MWJG 09 Assembly Manual 26 26 14 I KitX8 I1 I2 Corner Guard installation I1 I2 I Kit I Kit I Kit I Kit I Kit I Kit I Kit I Kit Put on corner guard to make the cabinet stable...

Reviews: