background image

— 12 —

Page 12

June 5, 2002 1:41 pm

Up to 8 timer recording programs can be made using VCR Plus+ 
timer programing, Express timer programing or 24HR Quick 
Programing method as far as a year in advance. Remember, the 
clock must be set before you can program the timer.

NOTES:

If all the 8 programs have already been set, “PROGRAM FULL” 
appears on the TV screen.

After timer recording is completed, the VCR turns off 
automatically.

You can program the timer recording while a regular recording 
is in progress; the menu screens will not be recorded.

Even if a power failure occurs, the VCR keeps your timer 
programs. However, the clock time, channel settings, and other 
menu settings are lost. As a result, when the power is supplied 
again to this VCR after the power failure, this VCR starts the 
Plug&Play setting automatically to restore the clock time and 
channel setting. If the clock time and channel setting are 
restored correctly, each timer program you have made will start 
at its start time unless its end time has elapsed.

If the tape reaches its end during timer recording, the recording 
stops and “ 

#

“, “ 

” and “ 

$

” on the display panel blink. Press 

TIMER

 to disengage timer, then press 

STOP/EJECT

 (

0

) on 

the VCR to eject the cassette or press 

POWER


1

 then press 

REW

 (

3

) on the Remote to rewind the tape.

Changing VCR Plus+

®

 Setting

The VCR Plus+ programing system assigns a VCR Plus+ guide 
channel to the TV channels and the cable channels. These guide 
channel numbers are also called the VCR Plus+ channel codes. 
Most TV listings have a section, usually a chart, indicating the 
guide channel numbers assigned to each station.
To ensure that VCR Plus+ timer recording operates correctly, it is 
necessary to set the VCR Plus+ “Guide Channel Set” for each 
station.
If you have moved to a different area or if a broadcasting station’s 
channel number has been changed, perform the following steps to 
set the correct guide channel number.

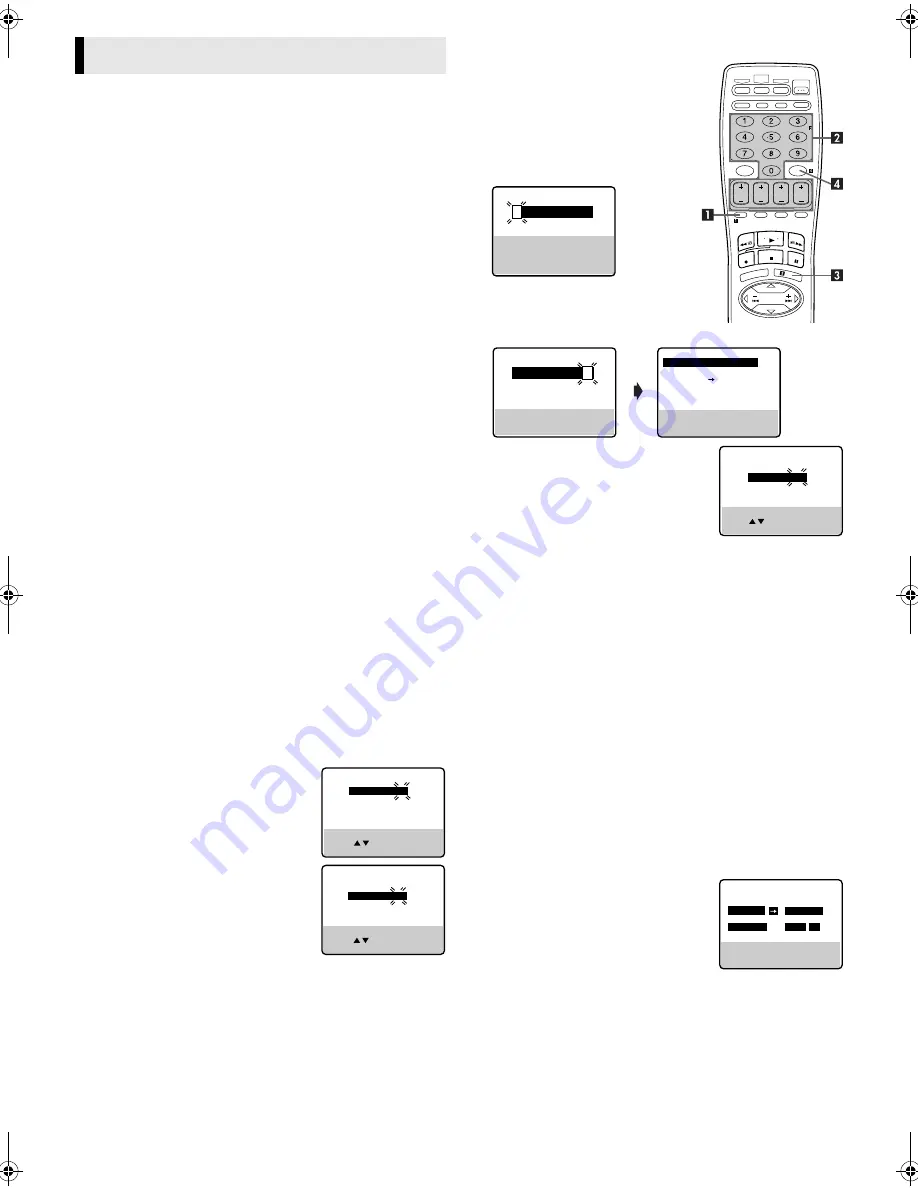
A

Access Main Menu screen, then Initial Set screen

Press 

MENU

 on the Remote. Press 

rt

 to move the highlight bar 

(arrow) to “INITIAL SET”, then press 

OK

 or 

e

.

B

Access Guide Channel Set screen

Press 

rt

 to move the highlight bar (arrow) to “GUIDE 

CHANNEL SET”, then press 

OK

 or 

e

.

C

Input guide channel number

Press 

rt

 or the 

Number keys

 to select the 

VCR Plus+ guide channel number as 
shown in the TV listing, then press 

OK

 or 

e

.

D

Input receiving channel number

Press 

rt

 or the 

Number keys

 to select the 

number of the channel on which the guide 
channel’s broadcasts are received, then 
press 

OK

 or 

e

.

Repeat steps 

3

3

3

3

 and 

4

4

4

4

 for each instance.

E

Return to normal screen

Press 

MENU

 on the Remote.

VCR Plus+

®

 Timer Programing

The PlusCode programing numbers are 
the numbers next to the program in 
most TV listing.
Load a cassette with the record safety 
tab intact. The VCR turns on, and the 
counter is reset, automatically.

A

Press 

PROG.

 on the Remote to access 

the PlusCode No. screen.

B

Press the appropriate 

Number keys


to input the PlusCode number, then 
press 

OK

 or 

e

. Check to make sure 

the setting is accurate on the Program screen.

If the Guide Channel Set screen 
appears after pressing 

OK

, press the 

Number keys

CH+/–

 or 

rt

 to input 

the number of the channel on which 
the broadcast for the PlusCode 
number is received on the VCR.

To set the tape speed, press 

SP/EP

.

To change the stop time, press 

STOP+/–

.

To timer-record daily (Monday–Friday) or weekly serials, 
press 

DAILY

 (

M-F

) (

Number key “8”

) or 

WEEKLY

 (

Number 

key “9”

). Pressing the button again makes the “DAILY” or 

“WEEKLY” display disappear.

If you made a mistake, press 

CANCEL

 to access the PlusCode 

No. screen again.

If an incorrect PlusCode number or the one for a broadcast 
already finished has been inputted, “ERROR” is displayed for 
about 5 seconds, then the PlusCode No. screen reappears.

C

Press 

OK

 or 

PROG.

.

If “PROGRAM NOT COMPLETED PROGRAM OVERLAP” 
appears, see “Program overlap warning display” (

pg. 13).

D

Press 

TIMER

. The VCR turns off automatically and “

#

” is 

displayed on the display panel.

Express Timer Programing

Load a cassette with the record safety tab intact. The VCR turns 
on, and the counter is reset, automatically.

A

Press 

PROG.

 on the Remote to access the PlusCode No. screen.

B

Press 

START+/–

 once to access 

Program screen.
Press 

START+/–

STOP+/–

DATE+/–

 or 

CH+/–

 repeatedly to enter the start 

time, stop time, date or channel.

Press and hold 

START+/–

 or 

STOP+/–


to increase the time in 30-minute 
intervals.

To set the tape speed, press 

SP/EP

.

To timer-record daily (Monday–Friday) or weekly serials, 
press 

DAILY

 (

M-F

) (

Number key “8”

) or 

WEEKLY

 (

Number 

key “9”

). Pressing the button again makes the “DAILY” or 

“WEEKLY” display disappear.

C

Press 

OK

 or 

PROG.

.

If “PROGRAM NOT COMPLETED PROGRAM OVERLAP” 
appears, see “Program overlap warning display” (

pg. 13).

Timer Recording

GUIDE CHANNEL SET

GUIDE CH :      6       

VCR CH

:  – – –


PRESS NUMBER KEY (0–9)

 OR (   ,   ), THEN (OK)

 PRESS (MENU) TO END

GUIDE CHANNEL SET

GUIDE CH :      6       

VCR CH

:    47


PRESS NUMBER KEY (0–9)

 OR (   ,   ), THEN (OK)

 PRESS (MENU) TO END

PLUSCODE NO.

PRESS NUMBER KEY (0–9)
PRESS (+/–) TO SET

EXPRESS PROGRAMMING

PRESS (PROG.) TO END

PROGRAM 1


(PLUSCODE NO. 12345678)

START

STOP

8:00PM

10:00PM

DATE

CH

12/24/02

12   SP

TUE

 PRESS (8=DAILY, 9=WEEKLY
 STOP+/– = STOP TIME, SP/EP)
 PRESS (PROG.) TO END

PRESS NUMBER KEY (0–9)

THEN (OK) 

PRESS (PROG.) TO END

  1 2 3 4 5 6 7 8

PLUSCODE NO.

GUIDE CHANNEL SET

GUIDE CH :    12       

VCR CH

:  – – –

PRESS NUMBER KEY (0–9)

OR (   ,   ), THEN (OK)

PRESS (PROG.) TO END

PROGRAM 1

START

STOP

– –:– –AM

– –:– –AM

DATE

CH

– –/– –/– –

– – – SP

 PRESS (+/

, SP/EP, 8=DAILY

 9=WEEKLY), THEN (0K)
 PRESS (PROG.) TO END

AG-3200P-EN.fm  Page 12  Wednesday, June 5, 2002  1:43 PM

Summary of Contents for AG-3200P

Page 1: ...ecorder AG P Before attempting to connect operate or adjust this product please read these instructions completely Printed in China VQT0A13 0702MNVf f f fPJf f f fBJ LPT0714 001A REW FF REC LINK 24HR QUICK PROGRAM S VIDEO POWER INSERT A DUB ...

Page 2: ...his reminder is provided to call the CATV system installer s attention to Article 820 40 of the NEC that provides guidelines for proper grounding and in particular specifies that the cable ground shall be connected to the grounding system of the building as close to the point of cable entry as practical CAUTION Changes or modifications not approved by PANASONIC could void user s authority to opera...

Page 3: ...om the type of power source indicated on the marking label If you are not sure of the type of power supply to your home consult your product dealer or local power company If your product is intended to operate from battery power or other sources refer to the operating instructions 3 Overloading Do not overload wall outlets extension cords or integral convenience receptacles as this can result in a...

Page 4: ...d has been spilled or objects have fallen into the product c If the product has been exposed to rain or water d If the product does not operate normally by following the operating instructions Adjust only those controls that are covered by the operating instructions as an improper adjustment of other controls may result in damage and will often require extensive work by a qualified technician to r...

Page 5: ...S VIDEO input connector S VHS indicator S VIDEO AC power cord The glow in the dark buttons shown in white on the illustration above are helpful when using the Remote in darkened rooms To recall an indication A Press OSD OK All indications corresponding to the current status are displayed for 5 seconds After that the counter information and RECORD PAUSE if in the Record Pause mode remain on the TV ...

Page 6: ... Depending on areas or reception conditions the VCR may not receive the Auto clock setting data from the PBS channel If this function is taking a considerable amount of time it may be necessary to perform the procedure in Semiauto Clock Set 墌 pg 7 or Manual Clock Set 墌 pg 8 What to do if Plug Play setting failed If an incorrect time is displayed on the display panel perform the procedure in Semiau...

Page 7: ...ress OK or e to move the highlight bar to D S T then press rt repeatedly until the desired setting is selected AUTO Select if you want to adjust your VCR s clock automatically by the incoming signal from the host channel Auto Daylight Saving Time enables automatic adjustment of the VCR s clock at the start and end of Daylight Saving Time Be sure to select the correct time zone manually in step 4 4...

Page 8: ...light bar arrow to AUTO CHANNEL SET then press OK or e The VCR selects the correct band TV or CATV automatically during Auto Channel Set When Auto Channel Set is complete SCAN COMPLETED appears on screen If the scan was unsuccessful SCAN COMPLETED NO SIGNAL appears on screen Check the connections and start again Press MENU to return to normal screen Setting channels manually Manual Channel Set You...

Page 9: ...R Pause playback and view still picture Press PAUSE 9 Press PLAY 4 to resume normal playback OR Push the JOG dial Push the JOG dial again to resume normal playback NOTE During still picture vertical vibration may appear on the TV screen Press CH on the Remote to get a clearer picture Pause and Frame by Frame playback Press PAUSE 9 to pause then press 2or 6 or PAUSE 9 repeatedly Press PLAY 4 to res...

Page 10: ...ay press 2or 6 repeatedly until the correct number is displayed on the screen only if SUPERIMPOSE is set to ON 墌 pg 15 Playback begins automatically when the desired recording is located Locating beginning of timer recordings Instant Review After ensuring that the VCR is turned off and that the timer mode is disengaged press REVIEW The VCR turns on and rewinds to the index code indicating the begi...

Page 11: ...or STOP EJECT 0 on the VCR Watching one program while recording another During recording If you connect the TV and the VCR only using the RF connection 墌 pg 6 to view pictures from the VCR press TV VCR on the Remote so that VCR mode indicator goes off from the display panel The TV broadcast being recorded disappears If you are using the AV connection 墌 pg 6 to view pictures from the VCR change the...

Page 12: ...on the Remote VCR Plus Timer Programing The PlusCode programing numbers are the numbers next to the program in most TV listing Load a cassette with the record safety tab intact The VCR turns on and the counter is reset automatically A Press PROG on the Remote to access the PlusCode No screen B Press the appropriate Number keys to input the PlusCode number then press OK or e Check to make sure the ...

Page 13: ...n the Program screen you do not want is shown To change a program press the appropriate button START STOP DATE CH DAILY M F Number key 8 WEEKLY Number key 9 and or SP EP when the Program screen on which you want to make changes is shown E Return to normal screen Press PROG CHECK repeatedly until no Program screen is shown F Reengage timer recording standby mode Press TIMER The VCR turns off automa...

Page 14: ...es not work with S VHS cassettes To keep the highest quality recording and playback pictures over a long period of time S VHS recording on S VHS cassettes is recommended Use of high grade tapes is recommended for S VHS ET recordings On some tapes picture quality will not improve even if the S VHS ET function is used Check the recording quality before you start important recordings 䡵 VIDEO CALIBRAT...

Page 15: ...the main audio is recorded on both the Hi Fi and normal tracks When this function is set to OFF the SAP audio cannot be recorded NOTE When the channel is changed on the VCR The STEREO indication appears on the screen for about 5 seconds if the program is a stereo broadcast The SAP indication appears on the screen for about 5 seconds if the program is a SAP broadcast Both indications appear when a ...

Page 16: ...emote for more than 10 seconds The VCR turns off CL appears for about 5 seconds on the display panel To release the child lock press and hold POWER 1 on the Remote until the VCR turns on NOTES Pressing TIMER during timer recording unplugging the AC power cord or a power outage also releases the child lock When the child lock function is in use keep the Remote out of the children s reach Timer reco...

Page 17: ...Press the Number key 2 C Press OK and release A B The Remote now can transmit B code control signals B Check remote control code for VCR Press and hold 4 on the VCR for more than 5 seconds while the VCR is turned off The code currently set appears on the display panel C Change code for VCR Press any key on the Remote The VCR now responds to B code control signals To set the Remote and the VCR back...

Page 18: ...onnector on recording VCR When using this VCR as the recording VCR select the appropriate mode depending on the connector being used 墌 pg 16 When using S VIDEO input connector on the front panel set FRONT AUX INPUT to S VIDEO When using S VIDEO IN connector on the rear panel set REAR AUX INPUT to S VIDEO When using VIDEO input connector on the front panel set FRONT AUX INPUT to VIDEO When using VI...

Page 19: ...e record safety tab has been removed When playing back an audio dubbed tape press A MONITOR to select the soundtrack you wish to hear 墌 pg 9 Selecting monitor sound Insert Editing and AV Dubbing Insert Editing You can replace a recorded scene with new scene recorded on another tape or with other material Both the picture and the sound recorded on the Hi Fi sound track are replaced at the same time...

Page 20: ... Locate start point and engage Insert Editing mode Press REW 3 then press PAUSE 9 when you find the beginning of the scene for which you want to edit then press INSERT The VCR enters the Insert Editing Pause mode 䡬 and light on the display panel If you want to perform AV Dubbing and replace the picture Hi Fi audio soundtrack and normal audio soundtrack all at the same time after you press INSERT p...

Page 21: ...type color signal and EIA monochrome signal 525 lines 60 fields Recording Playback system DA 4 Double Azimuth head helical scan system Signal to noise ratio 45 dB Horizontal resolution VHS 230 lines S VHS 400 lines Frequency range Normal audio 70 Hz to 10 000 Hz Hi Fi audio 20 Hz to 20 000 Hz Input Output RCA connectors IN x 2 OUT x 1 S video connectors IN x 2 OUT x 1 TUNER Tuning system Frequency...

Page 22: ...TV SYMPTOM POSSIBLE CAUSE CORRECTIVE ACTION Recording will not start There is no cassette loaded Insert a cassette on which the record safety tab is intact The loaded cassette has had its record safety tab removed Remove the cassette and cover the hole with adhesive tape or load a cassette on which the record safety tab is intact SYMPTOM POSSIBLE CAUSE CORRECTIVE ACTION Timer recording will not wo...

Page 23: ... 23 Memo ...

Page 24: ...0068 323 436 3500 Government Marketing Department 52 West Gude Drive Rockville MD 20850 301 738 3840 Broadcast PARTS INFORMATION ORDERING 9 00 a m 5 00 p m EST 800 334 4881 24 Hr Fax 800 334 4880 Emergency after hour parts orders 800 334 4881 TECHNICAL SUPPORT Emergency 24 Hour Service 800 222 0741 Panasonic Canada Inc 5770 Ambler Drive Mississauga Ontario L4W 2T3 905 624 5010 Panasonic de Mexico ...
Reviews: