Chapter 5 Shooting
—
Adjusting the white and black balance
- 114 -
Adjusting the white and black balance
To obtain high-quality video at all times using the unit, the white and black balance must be adjusted according to conditions.
Adjust the AWB (white balance adjustment), ABB (black balance adjustment), and AWB (white balance adjustment) in order to obtain higher image
quality.
≥
White balance settings are not possible when IR recording is enabled.
≥
White balance/black balance adjustment is done using the [AWB] USER button function. Make the settings beforehand. (
It is set in the [USER6] button icon at the time of purchase.
White balance adjustment
Follow the steps below to adjust the white balance automatically.
∫
When stored in white balance [Ach]
1
Switch to manual mode with the <AUTO/MANU> switch. (
2
Set the gain value. (
Normally, set this to 0 dB. If it is too dark, set the gain to an appropriate value.
3
Press the <WHITE BAL> button to switch to [Ach].
Each time you press the button, the white balance switches in the order “Preset”, [Ach], [Bch].
4
Change the <ND FILTER> switch settings according to the light conditions.
For setting examples for the <ND FILTER> switch, refer to “Brightness adjustment”. (
5
Place the white pattern at a point where the light conditions match those for the light source for the subject, and zoom in on the
white pattern so that the white color appears in the screen.
6
Adjust the iris (the lens stop).
Adjust the iris so that the brightness of Y GET is approx. 70%.
7
Either press the USER button assigned to [AWB] or touch the USER button icon.
Automatic adjustment of the white balance starts and the white balance adjustment value is memorized.
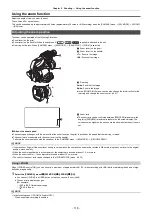
A
<ND FILTER> switch
B
Multidial
C
<AUTO/MANU> switch
D
<WHITE BAL> button
E
Color temperature
≥
The white balance being set is displayed.
Ach


