52
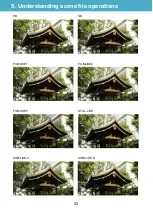
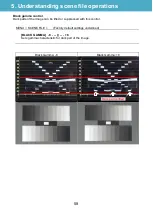
Gamma settings
There are cases where the color and contrast, which look natural to the eye, are not fully
reproduced in the captured image. An effective way to improve the gradation of the output signal
is to select a suitable Gamma curve according to the scene conditions. The AG-UX series offers
eight types of different Gamma curves.
HD:
This is a video Gamma characteristic for HD (High Definition).
This Gamma complies with the standards defined by ARIB, EBU, SMPTE, etc. Use this for
the purpose of normal HD shooting.
SD:
Gain is increased for dark areas more than HD Gamma.
This Gamma curve can be used for shooting in SD mode, or for HD shooting that needs the
same Gamma as used in SD shooting.
FILMLIKE 1:
Compared with HD Gamma, this has the characteristics by which the gradation of the
highlights can be reproduced better. Using this Gamma curve which gently slopes for the
low-brightness area makes the picture look calm. Contrast becomes sharper and the
gradation expression of the middle- and high-brightness areas (face, etc.) is extended.
FILMLIKE 2:
Compared with FILM LIKE 1, this has the characteristics by which the gradation of the
highlights can be reproduced better.
FILMLIKE 3:
Compared with FILM LIKE 2, this has the characteristics by which the gradation of the
highlights can be reproduced better.
CINE-LIKE V:
Video-use cine Gamma characteristics.
This is a Gamma curve to make a movie-like picture using a video camera. It creates a
picture where more importance is placed on contrast than in normal video mode recording.
CINE-LIKE D:
Film-use cine Gamma characteristics.
This Gamma gives priority to the Dynamic Range and maintains the gradation that ranges
evenly from low to high level. It creates a unique look which is sometimes used as an artistic
effect.
STILL-LIKE:
This is a Gamma curve to make digital still camera-like picture using a video camera.
5. Understanding scene file operations
Summary of Contents for AG-UX90PJ
Page 1: ...1 V1 00E ...
Page 4: ...4 1 Image sensor record formats ...
Page 9: ...9 2 Preparation before Shooting ...
Page 14: ...14 3 MENU settings ...
Page 34: ...34 4 Understanding advanced features ...
Page 44: ...44 5 Understanding scene file operations ...
Page 59: ...59 6 After recording ...
Page 62: ...62 7 Appendix ...
Page 71: ...71 Revision history Issued Revision history Document ver Dec 2016 First edition issued v1 00E ...

