background image

23

Setup (Initial Settings)

The unit’s main settings can be performed and
checked using the on-screen menus which are
displayed on the video monitor connected to the unit. 
It is also possible to perform and check the settings
using the item numbers and setting numbers which
appear on the front panel’s display area.
A user setting memory is provided.  The desired
settings can be stored in this memory in advance for
use during operation.

Setting method using on-screen
menus

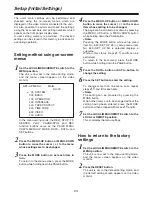
Set the LOCAL/MENU/REMOTE switch to the
MENU position. 

The unit is now set to the menu setting mode,
and the menu screen appears on the video
monitor.

1

Press the MENU-UP button or MENU-DOWN
button to move the cursor (

) to the menu

item whose setting is to be changed.

The page can be scrolled up or down by pressing
the MENU-UP button or MENU-DOWN button
while holding down the PAGE button.

<Note>

Pressing the MODE button while setup menu
item No. 622 (SET UP 25) or setup menu item
No. 623 (SET UP 50) is selected displays a
submenu.
While in this status, steps 

4

5

and 

6

can be

performed.
To return to the item menu, press the MODE
button while holding down the PAGE button.

4

Press the DATA+ button or DATA– button to
change the setting.

5

Set the LOCAL/MENU/REMOTE switch to the
LOCAL or REMOTE position.

This completes the menu settings.

7

Press the SET button to enter the setting.

To change more than one menu item, repeat
steps 

4

5

and 

6

for each item.

<Note>  

The setting can be canceled by pressing the
MODE button.
When other items are to be changed without the
setting having been entered, press the MODE
button and then proceed with steps 

4

5

and 

6

.

6

Press the MENU-UP button or MENU-DOWN
button to move the cursor (

) to the menu

whose settings are to be changed.

2

Press the MODE button to set each item in
turn.

To return to the menu screen, press the MODE
button while holding down the PAGE button.

3

In the menu setting mode, the REW, STOP, FF,
SEARCH, PLAY, PAUSE/STILL and REC
function buttons serve as the PAGE, MENU
DOWN, MENU UP, MODE, DATA–, DATA+ and
SET buttons.

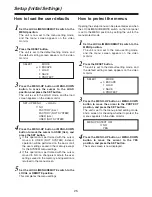
SET–UP MENU

MAIN

NO.00

00 SYSTEM

000 BASIC
100 OPERATION
200 INTERFACE
400 TAPE PROTECT
500 TIME CODE
600 VIDEO
700 AUDIO

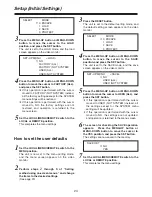
Set the LOCAL/MENU/REMOTE switch to the
MENU position.

The unit is now set to the menu setting mode,
and the menu screen appears on the video
monitor.

1

Press the RESET button.

The unit is set to the default setting mode, and
the default setting screen appears on the video
monitor.

2

How to return to the factory
settings

Summary of Contents for AJ-D95

Page 1: ...AJ DCP Digital Video Cassette Recorder Operating Instructions F10399W3040 D Printed in Japan VQT8017 3 P ...

Page 2: ...itude to constitute a risk of electric shock to persons The exclamation point within an equilateral triangle is intended to alert the user to the presence of important operating and maintenance service instructions in the literature accompanying the appliance CAUTION Do not install or place this unit in a bookcase built in cabinet or in another confined space in order to keep well ventilated condi...

Page 3: ... Time codes 19 User s bit 19 Setting the time code 19 Setting the user s bit 20 Time code user s bit playback 20 Superimposed Screens 21 Setup Initial Settings 23 Setting method using on screen menus 23 How to return to the factory settings 23 How to set the user defaults 24 How to load the user defaults 25 How to protect the menus 25 How to release the menu protection 26 How to display the DIAG m...

Page 4: ... 5P92LP Both L and M size cassettes supported This unit employs a front loading mechanism to support the recording or playback of DVCPRO or DVCPRO 50 format size L and M cassette tapes AC or DC operation This unit supports power supplied from both AC 120V and DC 12V sources Back space assemble recording function By using the REC button and PAUSE button together a combination which activates the au...

Page 5: ... ANALOG SDI OFF REC INHIBIT ON REMOTE PB PULL FOR VAR PLAY PAUSE STILL REC TAPE EE SET DATA j i MODE MENU UP DOWN PAGE REW STOP FF SEARCH RESET COUNTER 50 WIDE REMOTE REC INH CH 1 CH 2 dB 30 25 20 16 12 8 4 0 CTL TC UB HOURS MINUTES SECONDS FRAMES SERVO SCH Parts and Their Functions Front panel Counter display area ...

Page 6: ...n the error rate for either the video and audio playback signals has deteriorated A normal playback picture will appear even when this lamp is lighted Red This lamp lights when either the video or audio playback signals are subject to correction or interpolation Level meter This displays the levels of the audio signals The level of the input audio signals is displayed during recording and E E sele...

Page 7: ... 712 setting During playback the lamp is lighted by the No 712 setting See page 37 B50 Mbps lamp This lamp lights when the 50 Mbps mode has been established CHeadphones jack When a pair of stereo headphones are connected to this jack the sound of the recording or playback can be monitored through the headphones DVolume control This control is used to adjust the headphone volume EAudio monitor sele...

Page 8: ...ise will appear during still and linear 0 3a playback this is normal and not indicative of malfunctioning See page 16 LREC button Recording is commenced when this button is pressed together with the PLAY button When it is pressed in the stop or eject mode the input video signals and audio signals can be monitored even when the TAPE EE switch is set to TAPE It is also possible to use the button to ...

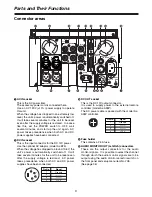
Page 9: ...1 2 4 Pin No Signal 1 Ground 2 3 4 12 V 1 2 3 4 Pin No Signal 1 Ground 2 3 4 12 V 1AC IN socket This is the AC power inlet The accessory power cord is connected here Use an AC 120V 10 power supply to operate this unit When the voltage has dropped to an extremely low level the unit s power is automatically switched off It will take several minutes for the unit to be reset even after the supply volt...

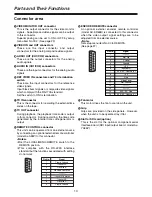
Page 10: ...he output connectors for the analog audio signals 9AUDIO IN CH1 CH2 connectors These are the input connectors for the analog audio signals REF VIDEO IN connectors and 75 Ω termination switch These are the input connectors for the reference video signals Input black burst signals or composite video signals which comply with the RS 170A standard Set the switch to ON for termination TC IN connector T...

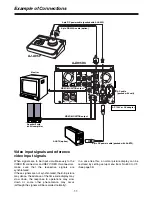
Page 11: ...ble option 4 pin DC power cable packed with AJ A95P AJ D95DC AJ A95P Video input signals and reference video input signals When signals are to be input simultaneously to the VIDEO IN connectors and REF VIDEO IN connectors make sure that the respective signals are synchronized If these signals are not synchronized the E E picture may dance the advance of the time code display may slow down the resp...

Page 12: ...VCPRO 25 Mbps mode use a VTR supporting DVCPRO 25 Mbps 184 minute tapes AJ P12MP AJ P24MP AJ P33MP AJ P46MP AJ P66MP CH1 AUDIO OUT 25 CH1 ST CH2 AUDIO MON SELECT CH 3 4 50Mbps CH2 REC INPUT SELECT ON OFF C B POWER EJECT LOCAL MENU ANALOG SDI OFF REC INHIBIT ON REMOTE PB PULL FOR VAR PLAY PAUSE STILL REC TAPE EE SET DATA j i MODE MENU UP DOWN PAGE REW STOP FF SEARCH RESET COUNTOR 50 M size cassette...

Page 13: ...rt as possible 1 2 3 Turn on the power 1 The stop mode is established when the STOP button is pressed The stop lamp lights and the tape stops traveling OIn order to protect the tape the tape protection mode is established after the time set in setup menu item No 400 STILL TIMER has elapsed See page 32 When the STOP REW FF or PLAY button is pressed the corresponding mode is established 1 Insert the...

Page 14: ... signals 1 Connect the signals that are to be recorded 2 Select the video and audio input signals using the INPUT SELECT button on the front panel 2 Adjusting the audio levels OAdjust the audio input signal levels The audio signals are recorded at the appropriate level when the audio recording level controls are in the pushed in position 4 Press the PLAY button while holding down the REC button Th...

Page 15: ...s will be disturbed if the lamp is flashing or off OSelect the 50 Mbps mode or 25 Mbps mode whichever corresponds to the recording mode of the tape for the setup menu item No 007 setting The recording mode can be identified and the playback mode can be switched automatically by selecting AUTO as the setup menu item No 008 setting See page 29 However in this case it may take some moments for the mo...

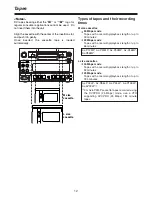
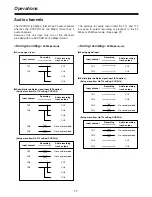
Page 16: ...n the AJ A95P Notes ONoise appears on the screen during playback at any tape speed except the normal tape speed 1a ODuring variable speed playback the sound recorded on the analog cue track is played back Variable speed playback When AJ A95P is connected Next VTR operation VTR operating mode Button pressed PAUSE STILL Play pause Play PLAY Play STOP Stop All modes STOP FF Fast forward STOP REW Rewi...

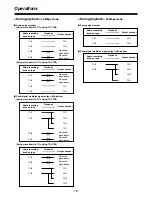
Page 17: ...Setup menu item No 712 setting CH1 CH2 Audio recording track on tape Input channel Recording CH1 CH1 CH2 CH2 No sound recorded CH3 No sound recorded CH4 CH3 CH4 Setup menu item No 712 setting CH3 CH4 Audio recording track on tape Input channel Recording CH1 CH3 CH2 CH4 No sound recorded CH1 No sound recorded CH2 CH3 CH4 Analog signal input Audio recording track on tape Input channel Recording CH1 ...

Page 18: ...CH1 No sound played back CH2 Output channel Audio recording track on tape Playback No sound played back CH3 No sound played back CH4 Serial digital multiplex signal output SDI option Setup menu item No 711 setting TR1 TR2 CH1 CH3 CH2 CH4 CH3 CH4 Output channel Audio recording track on tape Playback No sound played back CH1 No sound played back CH2 Setup menu item No 711 setting TR3 TR4 CH1 CH1 CH2...

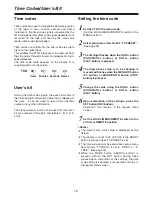
Page 19: ...F Setting the time code Notes OThe current time code value is displayed as the default OThe display is reset to 00 00 00 00 if the RESET button is pressed when TC PRESET is set OThe time code cannot be used unless setup menu item No 504 TC MODE is set to P REC or P FREE See page 33 OWhen the MODE button SEARCH button is pressed without the SET button having been pressed upon completion of the sett...

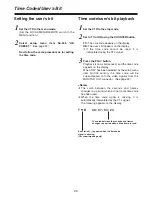
Page 20: ...nu mode Set the LOCAL MENU REMOTE switch to the MENU position 1 Select setup menu item No 506 UB PRESET See page 33 Now follow the same procedure as for setting the time code 2 Time code user s bit playback Set the VTR to the stop mode 1 Set to TC or UB using the COUNTER button TC The time code appears on the display UB The user s bit appears on the display OIf the time code cannot be read it is i...

Page 21: ... MONITOR OUT connectors have been connected to a TV monitor the control signals time codes etc can be displayed as abbreviations on the TV monitor screen This display can be set to ON or OFF by setting setup menu item No 002 See page 29 Display characters The background of the superimposed display characters can be changed by setting setup menu item No 006 CHARA TYPE See page 29 TCR TV monitor T T...

Page 22: ...servo is not locked E 00 appears on the front panel s counter display area LOW RF This appears when there is no head output E 01 appears on the front panel s counter display area HIGH ERROR RATE This appears when the error rate has deteriorated when the channel condition appears in red E 02 appears on the front panel s counter display area Operation modes The details to be displayed on the screen ...

Page 23: ...button 4 Press the DATA button or DATA button to change the setting 5 Set the LOCAL MENU REMOTE switch to the LOCAL or REMOTE position This completes the menu settings 7 Press the SET button to enter the setting To change more than one menu item repeat steps 4 5 and 6 for each item Note The setting can be canceled by pressing the MODE button When other items are to be changed without the setting h...

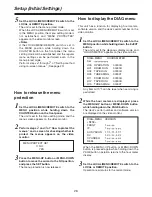
Page 24: ...the LOCAL or REMOTE position This completes the menu settings 7 SET UP MENU SAVE NO USER ALL USER NOT SYSTEM Press the MENU UP button or MENU DOWN button to move the cursor to the SAVE position and press the SET button The unit is set to the SAVE mode and the save screen appears on the video monitor 4 SAVE OK NO YES The screen for checking the SAVE operation appears Press the MENU UP button or MEN...

Page 25: ...or moved to NO no change is made to the user settings saved in the memory and operation is returned to the menu screen 4 Set the LOCAL MENU REMOTE switch to the LOCAL or REMOTE position This completes the menu settings 5 How to protect the menus Set the LOCAL MENU REMOTE switch to the MENU position The unit is now set to the menu setting mode and the menu screen appears on the video monitor 1 Open...

Page 26: ... protect the menus and a screen for checking whether to protect the menus appears on the video monitor How to display the DIAG menu Set the LOCAL MENU REMOTE switch to the MENU position while holding down the EJECT button The unit is set to the diagnosis display mode and HOURS METER appears on the video monitor 1 Any item with r can be reset when servicing is performed DIAG MENU HOURS METER Ser H0...

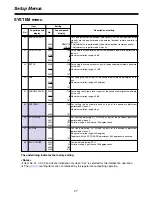
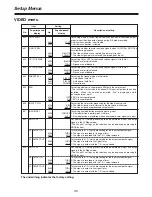
Page 27: ...unit Maximum variation range 25 degrees 04 CHROMA LEVEL 0000 0128 0255 128 0 127 For setting the chroma level as part of the encoder adjustments performed by the unit Maximum variation range 3 dB 05 SYSTEM H 0000 0255 128 127 For setting the horizontal phase as part of the encoder adjustments performed by the unit Maximum variation range 8 µs 07 SC FINE 0000 0255 128 127 For finely adjusting SC PH...

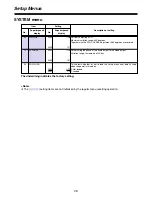
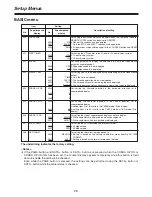
Page 28: ...ion of setting 10 AV PHASE 0000 0255 128 127 For adjusting the phase of the audio output to the video output Variation range Increments of 20 8 µs Setup Menus Note OThe setting items are not initialized by the regular menu resetting operation 20 P ON LOAD 0000 0001 OFF ON This selects whether or not to load the setup menu user default values when the power is turned on 0 Not loaded 1 Loaded The un...

Page 29: ... displayed by superimposing onto the video monitor output 0 Only the time is displayed 1 The time and operation status are displayed 2 The time and amount of remaining tape are displayed 3 The time operation status and amount of remaining tape are displayed 004 CHARA H POS 0000 0004 0008 0 4 8 For setting the character position in the horizontal direction for the superimposed display 005 CHARA V P...

Page 30: ... position of the TAPE EE switch 1 The digital circuit is set to the PB system It takes a shorter time for operation to transfer to the playback mode 106 HUMID OPE 0000 0001 OFF ON For setting whether to ignore condensation when it has formed and continue with operation 0 Unit does not continue to operate when condensation has formed 1 Unit continues to operate when condensation has formed in which...

Page 31: ...setting the operating method in the no gap mode Specifies whether or not to use the AUTO BACK function which rewinds the tape for a few seconds to eliminate gaps and distortion between segments 0 No AUTO BACK function 1 Auto back is performed when switching to the REC PAUSE mode after which the unit remains in REC PAUSE status When PAUSE is cancelled the tape is advanced and then recording starts ...

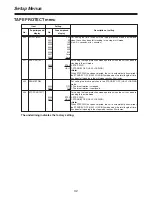
Page 32: ... of time it has been left standing in the still mode reaches 30 minutes 403 STOP PROTECT 0000 0001 STEP HALF For setting the tape protection mode operation when the unit has been left standing in the stop mode 0 STEP FWD 1 STANDBY OFF HALF LOADING Note When STEP FWD has been selected the unit is automatically transferred to the STANDBY OFF HALF LOADING mode when the total length of time it has bee...

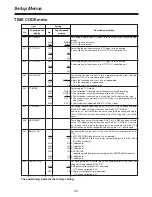
Page 33: ... specified 1 ISO CHARACTER 8 bit character set complying with the ISO 646 or ISO 2022 standard 2 Undefined 3 Undefined 4 Undefined 5 PAGE LINE page line multiplexing system complying with SMPTE262M standard 6 Undefined 7 Undefined 501 VITC POS 1 0000 0006 0010 10L 16L 20L For setting the position where the VITC signal is to be inserted The same line as the one used for VITC POS 2 cannot be set 502...

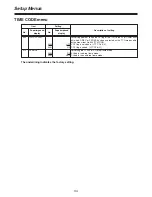
Page 34: ... menu item No 504 TC MODE 0 CF flag is not added LTC CF bit 0 1 CF flag is added LTC CF bit 1 510 DF MODE 0000 0001 DF NDF For setting the CTL and TCG drop frame mode 0 Used in the drop frame mode 1 Used in the non drop frame mode TIME CODE menu Item Setting No Superimposed display No Superimposed display Description of setting The underlining indicates the factory setting Setup Menus ...

Page 35: ...0000 0001 FORCED AUTO For setting frame detection processing during input 0 Frame detection is performed all the time 1 Frame detection is prohibited when non standard color signals are input 00 CMPST IN 0000 0001 THRU CUT This selects the 7 5 setup processing for the input composite signal 0 The signal is recorded in its original form 1 The signal is recorded with the 7 5 setup removed 01 CMPST O...

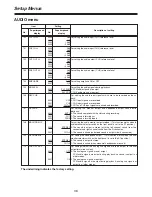
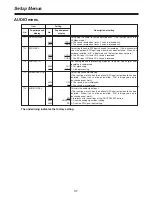
Page 36: ...nd is forcibly faded 708 MONITOR MIX 0000 0001 STEREO CH1 2 709 H PHONE MIX 0000 0001 STEREO CH1 2 For setting the headphone output This function works when the audio monitor selector switch on the front panel is set to the ST position 0 The sound is output in stereo 1 The sound is mixed when monaural headphones are used 710 CUE OUT SEL 0000 0001 OFF ON For setting whether the analog cue signals a...

Page 37: ...tal audio recording is commenced 0 Cut processing 1 V fade processing 714 EMBEDDED AUD 0000 0001 OFF ON For setting sound multiplexing This function works when the optional SDI input output board has been installed When it has not been installed N A is displayed and the function does not work 0 The sound is not multiplexed 1 The sound is multiplexed AUDIO menu Item Setting No Superimposed display ...

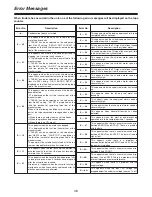
Page 38: ...ppears when the reel base which operates in accordance with the size of the tape has locked up for more than 2 5 seconds E 53 This appears when the capstan motor speed is abnormally low E 61 This appears when the supply reel motor has locked up E 62 This appears when the take up reel motor has locked up E 63 This appears when the supply reel motor speed is abnormally high E 64 This appears when th...

Page 39: ...e part white gear of the supply reel in the take up direction to take up the tape slack using the rubber part of the take up jig Note Take care not to damage the tape in any way 4 Once more use the Phillips head screwdriver to push in and turn the red plastic screw part counterclockwise Again rotate the flange part of the supply reel in the take up direction to take up the tape slack This two step...

Page 40: ...y after it has been heated OWhen the unit or tape is abruptly moved from an air conditioned location to a very warm or very humid location When moving the unit to the kind of location described above do not turn on its power immediately but leave it standing for about 10 minutes If condensation has formed inside the unit an error message d will light up on the counter display and the cassette tape...

Page 41: ... 5P92LP DVCPRO50 O33 min using AJ P66MP DVCPRO50 O184 min using AJ 5P92LP DVCPRO O66 min using AJ P66MP DVCPRO Tape used 1 4 thin magnetic layer metal tape FF REW time Less than 5 minutes using AJ 5P92LP VIDEO Digital video Sampling frequency DVCPRO50 Y 13 5 MHz PB PR 6 75 MHz DVCPRO Y 13 5 MHz PB PR 3 375 MHz Quantizing 8 bits Video compression system DCT variable length code Error correction Ree...

Page 42: ...CH1 CH2 low impedance 4 0 3 20 dBu Monitor output PHONOa2 L R low impedance 0 dBu CH1 MIX CH2 switchable Headphones output M3a1 stereo variable level maximum 20 dBu 8 Ω CH1 MIX STEREO CH2 switchable Counter 8 digits CTL TC UB amount of remaining tape switchable Audio level meter 17 steps excessive level display Other Servo lock tape travel status recording enabled prohibited SCH REMOTE WIDE channe...

Page 43: ......

Page 44: ...ntral Region 1707 N Randall Road E1 C 1 Elgin IL 60123 847 468 5200 WESTERN ZONE 3330 Cahuenga Blvd W Los Angeles CA 90068 323 436 3500 Dallas Region 6226 Abington Way Houston TX 77008 713 802 2726 No CA Northwest Region 5870 Stoneridge 3 Pleasanton CA 94588 925 416 5108 Government Marketing Department 52 West Gude Drive Rockville MD 20850 301 738 3840 Panasonic Canada Inc 5770 Ambler Drive Missis...

Reviews: