22
Introduction: Control Reference Guide
5.
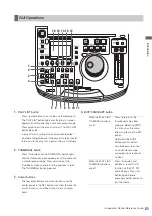
MENU/DIAG button
MENU button
Press this button to open the MENU. Press again to
return to the previous screen.
DIAG (SHIFT+MENU) button
Press to show information about this unit. Press again
to return to the previous screen. However, this function
is not available while thumbnails or play lists are
displayed.
Information about this unit includes [VIDEO SYSTEM],
[HOURSMETER], [WARNING], [UMID] and [DIF]. Use
the SET button or cross cursor buttons to switch
among them.
6.
IN/SLOT CLIP/PF1 button
Use these functions to create play lists. Press the
ENTRY button and this button simultaneously when
registering an event (when the PLAY LIST button and
the EVENT button are both on) to set an event IN point.
Hold down this button and press the RESET button to
cancel the IN point of the selected event.
➝
Refer to the Section “Using Play List” (page 67).
• Press the SHIFT button and this button
simultaneously while thumbnails are displayed to
switch the clip display between SELECTED and
specific SLOT.
• Press the ENTRY button and this button
simultaneously when the PLAY LIST button is off to
register a cue-up point.
• Press this button after the PF button when the
THUMBNAIL and PLAY LIST buttons are off to obtain
access to the setup menu registered using the PF1
button.
7.
TRIM–/SLOT SELECT– button
Hold down the IN, OUT or SPLIT button and press this
button in play list mode to shift the IN, OUT and SPLIT
points 1 frame backward (4 frames at 24PN).
Hold down the SHIFT button and this button
simultaneously when the PLAY LIST button is off to
move to the previous recording slot position.Pressing
this button when the unit is in slot 1 results in a move to
slot 6.
8.
ENTRY/CLIP (LIST/PF2 button)
Use these functions to create play lists.
Pressing the IN, OUT or SPLIT button simultaneous
with this button while registering an event (the PLAY
LIST and EVENT buttons are on), allows you to set the
IN, OUT and SPLIT points.
• Pressing the SHIFT button simultaneous with this
button in the play list mode allows you to add a clip
selected from a thumbnail display to the play list.
• Press this button after the PF button when the
THUMBNAIL and PLAY LIST buttons are off to obtain
access to the setup menu registered using the PF2
button.
9.
TRIM+/SLOT button
Hold down the IN, OUT or SPLIT button and press this
button in play list mode to shift the IN, OUT and SPLIT
points 1 frame forward (4 frames at 24PN).
While the PLAY LIST button is off, hold down the SHIFT
button and this button simultaneously to move to the
previous recording slot position. Pressing this button
when the unit is in slot 6 results in a move to slot 1.
10.
OUT/ALL CLIP/PF3 button
Use these functions to create play lists. Press the
ENTRY button and this button simultaneously when
registering an event (when the PLAY LIST button and
the ENTRY button are both on) to set an event OUT
point.
Hold down this button and press the RESET button to
cancel the OUT point of the selected event.
➝
For details, refer to “Using Play List” (page 67).
• Press the SHIFT button and this button
simultaneously while thumbnails are displayed to
return the clip display to ALL.
• Press the ENTRY button and this button
simultaneously when the PLAY LIST button is off to
register a cue-up point.
[VIDEO SYSTEM]
screen:
Shows current system
frequency, recording
format, input and output
formats and other
information.
[WARNING] screen:
Shows warning
information.
[HOURS METER]
screen:
Shows the unit serial
number, the number of
hours it has been on, and
the number of times it has
been switched on and off.
[UMID] screen:
Shows UMID information
for the current video.
[DIF] screen:
Shows various information
on the current DIF (the
IEEE 1394 interface).


