- 11 -
Purity and Convergence Procedure
Adjustment is necessary only if the CRT or the
deflection yoke is replaced or if the setting was
disturbed. The complete procedure consists of:
1.
Vertical Raster Shift Adjustment. (Only for Models
with Purity/Convergence Assembly with 4 Pairs
of Rings).
2.
Initial static convergence.
3.
Setting the purity.
4.
Final static convergence.
When the CRT or the Yoke is Replaced
Place the yoke on the CRT neck (do not tighten
the clamp).
For a 2-piece assembly (see Fig. 5):
Position purity/convergence assembly as shown and
tighten clamp snugly. Remove the hot-melt glue seal
on assembly and position like tabs of purity device
together at 12 o’clock to reduce its magnetic field
effect.
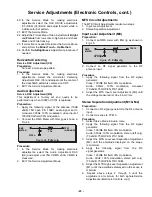
For models using 4 pairs of rings, place the vertical
raster shift tabs at 3 o’clock (90
o
from the purity and
convergence tabs, see Fig. 6 and Fig. 7)
For a 1-piece assembly (see Fig. 8):
Position like tabs of purity devices together at 12
o’clock to reduce any magnetic field effect. (For better
results, note part number and look for specifications at
Service Center)
For either assemblies:
Turn the Receiver ON. Operate the Receiver for 60
minutes using the first Purity Check field (white screen)
to stabilize the CRT.
Fully degauss the Receiver by using an external
degaussing coil.
Slide the deflection yoke back and forth on the neck of
the CRT until it produces a near white, uniform raster.
Vertical Raster Shift Adjustment
(Only for
Models with Purity/Convergence Assembly with 4
Pairs of Rings).
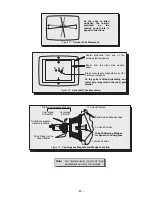
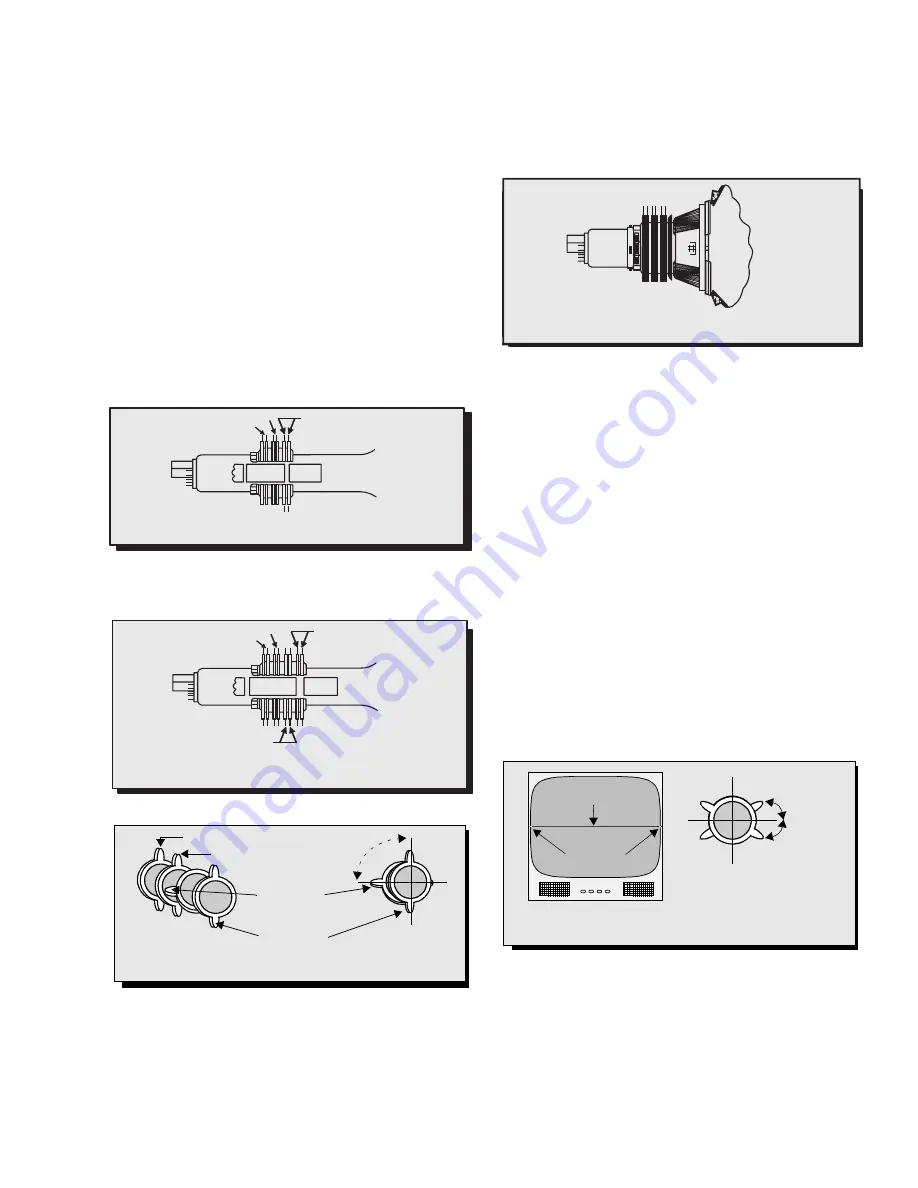
Apply a green pattern with a horizontal line, adjust the
Deflection Yoke so that has no tilt, then secure it.
Adjust center line of the pattern with the mechanical
center of the CRT, this center is determined by two
marks at the side edges of the screen. To adjust the
line, once the vertical raster shift tabs are place at 3
o’clock to reduce its magnetic field effect (see Fig. 6
and Fig. 7) open the tabs the same angle from the
center, until the center line of the pattern becomes a
straight line, centered with the marks of the CRT. (see
Fig. 9)
G3
G4
Purity Rings Centered
Over G3/G4 Gap
R&B Convergence Rings
R&B&G Convergence Rings
Figure 5.
Positioning of Purity/Convergence Assembly
(2-piece assembly)
G3
G4
Purity Rings Centered
Over G3/G4 Gap
R&B Convergence Rings
R&B&G Convergence Rings
Vertical Raster Shift Ring
Figure 6.
Positioning of Purity/Convergence Assembly
(4 Pairs of Rings)
90
o
Purity Rings
Vertical Raster
R&B Convergence Rings
R&B&G Convergence Rings
Figure 7.
Positioning of Purity/Convergence Assembly
(4 Pairs of Rings)
Shift Rings
Figure 8. Positioning of Purity/Convergence
Assembly (1-piece assembly)
Vertical Raster Shift tabs
Open the
same angle
from center
Figure 9.
Vertical Raster Shift Adjustment
(4 pairs of rings assembly)
Center Marks
from pattern
Center line
Mechanical


