background image

- 5 -

Accessories  ..........................................  5

Introduction  ...........................................  5

Major operating controls and  

their functions  .................................  6

How to install  ........................................  7

How to detach the hood  .......................  9 

How to adjust the viewfinder angle  ....  9 

Appearance  .........................................  10

Specifications  .....................................  11

Accessories

Mounting base  ....................................... 1
Mounting base screws  .......................... 2

Introduction

   This 4-inch CRT viewfinder is designed to be used with a convertible camera (such as 

the AW-E350, AW-E650, AW-E655, AW-E750 or AW-E860).

   The studio SDI card (AW-PB506A) or studio card (AW-PB305A) is required in order to 

attach the unit to the convertible camera.

Notes

   The AW-VF64 cannot be installed to the following models;  

AW-E300, AW-E300A, AW-E300S, AW-E600, AW-E800, AW-E800A, AW-RP605,  
AW-PB605

  The ranges within which the operation of this unit is guaranteed are as follows:

Supply voltage: 

10.5 V to 15.0 V

Ambient temperature:  +32°F to +104°F (0°C to +40°C)

   These ranges are more limited than the guaranteed operating ranges of other 

convertible cameras.  
Ensure that the unit is used within the ranges given here without fail: otherwise, 
trouble may result.

   Do not connect or disconnect the EVF connector while the unit’s power is still on. 

Doing so may result in viewfinder trouble.

   Noise may interfere with the pictures shown if the unit is used in a location with strong 

electrical or magnetic fields, such as near the transmitting antenna of a TV, radio 
broadcast station, or near a motor.

   When the viewfinder unit is to be discarded at the end of its service life, ask a 

specialized contractor to dispose of it properly in order to protect the environment.

Contents

060920 AW-VF64N_P.indd   5

2006/09/20   11:10:15

Summary of Contents for AWVF64N - 4" VIEWFINDER

Page 1: ...F0906Y0 D VQTB0132 Operating Instructions 4 CRT Viewfinder Model No AW VF64N Before operating this product please read the instructions carefully and save this manual for future use ...

Page 2: ...digital device pursuant to Part 15 of the FCC Rules These limits are designed to provide reasonable protection against harmful interference when the equipment is operated in a commercial environment This equipment generates uses and can radiate radio frequency energy and if not installed and used in accordance with the instruction manual may cause harmful interference to radio communications Opera...

Page 3: ...MENT AWAY FROM ALL LIQUIDS USE AND STORE ONLY IN LOCATIONS WHICH ARE NOT EXPOSED TO THE RISK OF DRIPPING OR SPLASHING LIQUIDS AND DO NOT PLACE ANY LIQUID CONTAINERS ON TOP OF THE EQUIPMENT CAUTION TO REDUCE THE RISK OF FIRE OR SHOCK HAZARD AND ANNOYING INTERFERENCE USE THE RECOMMENDED ACCESSORIES ONLY Safety precautions Note The rating plate serial number plate is on the bottom of the unit ...

Page 4: ...ience receptacles and the point where they exit from the apparatus 11 Only use attachments accessories specified by the manufacturer 12 Use only with the cart stand tripod bracket or table specified by the manufacturer or sold with the apparatus When a cart is used use caution when moving the cart apparatus combination to avoid injury from tip over 13 Unplug this apparatus during lightning storms ...

Page 5: ... within which the operation of this unit is guaranteed are as follows Supply voltage 10 5 V to 15 0 V Ambient temperature 32 F to 104 F 0 C to 40 C These ranges are more limited than the guaranteed operating ranges of other convertible cameras Ensure that the unit is used within the ranges given here without fail otherwise trouble may result Do not connect or disconnect the EVF connector while the...

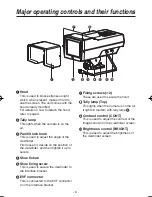
Page 6: ...decide on the position of the viewfinder and then tighten it up to secure Shoe fixture Shoe fixing screw This is used to secure the viewfinder to the interface bracket EVF connector This is connected to the EVF connector 2 on the interface bracket Fixing screws 2 These are used to secure the hood Tally lamp Top This lights when the camera is on the air It lights in tandem with tally lamp Contrast ...

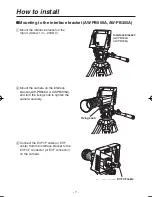
Page 7: ... AW PB506A or AW PB305A and turn the fixing knob to tighten the camera securely Connect the EVF I F cable or EVF cable from the interface bracket to the EVF I F connector or EVF connector on the camera Fixing knob Interface bracket AW PB506A AW PB305A Mounting to the interface bracket AW PB506A AW PB305A EVF I F cable ...

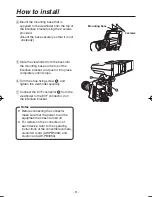
Page 8: ...nd push it into place completely until it stops Turn the shoe fixing screw and tighten the viewfinder securely Connect the EVF connector from the viewfinder to the EVF connector 2 on the interface bracket Mounting base 2 screws Notes Before connecting the connector make sure that the power to all the equipment has been turned off For details on the connections of each device refer to the operating...

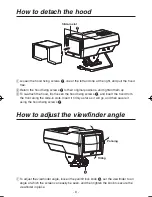
Page 9: ...ood first loosen the hood fixing screws and insert the hood from the front along the slide in slots Insert it firmly as far as it will go and then secure it using the hood fixing screws Panning Tilting How to adjust the viewfinder angle To adjust the viewfinder angle loosen the pan tilt lock knob set the viewfinder to an angle at which the screen can easily be seen and then tighten the knob to sec...

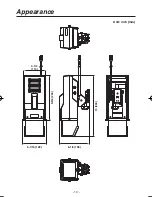
Page 10: ... 10 Appearance Unit inch mm 5 1 16 128 4 1 2 114 9 5 8 244 13 330 6 1 4 158 ...

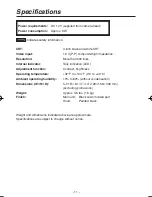
Page 11: ... 0 C to 40 C Ambient operating humidity 10 to 80 without condensation Dimensions W H D 5 1 16 6 1 4 13 128 158 330 mm excluding protrusions Weight Approx 3 5 lbs 1 6 kg Finish Main unit Black resin molded part Hood Painted black Weight and dimensions indicated above are approximate Specifications are subject to change without notice Power requirements DC 12 V supplied from camera head Power consum...

Page 12: ...436 3500 Government Marketing Department 52 West Gude Drive Rockville MD 20850 301 738 3840 Broadcast PARTS INFORMATION ORDERING 9 00 a m 5 00 p m PST 800 334 4881 24 Hr Fax 800 334 4880 Emergency after hour parts orders 800 334 4881 TECHNICAL SUPPORT Emergency 24 Hour Service 800 222 0741 Panasonic Canada Inc 5770 Ambler Drive Mississauga Ontario L4W 2T3 905 624 5010 Panasonic de Mexico S A de C ...

Reviews: