6.
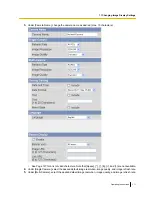
Under [Overlay Setting], select what information is displayed in the overlay displayed on the single camera
page, multi camera page, and buffered images page. See Page 9 for an example of a camera image
overlays.
a.
Select whether you want to display a time stamp in the upper left corner of camera images, then select
the desired format for the time stamp. To select 12-hour or 24-hour time format, see Page 95.
b.
Select whether you want to display a text message in the lower left corner of camera images, then
enter the desired text (max. 20 characters).
•
See Page 147 for a list of valid characters. Note that [Space], ["], ['], [&], [<], and [>] are not
available.
c.
Select whether you want to display trigger status in the upper left corner of camera images, after date
and time overlay (if enabled).
•
M
will be displayed when the motion detection feature has been triggered.
•
1
will be displayed when the built-in sensor has been triggered.
7.
Under [Language], select the camera’s display language.
•
The user can change the display language on the top page if desired.
•
If you select [English], [Japanese], [French] or [Simplified Chinese], the selected language is displayed
on every page.
•
If select a language other than English, Japanese, French, or Simplified Chinese, the selected
language is displayed as the initial language when clicking the [Top], [Single], [Multi], and [Buffered
Image] tabs. All other pages are displayed in English.
8.
Under [Banner Display], select the desired parameters for the banner displayed on the single camera page.
a.
Select whether you want to display a banner.
b.
Select which users the banner is displayed for.
c.
Enter the URL (max. 127 characters
*1
), including
http://
if necessary, of the banner image file. This
specifies the location of the image file that is displayed as the banner.
Note
•
If authentication is required to display the image URL, an authentication window will be
displayed when you access the single camera page.
•
Each time the single camera page is accessed, the camera accesses the URL of the banner
image file and reads the file. Be aware that the computer/server that contains the banner image
file may become burdened if the single camera page is accessed or refreshed frequently.
d.
Enter the URL (max. 127 characters
*1
), including
http://
if necessary, of the banner’s link. This
specifies the web page or image that is displayed when the user clicks the banner.
9.
Click [Save].
*1
Note that [Space], ["], ['], [&], [<], and [>] are not available.
112
Operating Instructions
7.1 Changing Image Display Settings


