background image

English

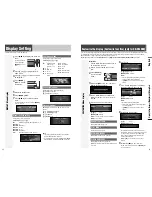
Power on

Press 

[SOURCE]

(

PWR

).

Notes:

¡

The opening screen appears. You can change the
opening screen. (only for CQ-C8300N,

a

page 33)

¡

The demonstration message appears for first use. (

a

page 8)

Power off

Hold down 

[SOURCE]

(

PWR

) until you

hear a beep, then release it.

Note:

The ending screen appears at ACC on. You can

change the ending screen. (only for CQ-C8300N,

a

page

33)

10

General

This chapter explains how to turn on or off the power, how to adjust the volume, etc.

11

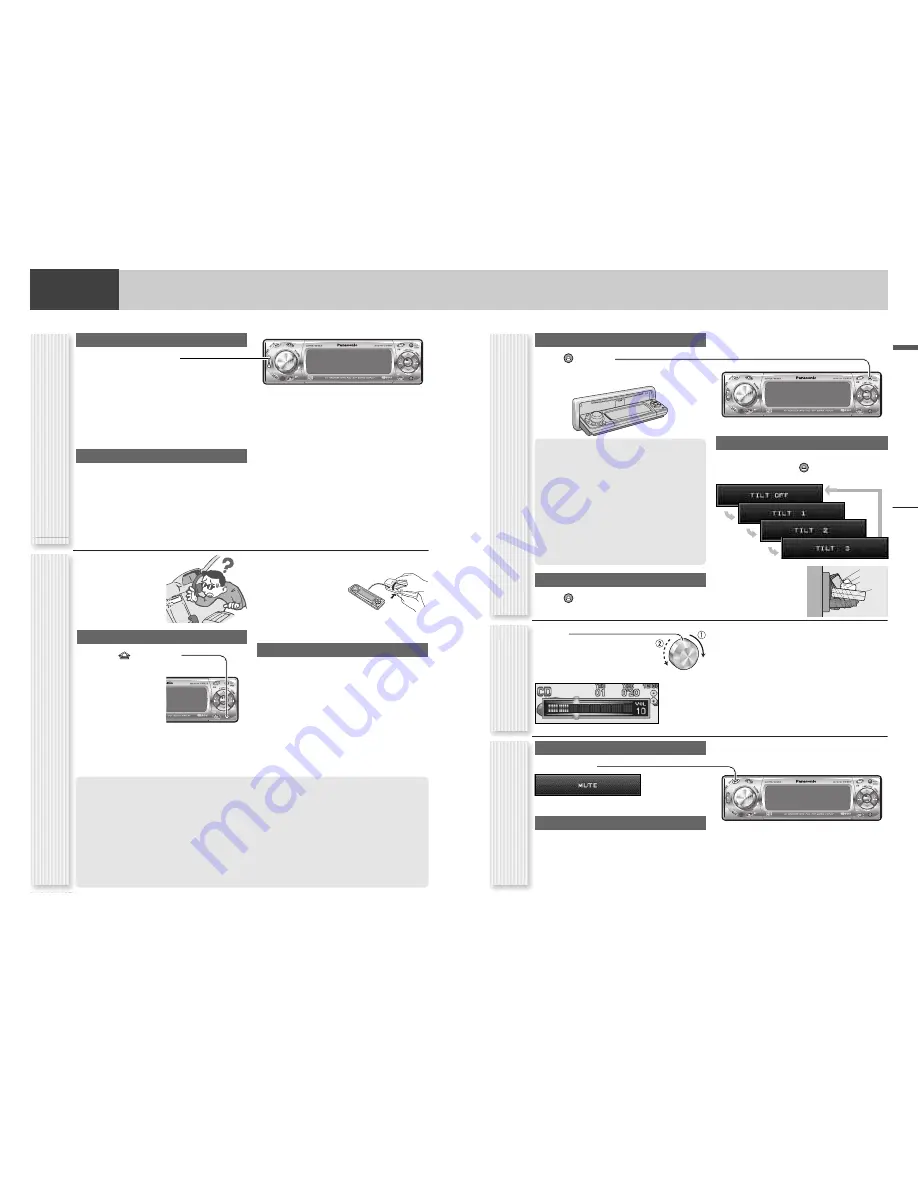
You can remove the face
plate to prevent it from
being stolen.

Removing

1

Press 

[

(Release).

The front panel auto-
matically closes after
a lapse of 5 seconds
while it is open.

The power is automatically turned off while the unit
is active.

2

Put the face

plate in the case.

Mounting

1

Slide the left side of the removable face

plate in place.

2

Press the right end of removable face

plate until “click” is heard.

Press it until you hear a click.

Cautions:

¡

It is recommended to remove or mount the face
plate when the plate is at the closed position.
Do not remove or mount the plate when the plate is
in motion.

¡

This face plate is not waterproof. Do not expose it to
water or excessive moisture.

¡

Do not remove the face plate while driving your car.

¡

Do not place the face plate on the dashboard or
nearby areas where the temperature rises to high
levels.

¡

Do not touch the contacts on the face plate or on the
main unit, since this may result in poor electrical
contacts.

¡

If dirt or other foreign substances get on the con-
tacts, wipe them off with clean and dry cloth.

¡

To avoid damaging the front panel, do not push it
down or place objects on it while it is open.

Open/Eject

Press 

[

(

OPEN

).

When a disc is already loaded, the disc will automatically
be ejected.

Close

Press 

[

(

OPEN

).

Tilt

The display angle changes among 4 levels as follows
every time you hold down 

[

(

TILT

)

for 1 sec. or

more and release. 

Note:

The last selected

angle is maintained even
after turning off the power.

Notes:

¡

The volume level can be set independently for each
source. (For radio, one volume setting for AM, one
volume setting for all FMs)

¡

The volume is not adjustable while an error display is
on the monitor. (

a

page 38)

q

Up

w

Down

Setting Range: 0 to 40

Default: 18

Volume off (down)

Press 

[MUTE]

.

Cancel

Press 

[MUTE]

again.

Note: 

Volume-down range can be specified. (

a

page

31)

CQ-C8300N

BAND

CQ-C8300N

BAND

CQ-C8300N

BAND

CQ-C8300N

BAND

General

Power On/off

(PWR: Power)

Front Panel Motion (Open/Close, T

ilt)

(OPEN/CLOSE, TILT)

V

olume Adjustment

(VOLUME)

Temporar

y V

olume Off (Down)

MUTE (ATT: Attenuation)

Cautions:

¡

To avoid damaging the front panel, do not push it
down or place objects on it while it is open.

¡

Do not pinch your finger or hand in the front panel.

¡

Do not insert foreign objects into the disc slots.

¡

For the following cases, the front panel automati-
cally closes. Use caution not to catch your finger.

¡

After a lapse of 20 seconds

¡

When a disc is inserted

¡

When the face plate is removed (

a

page 10)

TILT 1
TILT 2
TILT 3

OPEN

Face Plate Removing/Mounting

(Anti-Theft System)

Summary of Contents for CQ-C8100N

Page 1: ...ww panasonic co jp global Please read these instructions carefully before using this product and keep this manual for future reference Bitte lesen Sie diese Bedienungsanleitung vor der Verwendung dieses Produktes aufmerksam durch und bewahren Sie sie danach für spätere Nachschlagzwecke sorgfältig auf Prière de lire ces instructions attentivement avant d utiliser le produit et garder ce manuel pour...

Page 2: ...http panasonic co jp pas car software customize index html About this manual This operating instruction manual is for two models CQ C8300N and CQ C8100N The difference among these models are mentioned below Available Disc Format CD TEXT Customize function CQ C8300N CD DA MP3 WMA Supported Supported CQ C8100N CD DA Not supported Not supported Features Model Features CQ C8300N MP3 WMA CD Player Rece...

Page 3: ...n those specified herein may result in hazardous radiation exposure Laser products Wave Length 780 nm Laser Power No hazardous radiation is emitted with safety protection Do not take apart this unit or attempt to make any changes yourself This unit is a very intricate device that uses a laser pickup to retrieve information from the surface of compact discs The laser is carefully shielded so that i...

Page 4: ...ected Example Track number 5 1 Press NUMBER 2 Press 5 3 Press BAND SET POWER SOURCE SOURCE PWR Power MUTE SBC SW Super Bass Control Subwoofer SQ Sound Quality MENU DIM Dimmer TA Traffic Announcement AF Alternative Frequency VOLUME PUSH SEL Select DISP Display PTY Program Type TUNE TRACK FILE only for CQ C8300N COLOR Release TILT OPEN eject SOURCE POWER MUTE SBC SW Super Bass Control Subwoofer BAND...

Page 5: ...ght automatically by the Clock Time service a page 18 1 Press MENU to display the menu dis play For using the remote control hold down MENU for 2 sec or more 2 Press or to display the DIS PLAY menu 3 Press to select CLOCK ADJ 4 Press BAND SET to confirm the dis play 5 Adjust the setting value Adjusting minutes Adjusting hours Forward Backward 6 Press BAND SET 7 Press MENU to confirm the adjust men...

Page 6: ...y result in poor electrical contacts If dirt or other foreign substances get on the con tacts wipe them off with clean and dry cloth To avoid damaging the front panel do not push it down or place objects on it while it is open Open Eject Press OPEN When a disc is already loaded the disc will automatically be ejected Close Press OPEN Tilt The display angle changes among 4 levels as follows every ti...

Page 7: ...wer frequency q Up w Down 3 Hold down or for 2 sec or more to confirm your adjustment Note You can select a SQ preset to be targeted with and and 2 6 on the remote con trol 4 Hold down or for 2 sec or more to confirm your adjustment The existing adjustment is overwritten with new adjustment Notes FLAT is not changeable If no operation takes place for more than 10 sec onds the display returns to th...

Page 8: ...BAND At power on CQ C8300N BAND Darker CQ C8300N BAND Change of Display Color Presetting 1 Hold down COLOR for 2 sec or more The adjusting screen adjusted last time appears 2 Adjust the setting value 3 Hold down COLOR for 2 sec or more to confirm the adjustment Note If no operation takes place for more than 5 sec 10 sec at CUSTOM the display returns to the regular mode STORM You can select a color...

Page 9: ...g down the numeric button 1 6 2 sec or more To stop presetting stations press DISP Display 1 Press SOURCE to select the radio mode 2 Press BAND to select a band Notes For tuning in on only stations whose receiving conditions are good in the station search set LOCAL to ON a page 17 For reducing noise when a receiving FM stereo wave is weak set FM MONO to ON a page 17 3 Select a station Frequency ad...

Page 10: ...l return to the previous mode TA Standby Mode PTY Program Type The following functions are available when the PTY mode is active a page 21 The PTY of receiving station appears Programs can be searched for by PTY Note PTY language can be selected a page 21 Other functions of RDS CT Clock Time The clock is automatically adjusted PS Program Service Name As well as the frequency the name of the broadc...

Page 11: ...uage selection Note PTY language is selectable only when PTY appears 1 Press MENU to display the menu dis play For using the remote control hold down MENU for 2 sec or more 2 Press BAND SET to adjust English a German a Spanish a Swedish a Italian a French a Dutch a Back to ENGLISH 3 Press MENU to confirm the adjust ment For using the remote control hold down MENU for 2 sec or more 1 Press MENU to ...

Page 12: ... BAND Track number Time Lights when the disc is loaded Play Mode indicators Lights when each mode is activated CD Text Display Only for CQ C8300N The CD text is toggled on and off every time DISP Display is held down for 2 sec or more Notes For scrolling text hold down BAND for 2 sec or more NO TEXT is displayed when there is no information on the disc Random and Repeat play can be set 1 Press MEN...

Page 13: ...mation on the disc ID3 WMA tag information is displayed for the album name and title artist name File number File type indicator Folder Random Folder Repeat Folder Scan FLDR Folder name File name Album name Title name Artist name Off Random and Repeat play can be set 1 Press MENU to display the menu dis play For using the remote control hold down MENU for 2 sec or more 2 Press or to select a mode ...

Page 14: ... recommended to minimize the chances of making a disc that contains both CD DA files and MP3 WMA files If CD DA files are on the same disc as MP3 or WMA files the songs may not play in the intended order or some songs may not play at all When storing MP3 data and WMA data on the same disc use different folders for each data Do not record files other than MP3 WMA files and unnecessary folder on a d...

Page 15: ...r scrolling text hold down BAND for 2 sec or more NO TEXT is displayed when there is no information on the disc Track number Changer indicator Disc Random Disc Repeat Disc Scan CD changer CD changer 1 CD changer 2 Random and Repeat play can be set 1 Press MENU to display the menu dis play For using the remote control hold down MENU for 2 sec or more 2 Press or to select a mode to be adjusted 3 Pre...

Page 16: ...DIO Menu display 1 Press VOLUME SEL Select to display the menu display 2 Press VOLUME SEL Select to select a mode to be adjusted 3 Turn VOLUME Volume clock wise or counter clockwise to adjust Note If no operation takes place for more than 5 sec onds in the audio menu 2 sec in Main volume adjust ment and 10 sec in the SQ preset change operation the display returns to the regular mode 1 Press MENU t...

Page 17: ...data A and still image data 1 are not overwritten If BACK is selected the screen of step 5 appears 8 Confirm the changed item Select BAND SET Confirm Customization is performed Do not turn off the power in mid operation It takes approx 8 minutes to complete this operation for a 751 KB moving image After completion of this operation the screen of step 5 appears Note If No is selected the screen of ...

Page 18: ...d is poor a Make sure that the ground lead is connected to an unpainted part of the chas sis securely Noise is made in step with engine revolutions Alternator noise comes from the car a Change the wiring position of the ground lead a Mount a noise filter on the power supply Customize the display Customize function only for CQ C8300N Notes on Customize Function Note on Download Service The download...

Page 19: ...t station and AF stations Update of AF list ended in failure a Wait until AF list is successfully updated For unstable reception tune into a stable station by hand Radio continued RDS English Troubleshooting Common continued Some operations are not executable Some operations are not executable in particular modes such as menu mode a Read the operating instructions carefully and cancel the mode In ...

Page 20: ... on the disc a Remove the foreign material or use a flawless disc Sound skipping due to vibration The unit is not sufficiently secured a Secure the unit to the console box with the rear support strap etc The unit is tilted at over 30 in the front to end direction a Make the angle 30 or less Disc unejectable Something such as a peeled label obstructs the disc coming out a Hold down the OPEN button ...

Page 21: ...22 W x 4 DIN45 324 at 4 Ω Speaker Impedance 4 8 Ω Preout 5 V 60 Ω Subwoofer out 5 V 60 Ω External Input Impedance 10 kΩ AUX IN External Input Sensitivity Max 2 V AUX IN Dimensions Main Unit 178 W x 50 H x 155 D mm Weight Main Unit 1 6 kg Notes on discs How to hold the disc Do not touch the underside of the disc Do not scratch on the disc Do not bend the disc When not in use keep disc in the case D...

Page 22: ... rechten und linken Federn in den Löchern einschnappen q Visser le boulon dans l appareil principal w Fixer l arrière de l appareil principal e Bouteroller les ressorts droit et gauche dans chaque trou q Schroef de bout in het hoofdtoestel w Zet de achterkant van het hoofdtoestel vast e Pas de rechter en linker veren in de bijbehorende gaten Main unit securing Befestigung des Hauptgerätes Fixation...

Page 23: ...a 3 wire type speaker system having a common earth lead Verwenden Sie niemals Lautsprechersysteme mit Dreierverkabelung die einen gemeinsamen Erdungsleiter aufweist Ne pas utiliser pas de système de haut parleur de type à 3 fils ayant un fil de mise à la masse commun Gebruik geen luidsprekersysteem met drie draden en een gedeelde aarddraad Not used Nicht verwendet N est pas utilisé Niet gebruikt A...

Reviews: