background image

3

ENGLISH

Note: 

The illustrations in this manual are for explanation purposes only and may differ from the 

actual unit. It is subjected to change without notice for future improvement.

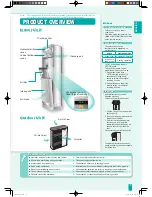
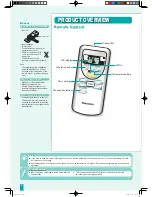
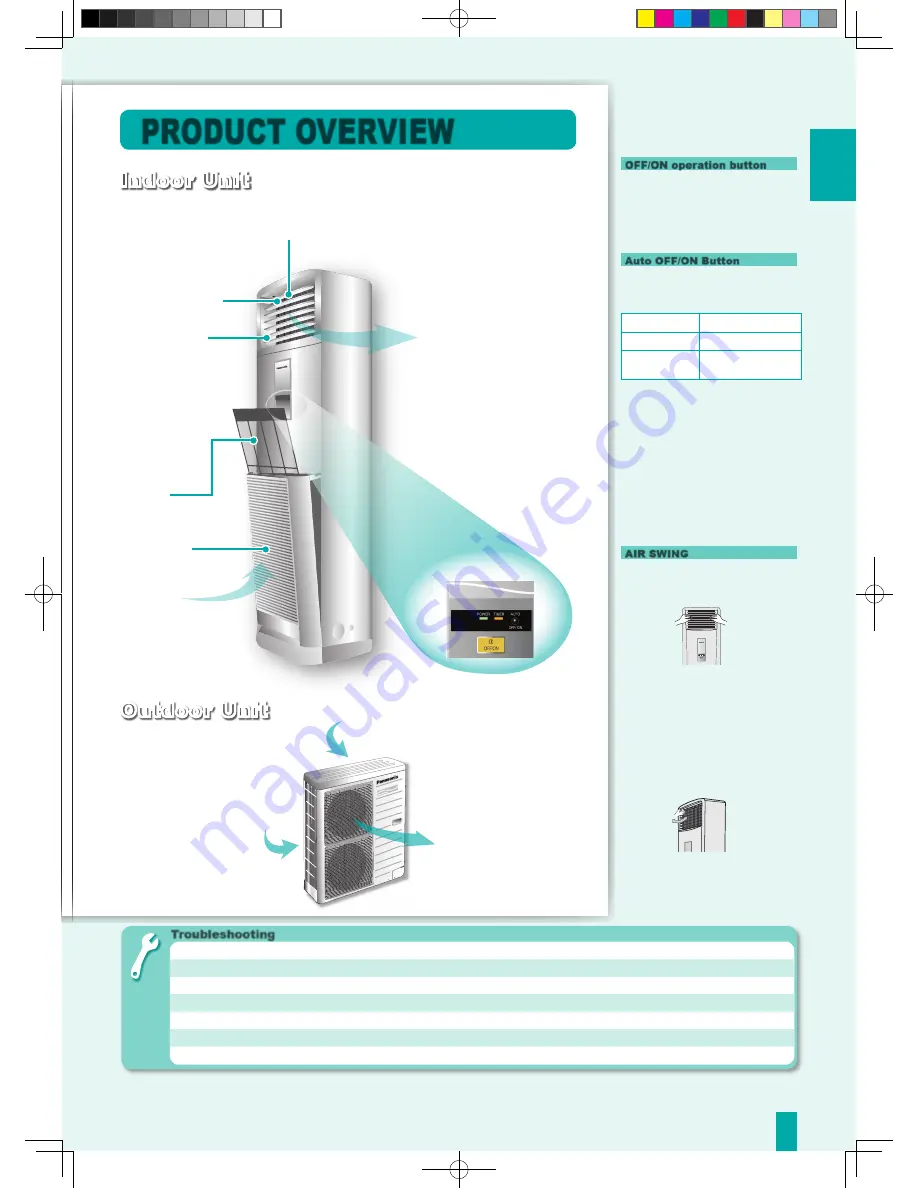
PRODUCT OVERVIEW

Indoor Unit

Outdoor Unit

Air inlet 

(rear)

Air outlet

Troubleshooting

l

  Operation delayed for few minutes after restart.

ä

  This is a normal self protection control.

l

  Sound like water flowing during operation.

ä

  Caused by refrigerant flow inside.

l

  Mist emerges from indoor unit.

ä

  Condensation effect due to cooling process.

l

  Noisy during operations.

ä

  Installation work could be slanted or intake grille didn’t close properly.

l

  Remote control/display does not work.

ä

  Check whether batteries are correctly inserted or need replacement.

l

  The unit cannot operate.

ä

  Check either circuit breaker is tripped, or timer is used correctly.

l

  Outdoor unit emits water/steam.

ä

  Condensation or evaporation happens at piping surface.

Air inlet 

(side)

Vertical airflow 

vanes

Discharge Vent

Discharge air

Horizontal airflow 

vanes

Control and Indicator 

Panel (Signal receiving)

Air intake

Air filter

About

•  To turn off or turn on the air 

conditioner.

•  Operation mode, temperature, fan 

speed and OFF/ON timer should be 

set by remote control.

OFF/ON operation button

Auto OFF/ON Button

•  To operate the unit if the  


remote control is misplaced or  

 malfunctioning.

Action

Operation mode

Press once.

Automatic Operation

Press until 

“beep” sound.

Cooling Operation

•  To OFF, press again the Auto 

OFF/ON button.

•  To switch the remote control 

signal receiving sound off or on.

1. Keep pressing the Auto 

OFF/ON button for about 10 

seconds until “beep-beep” 

sound to switch off the signal 

receiving sounds.

2. Repeat the above step if you 

want to switch on the signal 

receiving sounds.

•  Airflow direction only can be 

adjusted manually.

•  Vertical airflow direction control.

1. Pull the vane by the left and right 

portion gently.

2. Don’t use the uppermost and the 

lowest vane to adjust.

3. Don’t let the vanes downward 

continuously for a long time, 

otherwise condensation may be 

caused around the discharge 

vent.

•  Horizontal airflow direction control.

To adjust horizontal airflow vanes 

gently by holding the control handle 

on the top left. 

AIR SWING

Intake grille

F566276_EN.indd   3

2008-12-16   10:08:46

Summary of Contents for CS-C45FFH

Page 1: ...oner CS C45FFH CU C45FFH ENGLISH Before operating the unit read these operating instructions thoroughly and keep them for future reference CONTENTS Safety Precautions 2 Product Overview 3 How to Operate 5 Care Cleaning 7 Product Specification 8 ...

Page 2: ... Bulb Temperature Indoor Outdoor DBT WBT DBT WBT Maximum Temperature 32 23 43 26 Minimum Temperature 21 15 21 15 Remove the cover of the outdoor unit before operating Use specified supply cord If the supply cord is damaged or needed to be replaced it must be replaced by the manufacturer or its service agent or a similarly qualified person in order to avoid a hazard Remove the batteries of remote c...

Page 3: ...and Indicator Panel Signal receiving Air intake Air filter n About To turn off or turn on the air conditioner Operation mode temperature fan speed and OFF ON timer should be set by remote control OFF ON operation button Auto OFF ON Button To operate the unit if the remote control is misplaced or malfunctioning Action Operation mode Press once Automatic Operation Press until beep sound Cooling Oper...

Page 4: ...ay interfere with signal transmission Consult your dealer If the display is chaotic or can not be adjusted use a screwdriver to short the two terminals to reset the remote control to the original set by manufacturer Remote Control Preparation n About Remote Control Signal Insert batteries AAA or R03 The batteries can be used for approximately 1 year Remove the batteries if the unit is not to be us...

Page 5: ... to prevent sunlight and heat from coming in Hint The unit will automatically select the operation mode according to the room temperature Once the operation mode is selected the unit will operate at the standard setting temperature as shown Room temperature Operation mode Standard setting temperature 23 C above Cool 25 C Below 23 C Dry 22 C The operation mode judging temperature and standard setti...

Page 6: ...ly by using either ON or OFF timer Hints Troubleshooting l POWER indicator is blinking 30 minutes before ON timer is activated ä The unit is determining the operation mode by sensing the room temperature This happens when it has been set to AUTO operation mode l The timer indicator of the indoor unit will light up during the timer operation l To cancel either the ON or OFF timers press If you pres...

Page 7: ... use benzene thinner or scouring powder Use soaps or neutral household detergent pH7 only Do not use water with temperature higher than 40 C n Pre season Inspection n Preparation for extended Non operation INDOOR UNIT Wipe gently l Clean the filter regularly as dirty filters will cause unpurified air low cooling capacity unpleasant smells and higher energy consumption l The unit will become dirty ...

Page 8: ...nditions 1m Distance Max cooling 57 Air Circulation m3 min 27 0 Product Weight kg 52 88 Dimensions H W D mm 1880 600 350 1175 900 320 Ambient Temperature C 18 43 Test conditions 1 Cooling Indoor Dry Bulb Temp C 27 Outdoor Dry Bulb Temp C 35 Wet Bulb Temp C 19 Wet Bulb Temp C 24 2 Standard piping length 7 5 m Includes Indoor Unit piping length 3 Air filter is attached Model PRODUCT SPECIFICATION F5...

Page 9: ...g operation Circuit breaker switches off frequently Water foreign particles have entered the Remote Control Power cord becomes unnaturally warm Water leak from Indoor unit Switches or buttons are not functioning properly NON SERVICEABLE CRITERIAS F0812 3 F566276 F566276_EN_back indd 22 2008 12 16 10 07 56 ...

Reviews: